

Grandma's Homemade Cinnamon Bread & Chelsea Recipe
Every year on Christmas Eve my mom would spend the day baking the most delicious cinnamon bread, buns, and chelsea to enjoy on Christmas day. It was always such a wonderful treat and a tradition I looked forward to every year, and I am so happy I get to continue it with my kiddos.
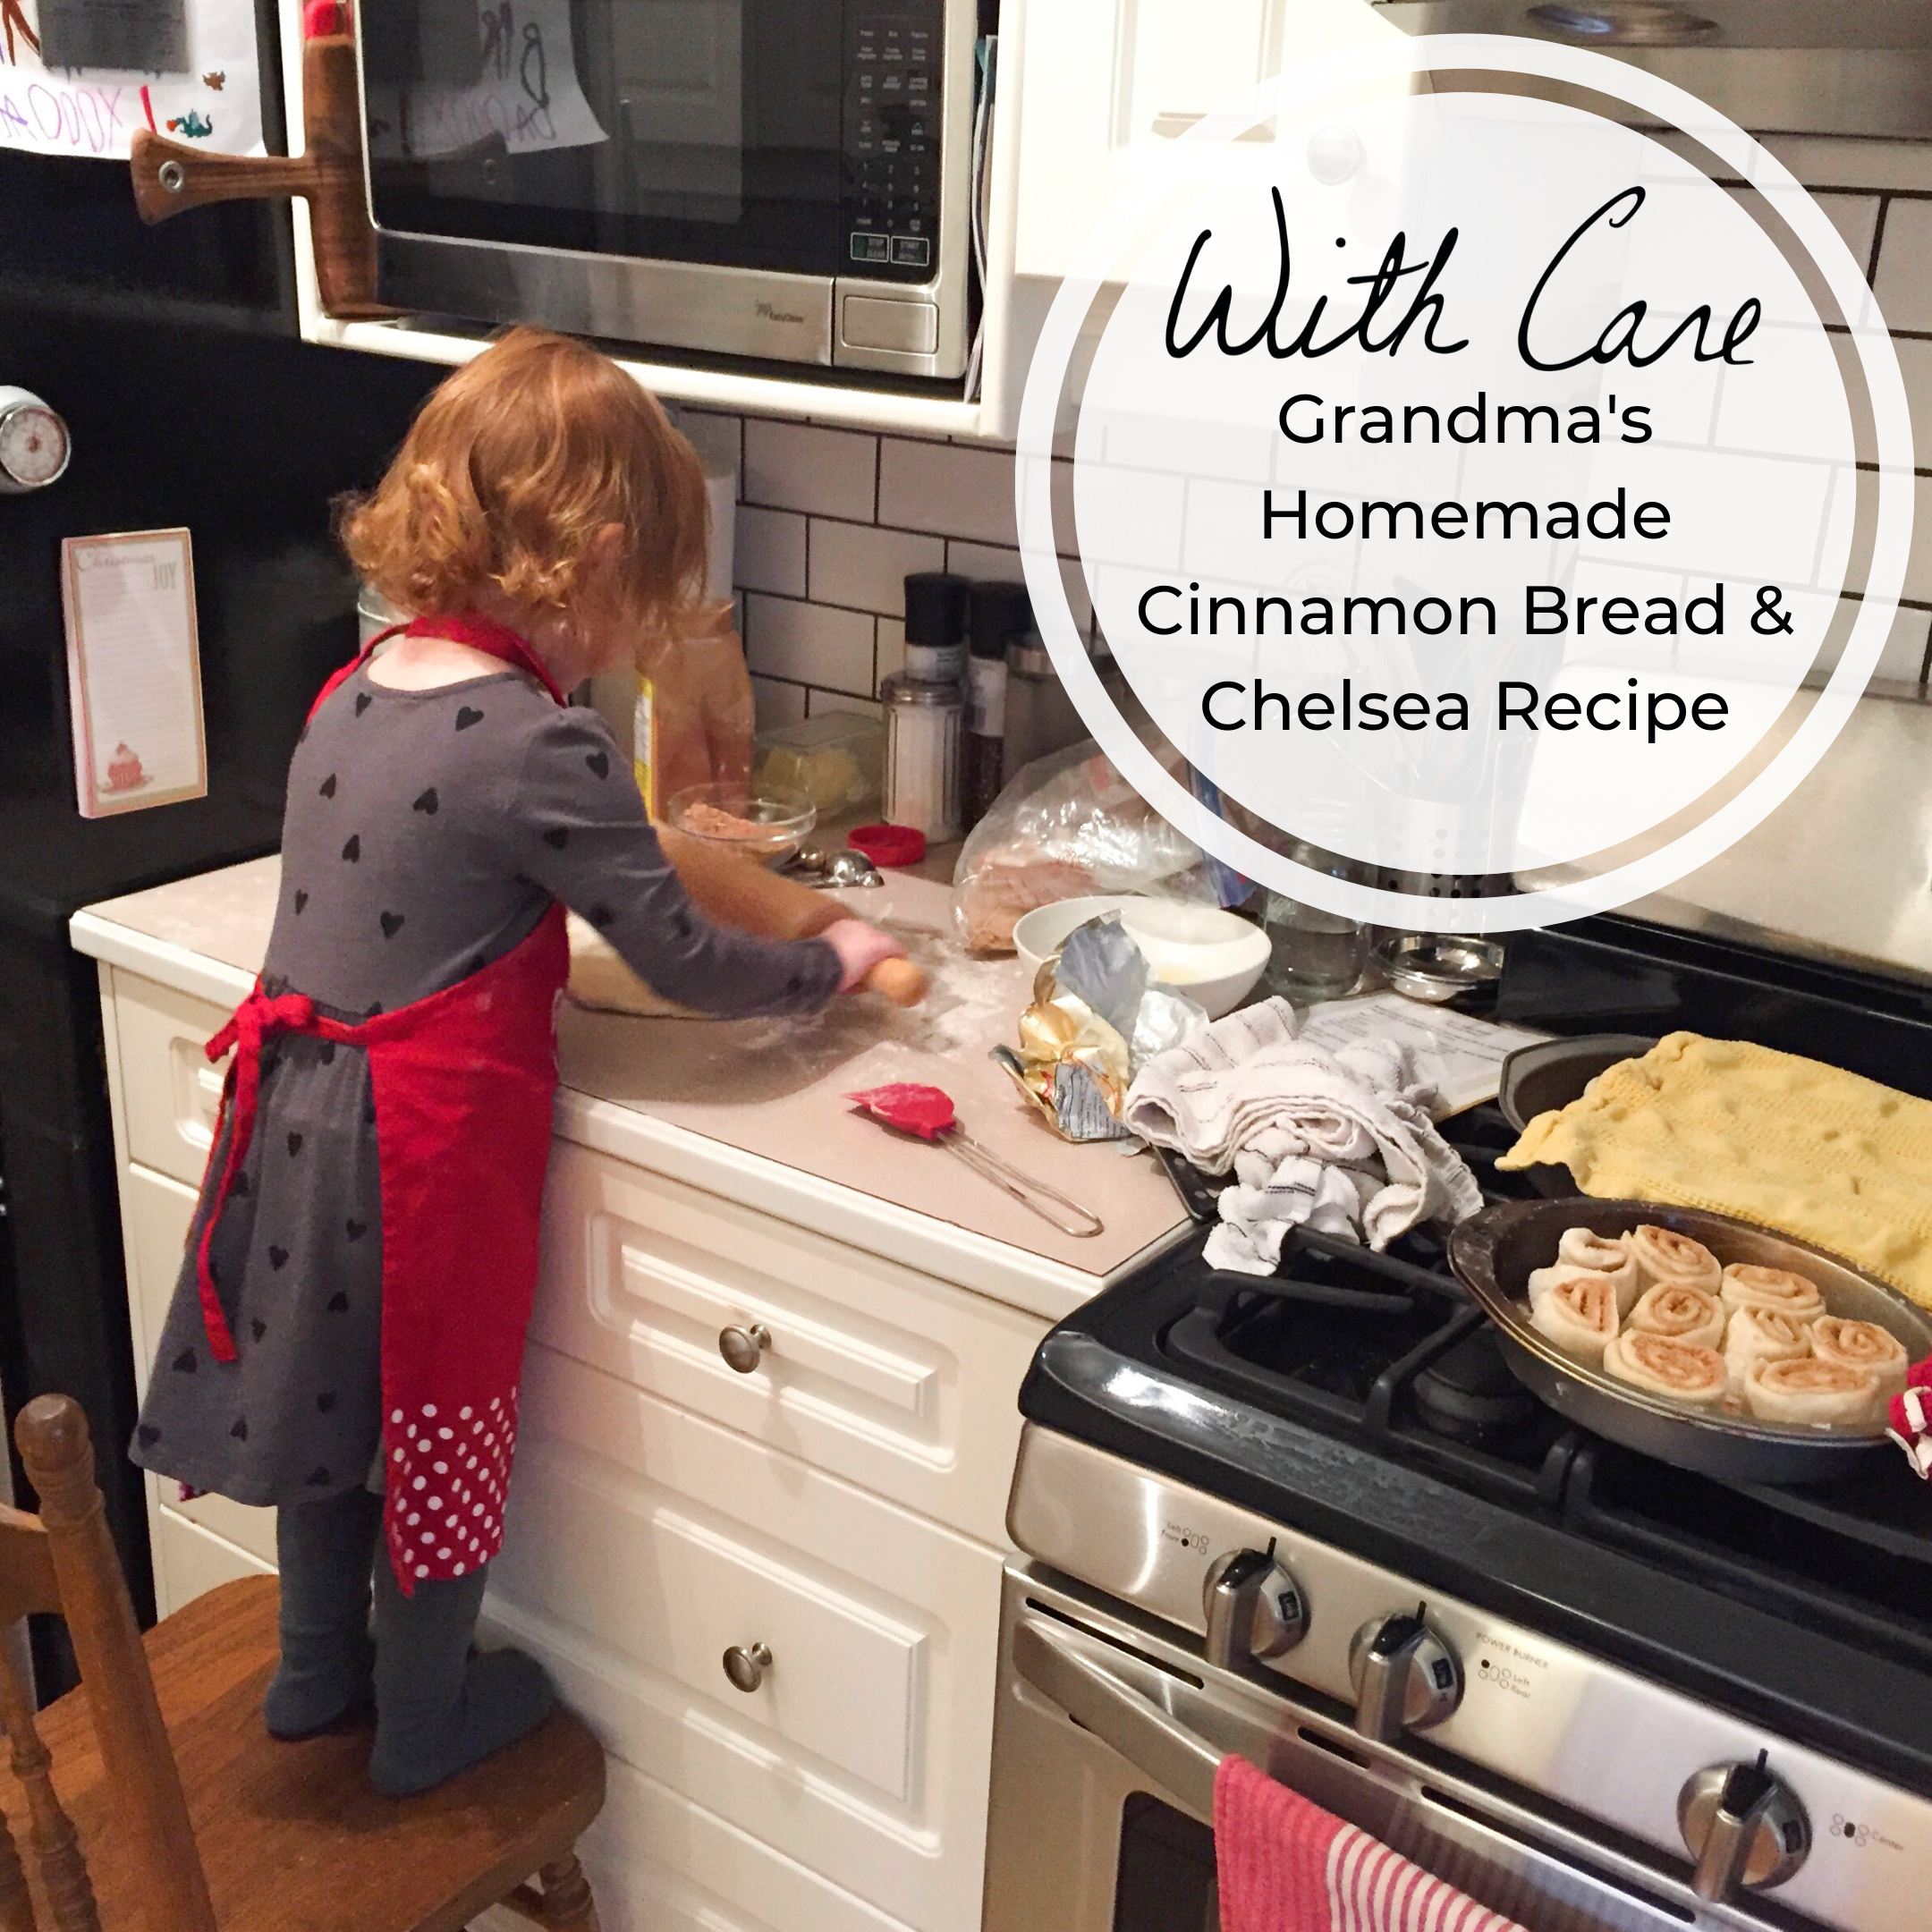
Every year on Christmas Eve my mom would spend the day baking the most delicious cinnamon bread, buns, and Chelsea to enjoy on Christmas day. A recipe passed down from her mother. It was always such a wonderful treat, and a tradition I’m so happy I get to continue it with my kiddos.
The recipe is a basic sweet dough and can be made into regular buns, cinnamon bread, or chelsea buns (aka cinnamon buns). It isn’t difficult to make, but the steps take 5 hours in total because of multiple risings. You won’t be working that whole time, but it’s usually best to start early in the day and work your schedule around the different steps. You might be thinking, what the heck? Just buy some freaking bread and call it a day! … and to you I say “Go for it!” If this isn’t your thing and you want something a little quicker check out my 6 Simple Last Minute DIY Holiday Gifts. There is some serious deliciousness in there, and all it takes is melting and blending. If you’re looking for something with a little more time commitment give this family recipe a try and let me know what you think.


For all the parents out there wondering how I bake with 4 kiddos, let me start by saying that I choose very specific baking tasks for each kid to assist with (at their particular level eg. Penny at 3.5 years old spreads sugar, but Ben at 8 year old helps measure stuff and make the dough) and Daddy is there to keep the other's occupied. Also, it’s not all cupcakes and sprinkles, but it’s pretty amazing to watch their excitement when they eat something they helped make.
I hope you enjoy whatever sweet traditions you do with your loved ones this holiday season.
- Care
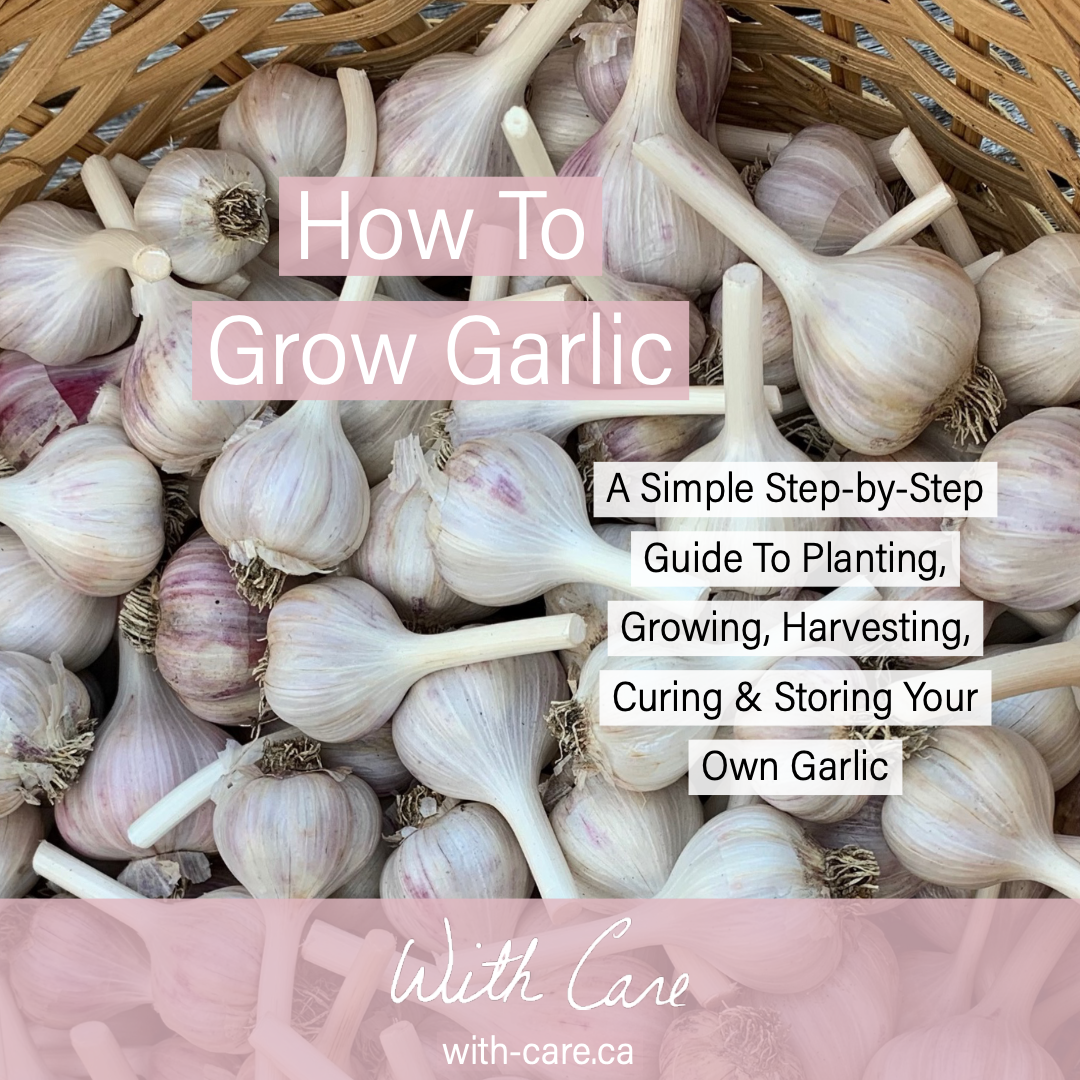
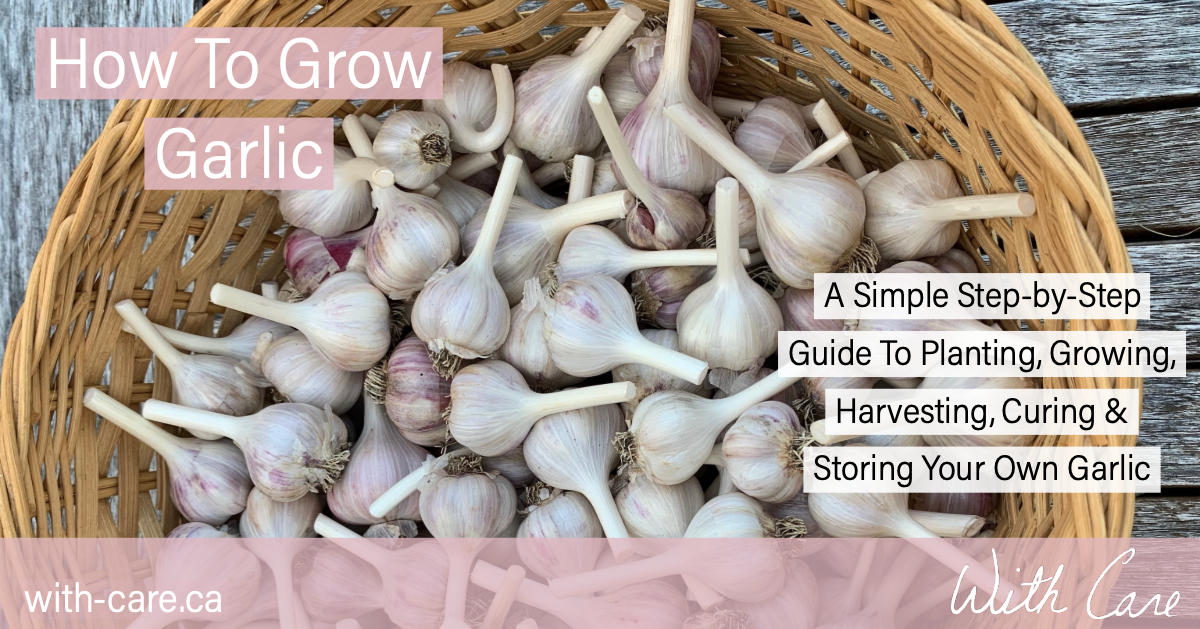
How To Grow Garlic - A Simple Step-By-Step Guide To Planting, Growing, Harvesting, Curing & Storing Your Own Garlic
I’ve had so many requests for information about growing garlic, so I put together this little guide. It’s just 9 simple steps and when you’re done you’ll have the most delicious homegrown garlic.
If you don’t have a garden, check it out and then share with a friend who does. You might just be lucky enough to receive some of their homegrown garlic harvest. It’s that good!
Hope you enjoyed my guide to growing garlic. Now that you’re excited to plant, check out my DIY raised garden beds and my garlic scape and basil pesto recipe.
As always, let me know if you have any questions.
- Care

Watch My New Video to Learn More About With Care
It's hard to believe that this summer marks 5 years of running my business. Throughout the last 5 years I have been honoured to educate and support over a thousand local families. In addition to teaching classes and workshops, my goal for the next phase of my business is to bring my educational and inspirational content online to a wider audience. I made this video with Anchor Studio to give everyone an idea of what they can expect from my YouTube Channel and Blog. I would love if you would watch and subscribe to my channel.
It's hard to believe that this summer marks 5 years of running my business. Throughout the last 5 years I have been honoured to educate and support over a thousand local families. In addition to teaching classes and workshops, my goal for the next phase of my business is to bring my educational and inspirational content online to a wider audience. I made this video with Anchor Studio to give everyone an idea of what they can expect from my YouTube Channel and Blog. I would love if you would watch and subscribe to my channel.

Please feel free to send along any topics you would like covered. I have some amazing collaborations coming up this summer and fall, so stay tuned for lots of new content and some incredible giveaways! I appreciate all of the incredible support from the families I have worked with and can't wait to see where this new journey takes me.
- Care xo
P.S. If you're on Instagram I would love it if you could give me a follow.

Family Friendly Homemade Meatballs - Perfect Iron Rich Recipe for Starting Solids
Meatballs are a great option for a healthy family dinner and a perfect way to start incorporating iron rich meats into your baby's diet. They can be paired with a whole grain pasta, tomato sauce and veggies, or some roasted or steamed veggies for a quick dinner. I usually make a double batch with fresh ground beef, and freeze a bunch for future evenings when we need a fast healthy meal.
Meatballs are a great option for a healthy family dinner and a perfect way to start incorporating iron rich meats into your baby's diet. They can be paired with a whole grain pasta, tomato sauce and veggies, or some roasted or steamed veggies for a quick dinner. I usually make a double batch with fresh ground beef, and freeze a bunch for future evenings when we need a fast healthy meal.
Meatballs are great because they can be made out of a variety of types of ground meats, plus you can add finely chopped herbs and greens without most kids being bothered by them. The one thing my kids always complained about was the diced onion, so I recently started grating the onion and it has worked wonders. They never know it's in there, but the meatballs still get the onion flavour and moisture. #momwin

Family Friendly Meatball Recipe
Prep Time: 10 mins Cooktime: 17-20 mins Makes about 20 meatballs
INGREDIENTS:
1 lb lean ground beef (or alternative ground meat)
1 whole egg (or flax egg)
1/2 cup whole grain bread crumbs soaked in 3 tbs milk (I make them with the end of a loaf of bread in the vitamix)
1-2 garlic cloves mashed (depending on preference)
1/4 cup onion grated (small onion or ~1/3 large red onion)
2 Tbsp finely chopped fresh oregano
2 Tbsp finely chopped fresh parsley
2 Tbsp finely chopped fresh basil
handful of spinach finely chopped *optional
salt & pepper to taste
2 drops of tabasco sauce *optional
INSTRUCTIONS:
Preheat Oven to 400°F
Place all ingredients in a large mixing bowl and mix by hand until combined. Do not overwork meat.
Scoop out 1 generous Tbsp at a time and roll into meatballs (you can always change the shape or size of these meatballs to suit your needs, just remember to adjust the baking time accordingly)
*If your ground beef is fresh you can freeze raw meatballs for future use
Bake meatballs on a rack over a baking pan for 17-20 mins. Turn once while baking.
Remove from oven and serve immediately, or allow to cool and refrigerate or freeze
I absolutely love paring these iron rich meatballs with homemade vitamin C rich tomato sauce. I'll be sure to share my favourite sauce recipe soon.
Don't hesitate to ask any questions below. Hope your family enjoys these as much as ours does.
Care

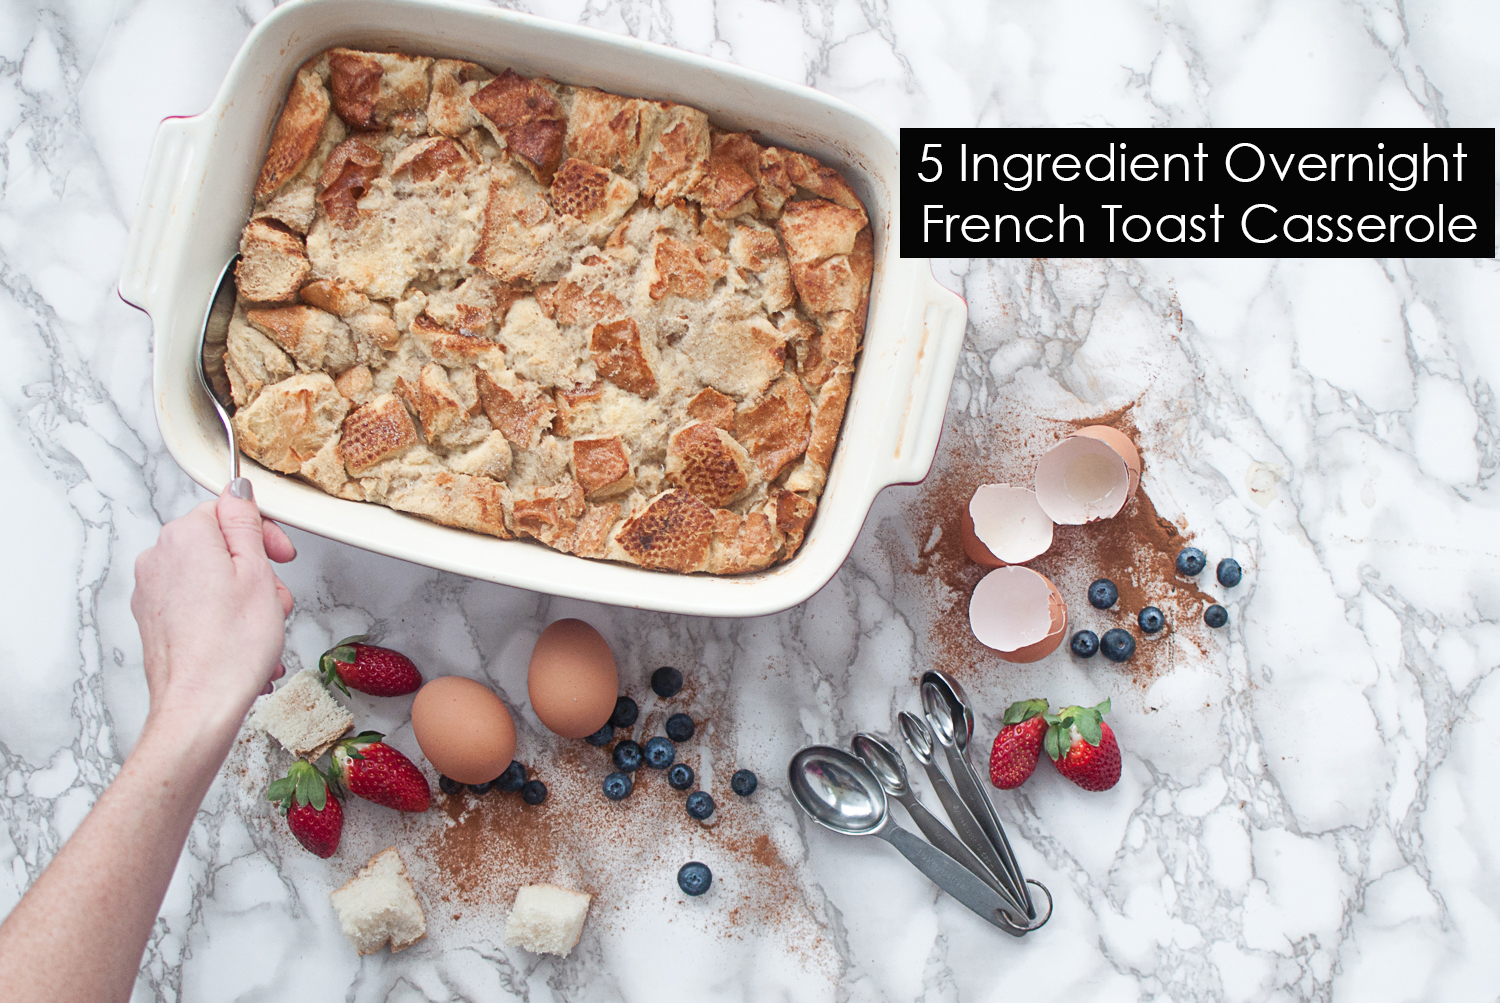
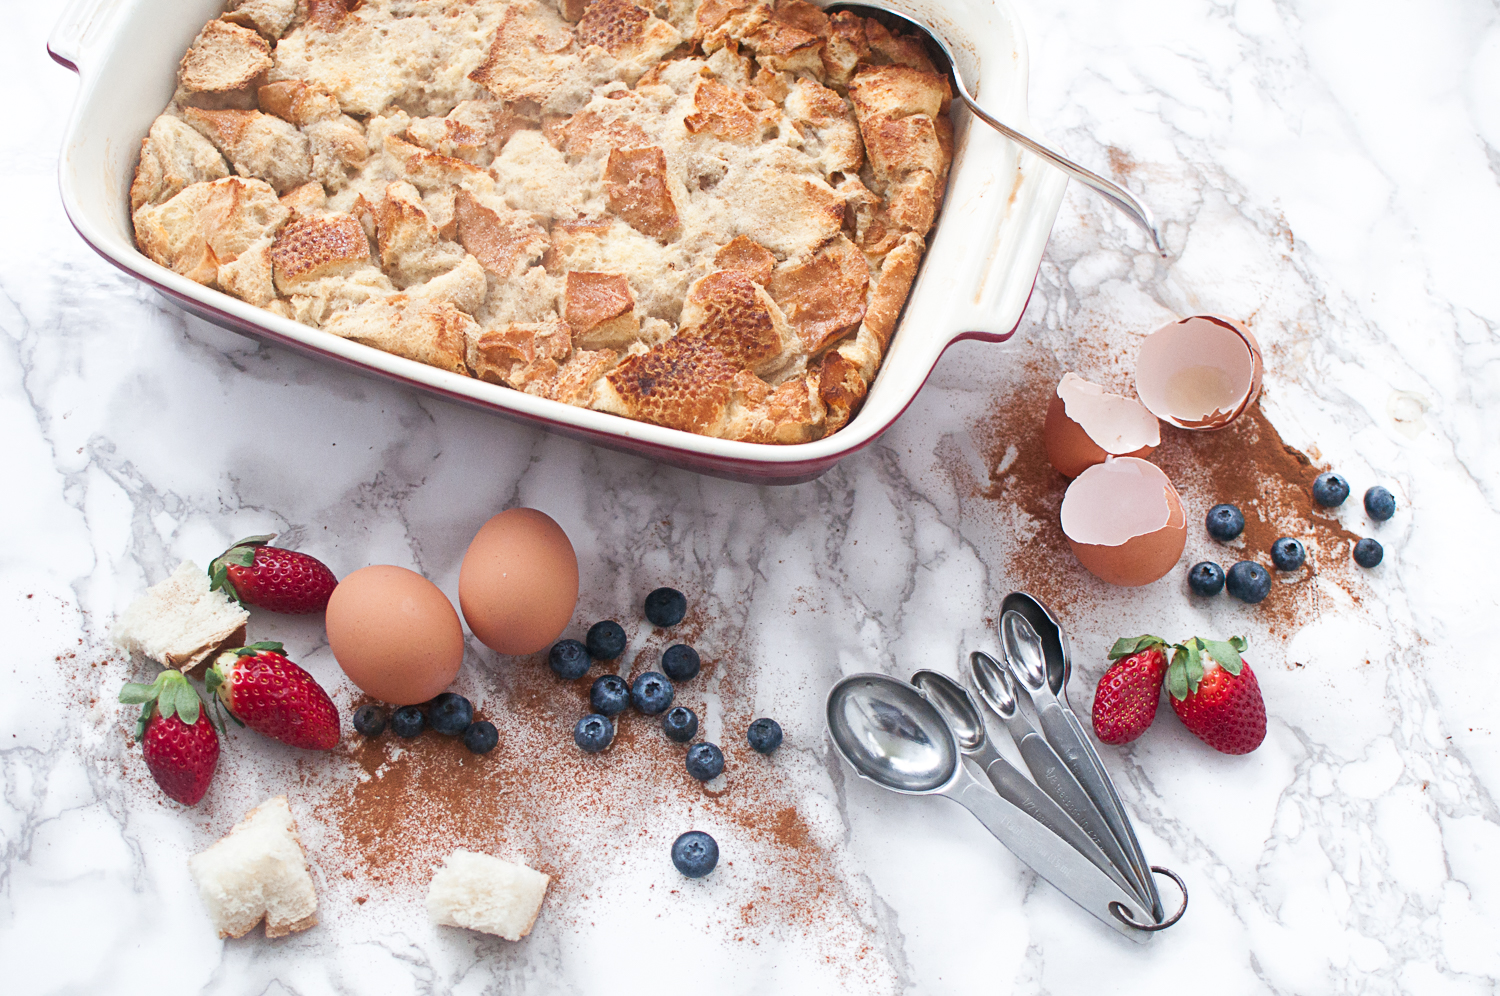
5 Ingredient Overnight French Toast Casserole
I always love pre-made options for feeding my family, so over the holidays I set out to search for an overnight french toast casserole recipe. I was so excited to try out something new, but was shocked when I saw just how much sugar was included in most recipes. No judgement here, I love sugary homemade treats, but I don't want to make every breakfast a dessert. Plus, french toast is a breakfast that already typically gets doused in syrup by my kids, so I wanted it to be a tad healthier.
I always love pre-made options for feeding my family, so over the holidays I set out to search for an overnight french toast casserole recipe. I was so excited to try out something new, but was shocked when I saw just how much sugar was included in most recipes. No judgement here, I love sugary homemade treats, but I don't want to make every breakfast a dessert. Plus, french toast is a breakfast that already typically gets doused in syrup by my kids, so I wanted it to be a tad healthier.
When I couldn't find what I wanted I decided to adapt my french toast recipe to suit an overnight bake. It was so simple, and turned out better than I could have expected. The kids gobbled it up and begged for seconds. Plus, mom and dad loved it too.
The best part is that it only takes 5 ingredients and a few minutes to make up the night before. Then you get to enjoy your morning with your family while the delicious smell of fresh baked french toast casserole wafts through your home. For a tired mama, it doesn't get much better.
Ingredients:
1 loaf of crusty bread cut into cubes (I used an Italian loaf this time, but plan on trying a whole grain variety next time.)
8 large eggs whisked
3 cups whole milk (or combo of milk and cream)
1/2 tsp cinnamon
1/2 tsp vanilla extract
Instructions:
Grease large casserole dish with butter (approximately 9x13)
Cut up crusty loaf into chunks and place in casserole dish *If bread is not stale leave it out in the dish for a while to dry out. It absorbs the custard better when dry.
In a large bowl whisk eggs, milk, cinnamon & vanilla
Pour custard mixture over bread
Use a silicone flipper to gently rotate bread in pan so it all gets covered in custard
Cover with Abeego or plastic wrap and refrigerate for a few hours or overnight
When ready to bake preheat oven to 350 degrees and remove plastic wrap
Use silicone flipper to rotate bread again and pat down into pan with flipper
Place in oven and bake for 45 minutes rotating the pan half way through
*optional* When timer is up, sprinkle top with 1 tsp granulated sugar and broil on low for 5 minutes.
Remove from oven and let cool for a few minutes before serving.
For a special treat on New Years Day I served the casserole with fresh whipped cream, some delicious maple syrup and tons of berries and bananas. Plus a hearty helping of local bacon ;) For regular everyday eating try serving it with greek/coconut yogurt and fresh fruit. Plus you can sprinkle the top with some hemp hearts for a little extra boost.
You can also add fresh or frozen fruit to your french toast casserole before baking. Blueberries and diced apples are both delicious additions to this simple recipe.
Hope you and your family enjoy this as much as mine did. Please let me know if you make it. I would love to hear how it goes.
Care xo

6 Simple Last Minute DIY Holiday Gifts
As a long time avid DIY'er I absolutely love making our friends and family some homemade goodies for the holidays. This year I thought I would share a few of my simple DIY recipes with my readers in case you're in need of some last minute gifts or stocking stuffers. These all make great gifts for party hosts, teachers, neighbours, family and friends, and most can be made in a few minutes.

As a long time avid DIY'er I absolutely love making our friends and family some homemade goodies for the holidays. This year I thought I would share a few of my simple DIY recipes with my readers in case you're in need of some last minute gifts or stocking stuffers. These all make great gifts for party hosts, teachers, neighbours, family and friends, and most can be made in a few minutes.
Irish Cream

I started making this delicious Smitten Kitchen Irish Cream Recipe last year and it has quickly become a favourite everywhere we take it. This Irish cream is so much creamier than the stuff you grab off the shelf at the store, plus it's only got 5 ingredients and lasts weeks in the fridge...we have never managed to test the longevity, but I believe the recipe ;)
Simply mix the 5 ingredients in your blender, grab some cute glass bottles from Ikea or your local dollar store and fill them up. My family especially enjoyed the mini stocking stuffer bottles I did last year. Perfect for your Christmas morning coffee.
Peppermint Patties

I used to make tons of complicated Christmas cookies, but now that I have 3 kids I have limited time for making dough, rolling it out, cutting, icing etc, so I've moved on to some simpler recipes. Mainly ones that involves melting chocolate in the microwave like this Homemade Peppermint Pattie Recipe. So easy to make and always a big hit parties. You really can't go wrong with mint and chocolate at the holidays.
Hot Chocolate Mix
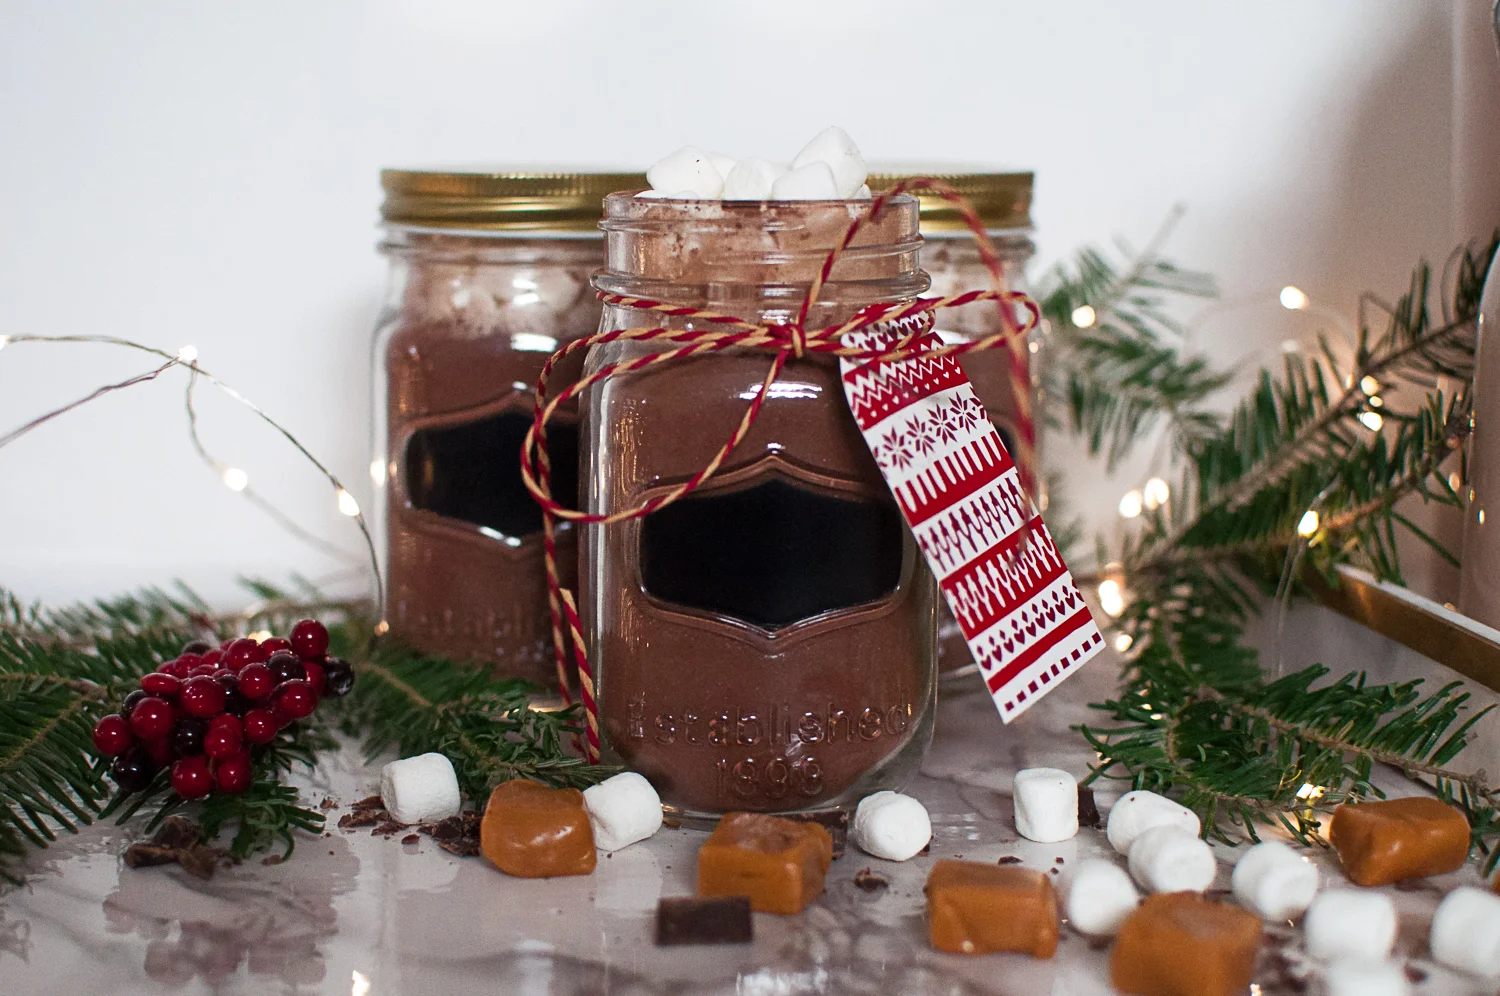
Kids freaking love hot chocolate, so what's better than a jar of homemade hot chocolate mix with mini marshmallows? I know my kids would love this gift, so that's why I made a bunch for our friends and neighbours with little ones. I hope they enjoy it over the winter holiday. Once again this is a Smitten Kitchen recipe and only has a few simple ingredients. You toss them in the food processor, mix them up and divy it into jars. Couldn't be easier.
Bum Balm
This DIY Bum Balm is an absolute favourite in our house. Best of all, it's not just for bums! This stuff is amazing at this time of year when dry and cracked skin flares up. Friend's and family now ask me for jars of it for their winter skin. So I thought it was appropriate to share it again here as a great holiday gift.

Honey Coconut Face Scrub
This luxurious and simple Honey Coconut Face Scrub Recipe has been a long time favourite of mine. This week I whipped up a giant batch in mere minutes to gift to some of the lovely ladies in my life. *Please Note: I recommend using a plastic lid on anything that will be kept in the bathroom. Metal ones tend to rust which isn't so nice on your face scrub. I will switch these up before gifting them.
Homemade Turtles

I'm a chocolate and caramel addict so it's no surprise that I wanted to replicate these babies at home. I've tried making them with my own caramel several times, but always come back to this Homemade Turtle Recipe with the little square caramels. Mmmm...sometimes the lazy microwave version is totally the answer ;) Personally I like chocolate all the way around my turtles so I don't just cover the top. I pick up the pecan caramel cluster (solid from a few minutes in the freezer) and put it on a fork. I toss it in the chocolate gently upside down and flip it over, then I strain off the excess chocolate on the fork before resting it on parchment paper to cool.
This week I will be making up some more batches of these goodies and dropping them off with friends and family. Let me know if you make any of these Holiday DIYS for your loved ones. I would love to hear how they go over.
Happy Holidays!
Care xo


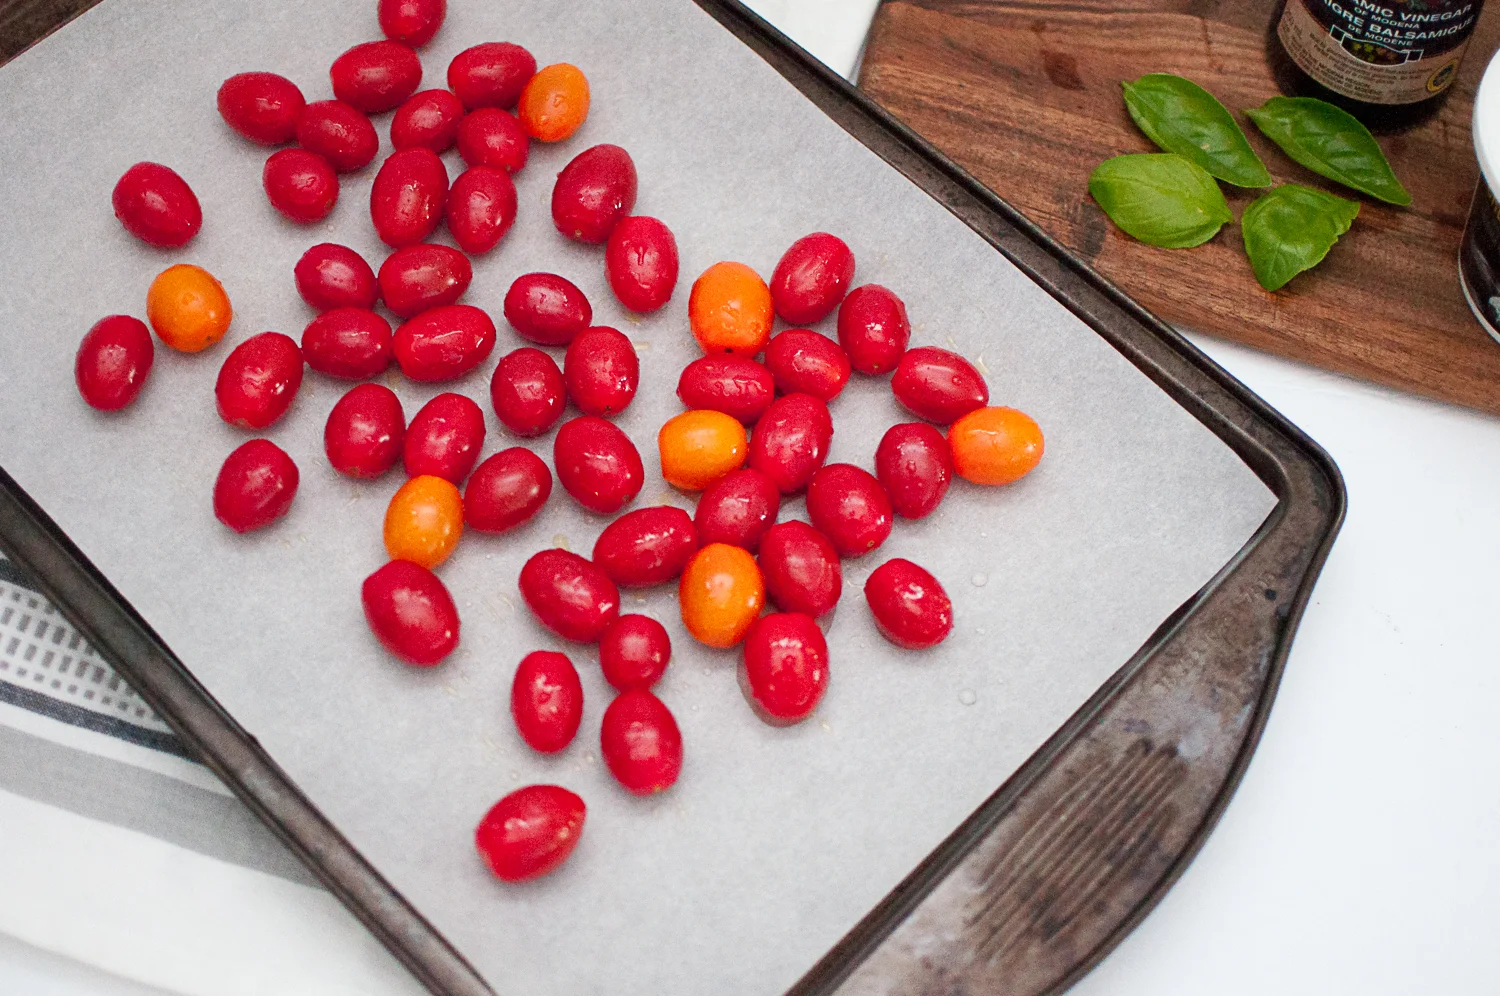
Oven Roasted Tomatoes with Burrata - Simple Summer Recipe
Summer is here and local tomatoes are hitting the farmers markets, so I wanted to share one of my favourite seasonal recipes. I was forced to recreate this recipe at home, because the local restaurant I usually get it at sadly closed this spring. I'm so happy with how it turned out. I always think it's a good sign when you need to make a new recipe twice in one weekend. That's exactly what I did with this one.
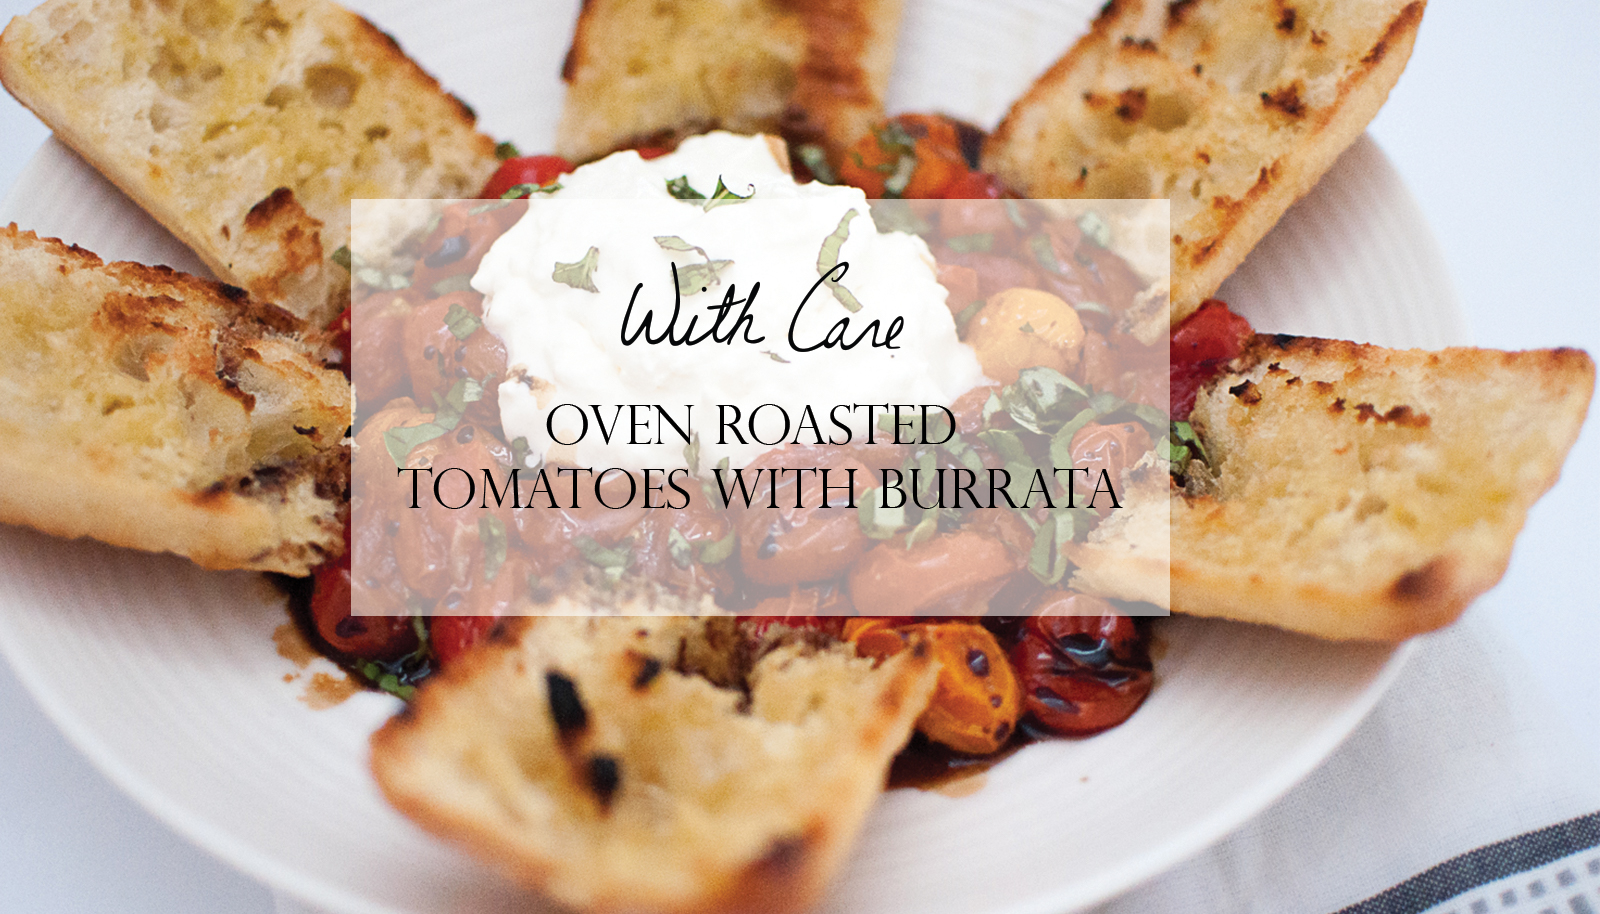
Summer is here and local tomatoes are hitting the farmers markets, so I wanted to share one of my favourite seasonal recipes. I was forced to recreate this recipe at home, because the local restaurant I usually get it at sadly closed this spring. I'm so happy with how it turned out. I always think it's a good sign when you need to make a new recipe twice in one weekend. That's exactly what I did with this one.
If you're anything like me you won't be able to get enough of these soft, warm roasted tomatoes drizzled with olive oil, balsamic, sea salt, fresh chopped basil and a generous helping of burrata. Add in some grilled bread and you really can't go wrong.
This recipe includes only 7 ingredients, 6 of which we typically have on hand ...not the buratta ;) It takes about 20 mins to make from start to finish, and tastes like pure summer, so that makes it pretty perfect in my books.
INGREDIENTS: 1 quart of grape or cherry tomatoes, a few basil leaves, olive oil, sea salt, balsamic vinegar, 1 pkg of burrata cheese, baguette.
DIRECTIONS:
1. Wash tomatoes & basil
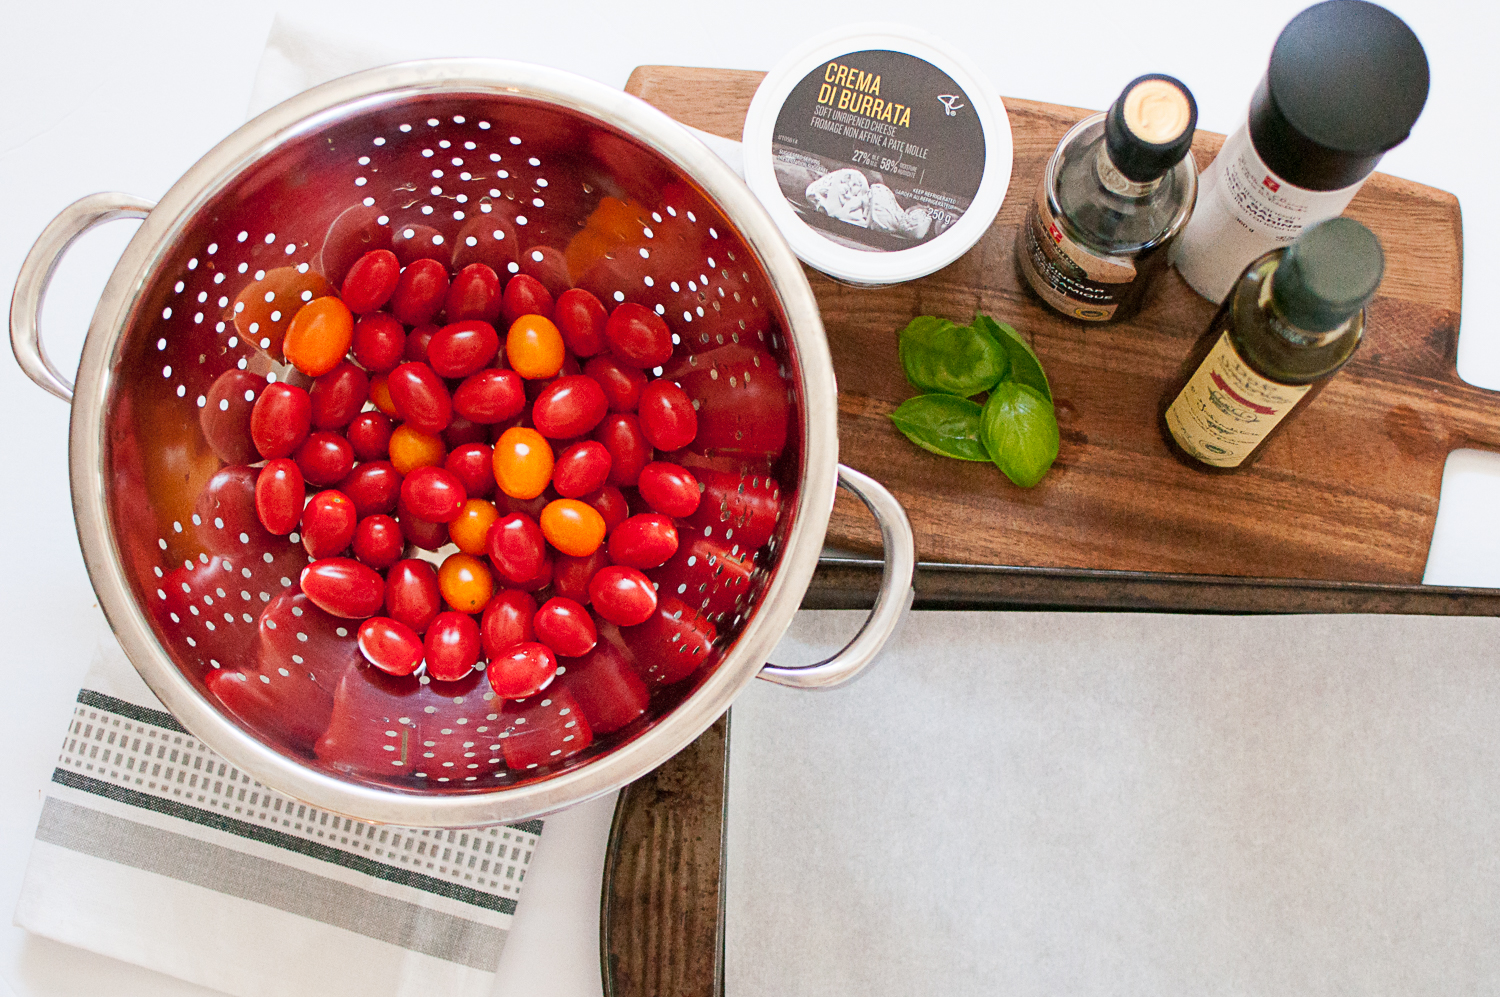
2. Toss tomatoes with olive oil and sea salt and place on parchment lined baking sheet. Bake at 400 for 15-20 minutes
3. Brush baguette with olive oil and grill in a grill pan over medium high heat while tomatoes roast.
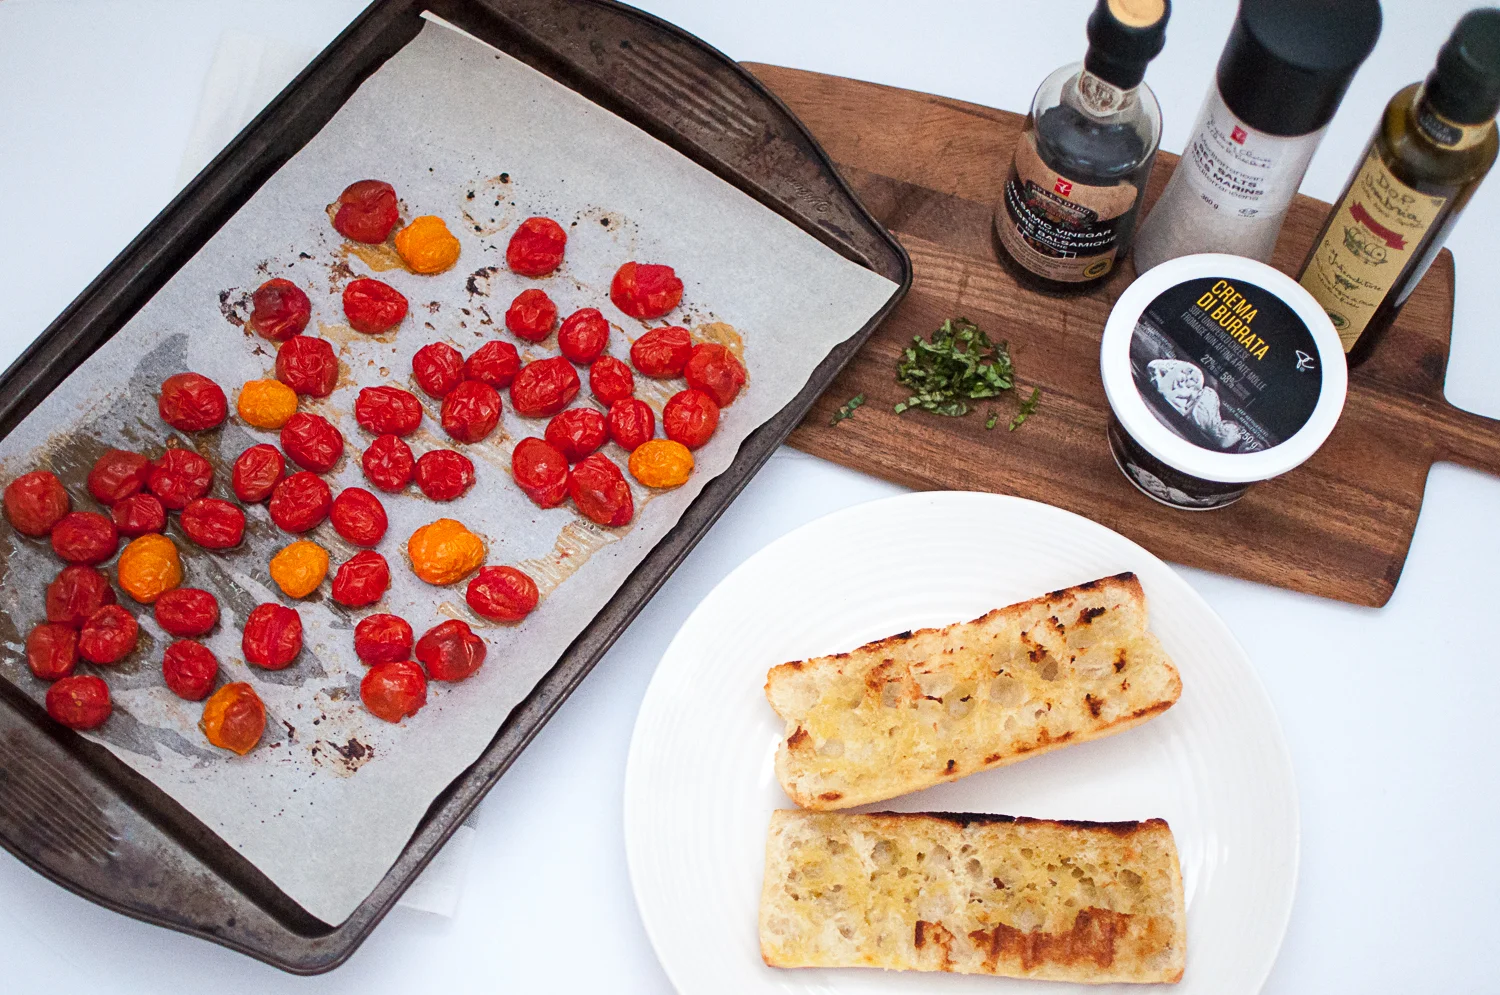
4. Once tomatoes are done, remove from oven, let cool for a few minutes, and then transfer to plate.
5. Add generous helping of buratta, and drizzle with balsamic, olive oil, sea salt and fresh chopped basil. Serve with grilled bread.

This recipe is going to be in heavy rotation around here this summer. I can't wait until we can make it with our own homegrown tomatoes.
Care

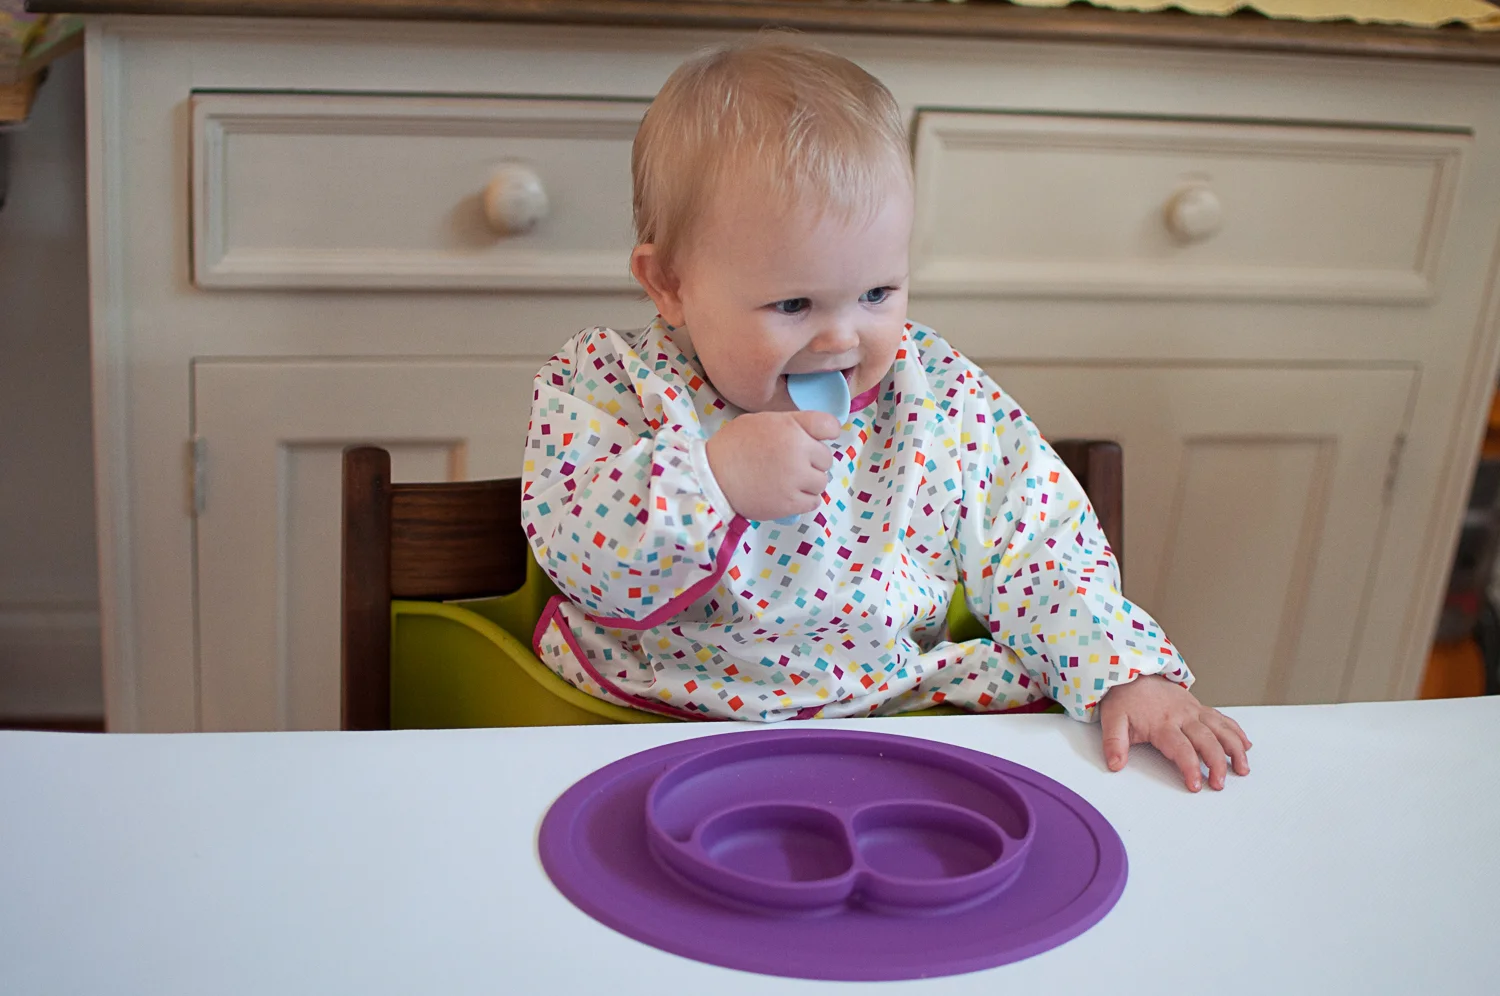
Starting Solids Favourite Products GIVEAWAY!
Every month when I teach Starting Solids I get asked about my favourite products for feeding baby. So I thought it would be fun to host a little GIVEAWAY for a few of my favourite feeding products. These are products that I use every day in my home with Penny, and some that have been favourites since I started solids with Ben over 5 years ago!
Every month when I teach Starting Solids I get asked about my favourite products for feeding baby. So I thought it would be fun to host a little GIVEAWAY for a few of my favourite feeding products. These are products that I use every day in my home with Penny, and some that have been favourites since I started solids with Ben over 5 years ago!
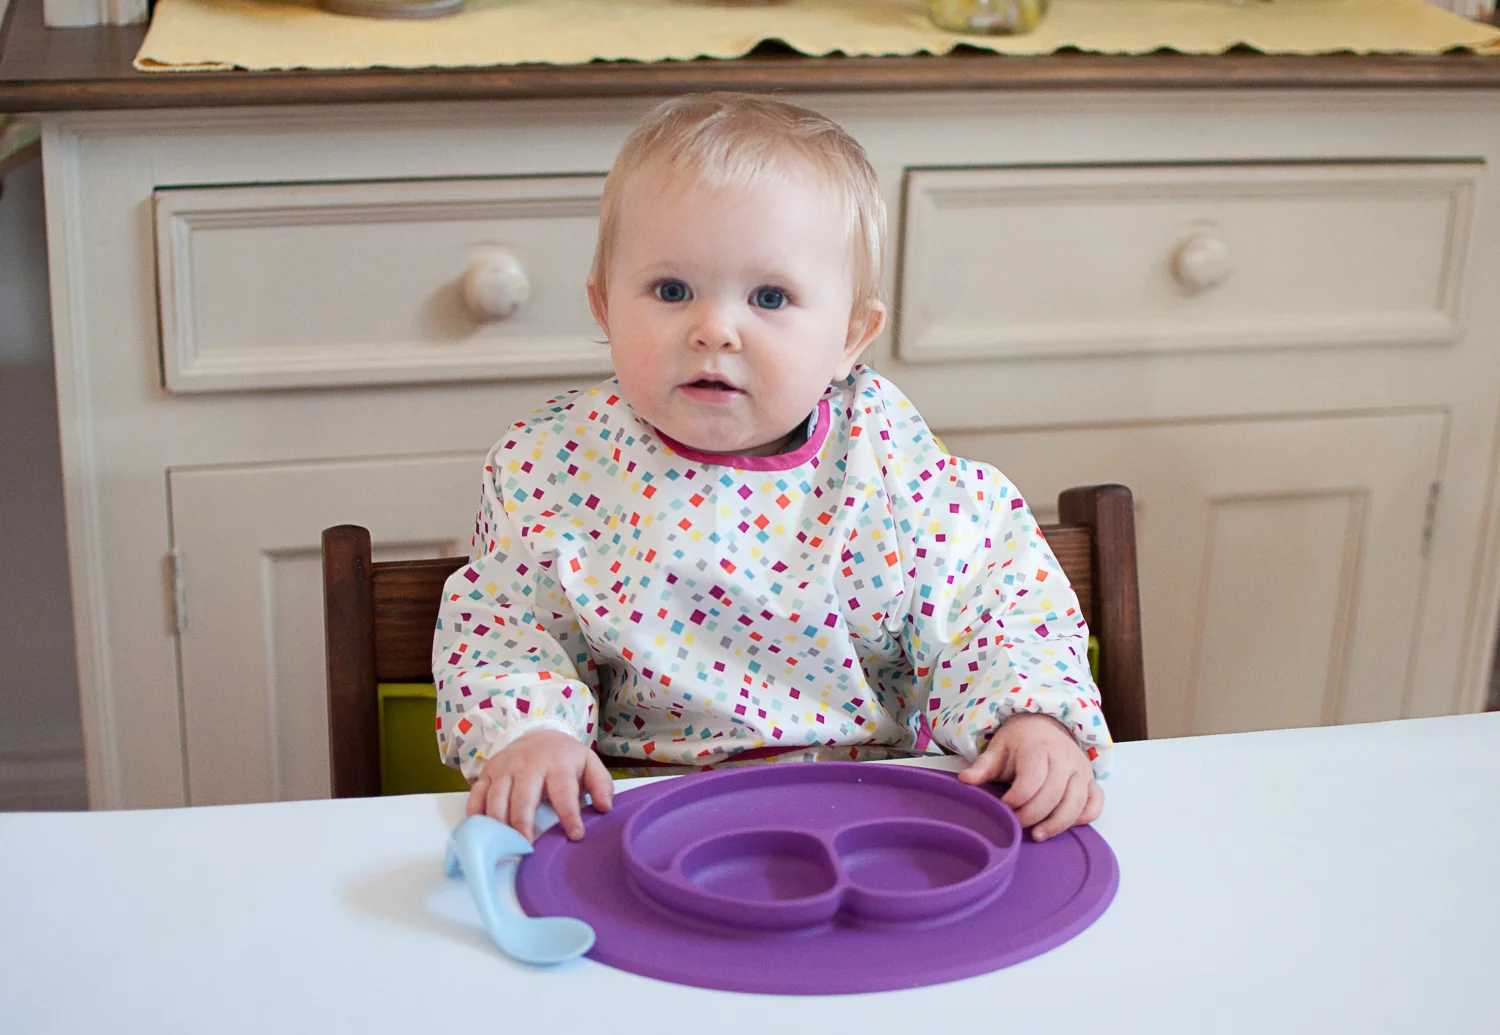
This amazing prize pack includes:
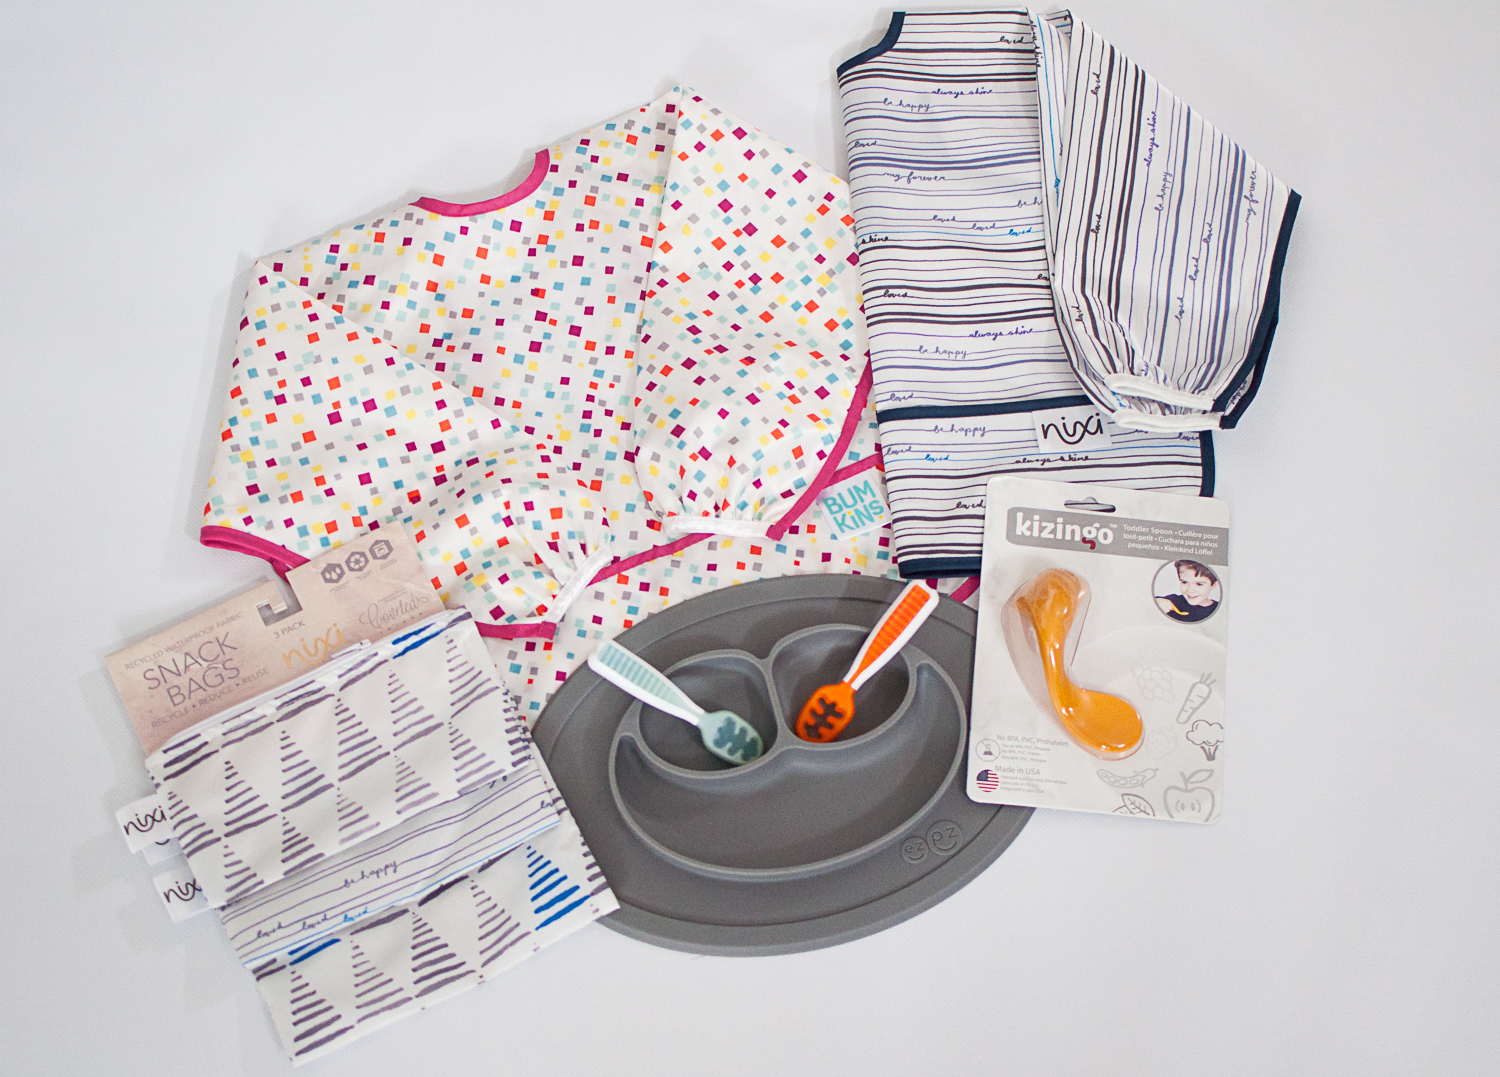
An ezpz Mini Mat - I love all of the amazing ezpz mats, so I knew I had to include them in my favourites giveaway. We have pretty much every size they make, and use them daily now that Penny is a solids champ. I love that they suction to the table so she doesn't throw them, plus they can be tossed in the dishwasher, and stand up to daily use with no fading or signs of aging. When you're first starting solids (especially if you're doing baby led feeding) I usually suggest placing the piece of food directly on the table, as it can be hard for your baby to reach into the mat when they are first starting out. Once they have their grasp down, and are confident picking up food and eating well, then you can add your ezpz mat.
2 Bumkins Sleeved Bibs - I've been using sleeved bibs since I started solids with Ben and honestly don't know why you would use any other bib. These long sleeve bibs save your babes precious clothes and your time doing stain removal. We still use sleeved bibs on our big kids if they're dressed for an event and need a snack. I especially love that these Bumkins ones have a tie back versus a piece of velcro, as my kiddos love to rip velcro open and smear food all over their clothes ;)
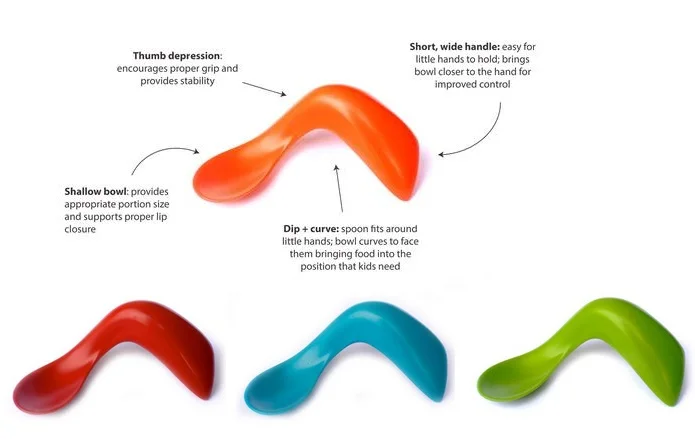
A Kizingo Spoon - Penny has been loving this curved handle spoon that's easy for little ones to grip. The Kizingo has a shallow tipped bowl and a shorter handle making it perfect for little hands. I have definitely added this to my list of favs for little feeders
A set of NumNum Gootensils - These were one of my favourites at the very start with Penny. She loved to dip the blue spoon into food and then gnaw on the bumpy surface of the spoon. Ideal for little teethers! The orange spoon with the openings was the first spoon that she successfully fed herself greek yogurt with. The thick yogurt gets trapped in the holes making it easy for a small baby who doesn't always keep the spoon upright.

Set of Bumkins Reusable Snack Bags - I love ensuring that our meals are as eco friendly as possible so these snack bags are a great addition to this giveaway. I haven't personally tried the bumpkins ones, but they look amazing! I love that their Nixi line is made from recycled fabrics and have these awesome prints.
Enter NOW by simply commenting below with your name and email address, or alternatively you may comment below and submit your email address to care@with-care.ca for entry. Plus make sure to check out our Facebook page & Instagram feed for 2 more ways to enter!
Contest is open to all Canadian and Continental US residents 18+ and closes Thursday May 18th at 11pm EST. A winner will be chosen at random and messaged within 24 hours. Good Luck!
As a special gift use code withcare for 10% off these amazing feeding products locally and online at Diaper-eez.
Don't hesitate to get in touch if you have questions about my Starting Solids Workshops and feel free to check out my YouTube for a few Starting Solids Videos. More to come!
Care
*Please note that Num Num spoons will be shipped directly from the manufacturer to winner, while other products will be shipped from With Care.
*This is a sponsored post which means I was provided compensation and/or product for this post. All thoughts and opinions are 100% my own.