

Grandma's Homemade Cinnamon Bread & Chelsea Recipe
Every year on Christmas Eve my mom would spend the day baking the most delicious cinnamon bread, buns, and chelsea to enjoy on Christmas day. It was always such a wonderful treat and a tradition I looked forward to every year, and I am so happy I get to continue it with my kiddos.

Every year on Christmas Eve my mom would spend the day baking the most delicious cinnamon bread, buns, and Chelsea to enjoy on Christmas day. A recipe passed down from her mother. It was always such a wonderful treat, and a tradition I’m so happy I get to continue it with my kiddos.
The recipe is a basic sweet dough and can be made into regular buns, cinnamon bread, or chelsea buns (aka cinnamon buns). It isn’t difficult to make, but the steps take 5 hours in total because of multiple risings. You won’t be working that whole time, but it’s usually best to start early in the day and work your schedule around the different steps. You might be thinking, what the heck? Just buy some freaking bread and call it a day! … and to you I say “Go for it!” If this isn’t your thing and you want something a little quicker check out my 6 Simple Last Minute DIY Holiday Gifts. There is some serious deliciousness in there, and all it takes is melting and blending. If you’re looking for something with a little more time commitment give this family recipe a try and let me know what you think.


For all the parents out there wondering how I bake with 4 kiddos, let me start by saying that I choose very specific baking tasks for each kid to assist with (at their particular level eg. Penny at 3.5 years old spreads sugar, but Ben at 8 year old helps measure stuff and make the dough) and Daddy is there to keep the other's occupied. Also, it’s not all cupcakes and sprinkles, but it’s pretty amazing to watch their excitement when they eat something they helped make.
I hope you enjoy whatever sweet traditions you do with your loved ones this holiday season.
- Care

How To Grow Garlic - A Simple Step-By-Step Guide To Planting, Growing, Harvesting, Curing & Storing Your Own Garlic
I’ve had so many requests for information about growing garlic, so I put together this little guide. It’s just 9 simple steps and when you’re done you’ll have the most delicious homegrown garlic.
If you don’t have a garden, check it out and then share with a friend who does. You might just be lucky enough to receive some of their homegrown garlic harvest. It’s that good!

Hope you enjoyed my guide to growing garlic. Now that you’re excited to plant, check out my DIY raised garden beds and my garlic scape and basil pesto recipe.
As always, let me know if you have any questions.
- Care

Preparing Our Home For Baby 4 - Freddy’s Nursery Reveal
Baby 4 is on the way any day now (Edited to note that baby Freddy arrived on Thursday evening, just 5 hours after these photos were taken), and surprisingly this is the first time I’ve actually prepared an official nursery. I guess you could say that I want to soak up all I can with this last baby of ours.
Baby 4 is on the way any day now (Edited to note that baby Freddy arrived on Thursday evening, just 5 hours after these photos were taken), and surprisingly this is the first time I’ve actually prepared an official nursery. I guess you could say that I want to soak up all I can with this last baby of ours.
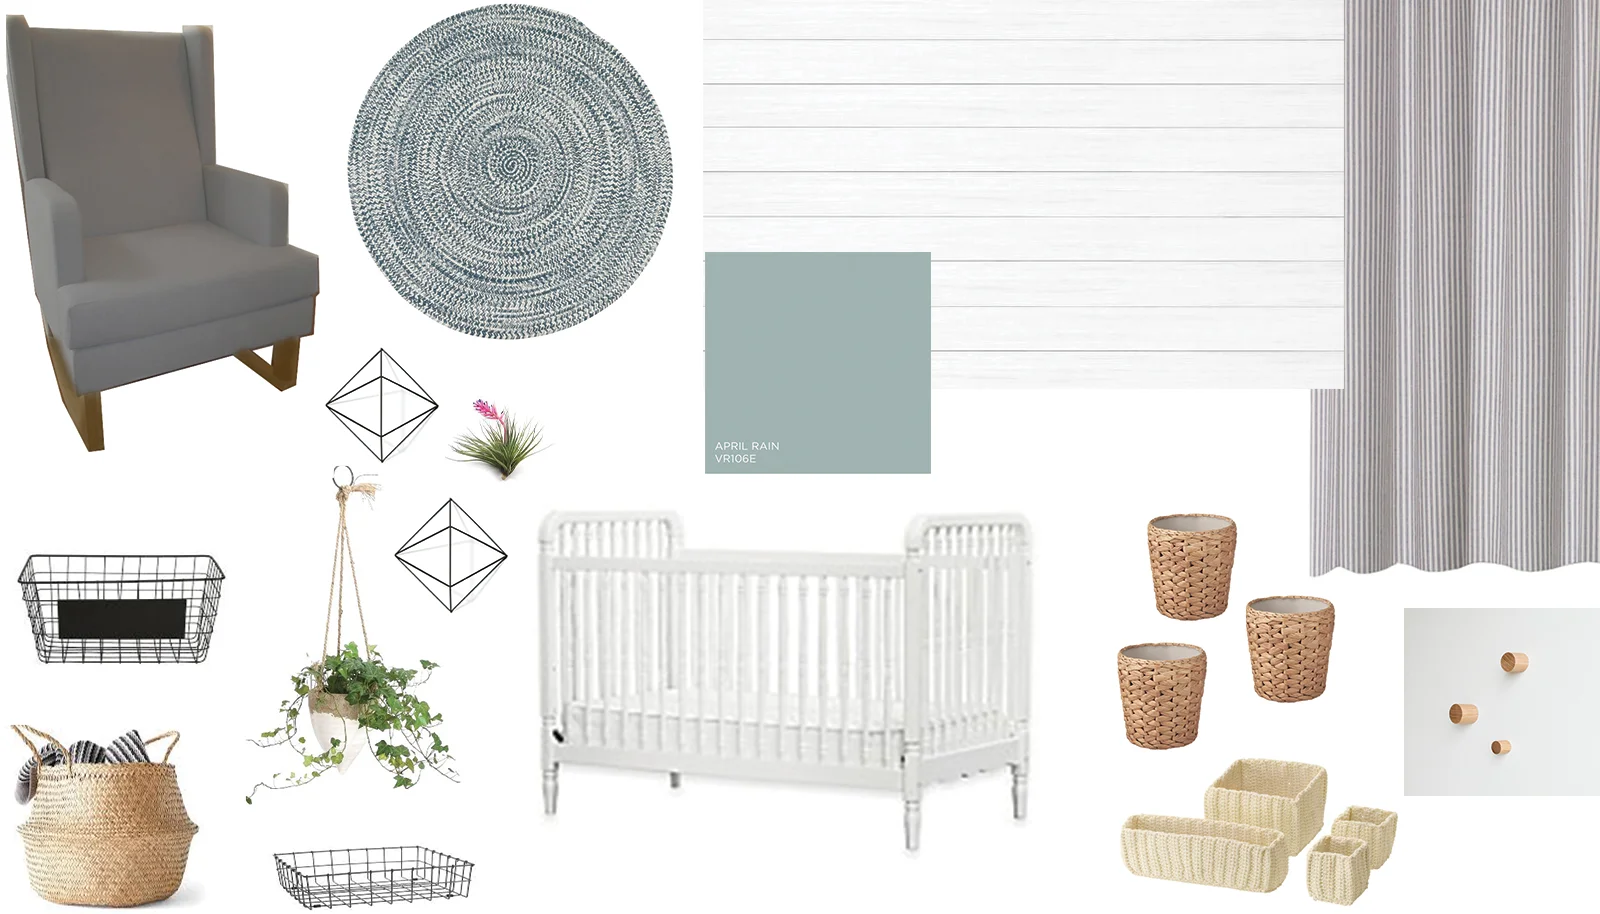
For our little guys room I set out to create a clean and simple space with a calming colour palate and a little farmhouse feel. After weeks of working on it I’m so excited to finally show you the finished room…and in reality it’s not 100% done. I still need something beautiful and safe to accent the wall above the crib eg. won’t kill a baby if it falls on them ;) Please let me know if you have any ideas!

When I started this nursery I knew one of my main priorities was a comfortable place to sit, rock, nurse, and cuddle our babe. For our last 3 kids I have had less than ideal chairs, so getting a custom chair from Off Your Rocker was basically my dream come true. I love that this rocker was made locally in Belleville Ontario and can be totally customized to suit your preference for style, wood stain, and fabric, all at a reasonable price. I decided on the Jamestown Wingback in Battleship Grey Twill with Walnut stain and couldn’t be happier with my choice. Not only is it beautiful, it’s so comfortable! A perfect place to spend a few thousand hours over the early years of this baby’s life ;) If you’re in the market for a chair check out Off Your Rocker, and make sure when you place your order to choose "Store Pickup" & Mention With Care to Receive FREE SHIPPING to the GTA!

I wanted the nursery to have a little bit of a rustic feel so my husband and I did DIY shiplap on one accent wall and painted it white to match the rest of the room. It’s subtle, but I love the way it looks with our spindle style crib.

We were in desperate need of some fresh linens for baby 4. After 7+ years of use, our old ones were all completely done and ready for retirement. Keeping our baby’s space and the air he breathes as safe and clean as possible is very important, so I chose a beautiful organic waterproof crib mattress protector & organic crib sheets from my favourite online source, Organic Lifestyle. They have some absolutely gorgeous, eco-friendly and sustainable products for around the home. Perfect for holiday gift giving! Use code care for 15% Off your order from Organic Lifestyle.

I was set on farmhouse ticking curtains (stripped fabric seen above) but couldn’t find any that worked for our budget and time line, so I set out to make my own. I sewed blackout lined curtains and a matching crib skirt from beautiful classic nickel ticking fabric I found locally at Tonic Living.
I also refinished my childhood nursery dresser by sanding and painting it and adding new porcelain knobs. It was a pretty quick project and gave it a totally fresh look on a small budget.

Instead of going for lots of traditional wall decor I decided to decorate this small space with greenery and beautiful baby stuff, like our favourite treasures and my ring sling collection.

I absolutely love having my slings easily accessible on these gorgeous locally made wooden wall knobs. Perfect to grab and go whenever we need.


I’m so happy with how this space has turned out. I know it will be a calm and soothing space for us to care for baby Freddy. Even with the day-to-day chaos that is our busy home. Check out all the details for products featured in my nursery reveal below, and please comment with any questions.
- Care
In The Post:
Rocking Chair: Off Your Rocker *Choose "Store Pickup" & Mention With Care to Receive FREE Shipping to the GTA | Photos: Anchor Studio *Get 10% off when you mention With Care at Booking | Organic waterproof crib mattress protector & organic crib sheet: Organic Lifestyle *Get 15% off with code care | Care’s Maternity Clothing sponsored by Canadian rental box company The Sprout Collection: *Use Code Care20off for 20% off | Curtain & Crib Skirt Fabric: Tonic Living | Dresser Knobs: Overstock.ca | Rug: Overstock.ca | Dresser Paint Colour: Behr Frozen Pond | Wooden Wall Knobs: JB + DG | Black & Pink Ring Slings: Potter & Pehar *Use Code WITHCARE10 for 10% Off | Sand Ring Sling: Jr Foxes | Umbra Prisma Wall Decorations: Amazon.ca | Wooden Rattles: Bonjour Baby Baskets | Patouche Baby Bonnet: Little Zen One *Use Code WITHCARE for $15 off your purchase of $100 or more | “You Are Loved” Print: ATTN2Detail Designs | White Round Metal Mirror & Heart Marquee Light: HomeSense | White Wood Shelves, Wickers Planters, Hanging Planter & Baskets: Ikea | Herbal Sitz Bath & Lavender Mineral Soak: Tenth Moon
*This is a sponsored post which means I was provided compensation and/or products/services for this post. All thoughts and opinions are 100% my own. I only partner with companies that I genuinely love and want to recommend.

Watch My New Video to Learn More About With Care
It's hard to believe that this summer marks 5 years of running my business. Throughout the last 5 years I have been honoured to educate and support over a thousand local families. In addition to teaching classes and workshops, my goal for the next phase of my business is to bring my educational and inspirational content online to a wider audience. I made this video with Anchor Studio to give everyone an idea of what they can expect from my YouTube Channel and Blog. I would love if you would watch and subscribe to my channel.
It's hard to believe that this summer marks 5 years of running my business. Throughout the last 5 years I have been honoured to educate and support over a thousand local families. In addition to teaching classes and workshops, my goal for the next phase of my business is to bring my educational and inspirational content online to a wider audience. I made this video with Anchor Studio to give everyone an idea of what they can expect from my YouTube Channel and Blog. I would love if you would watch and subscribe to my channel.

Please feel free to send along any topics you would like covered. I have some amazing collaborations coming up this summer and fall, so stay tuned for lots of new content and some incredible giveaways! I appreciate all of the incredible support from the families I have worked with and can't wait to see where this new journey takes me.
- Care xo
P.S. If you're on Instagram I would love it if you could give me a follow.

Garage Makeover Reveal With Care
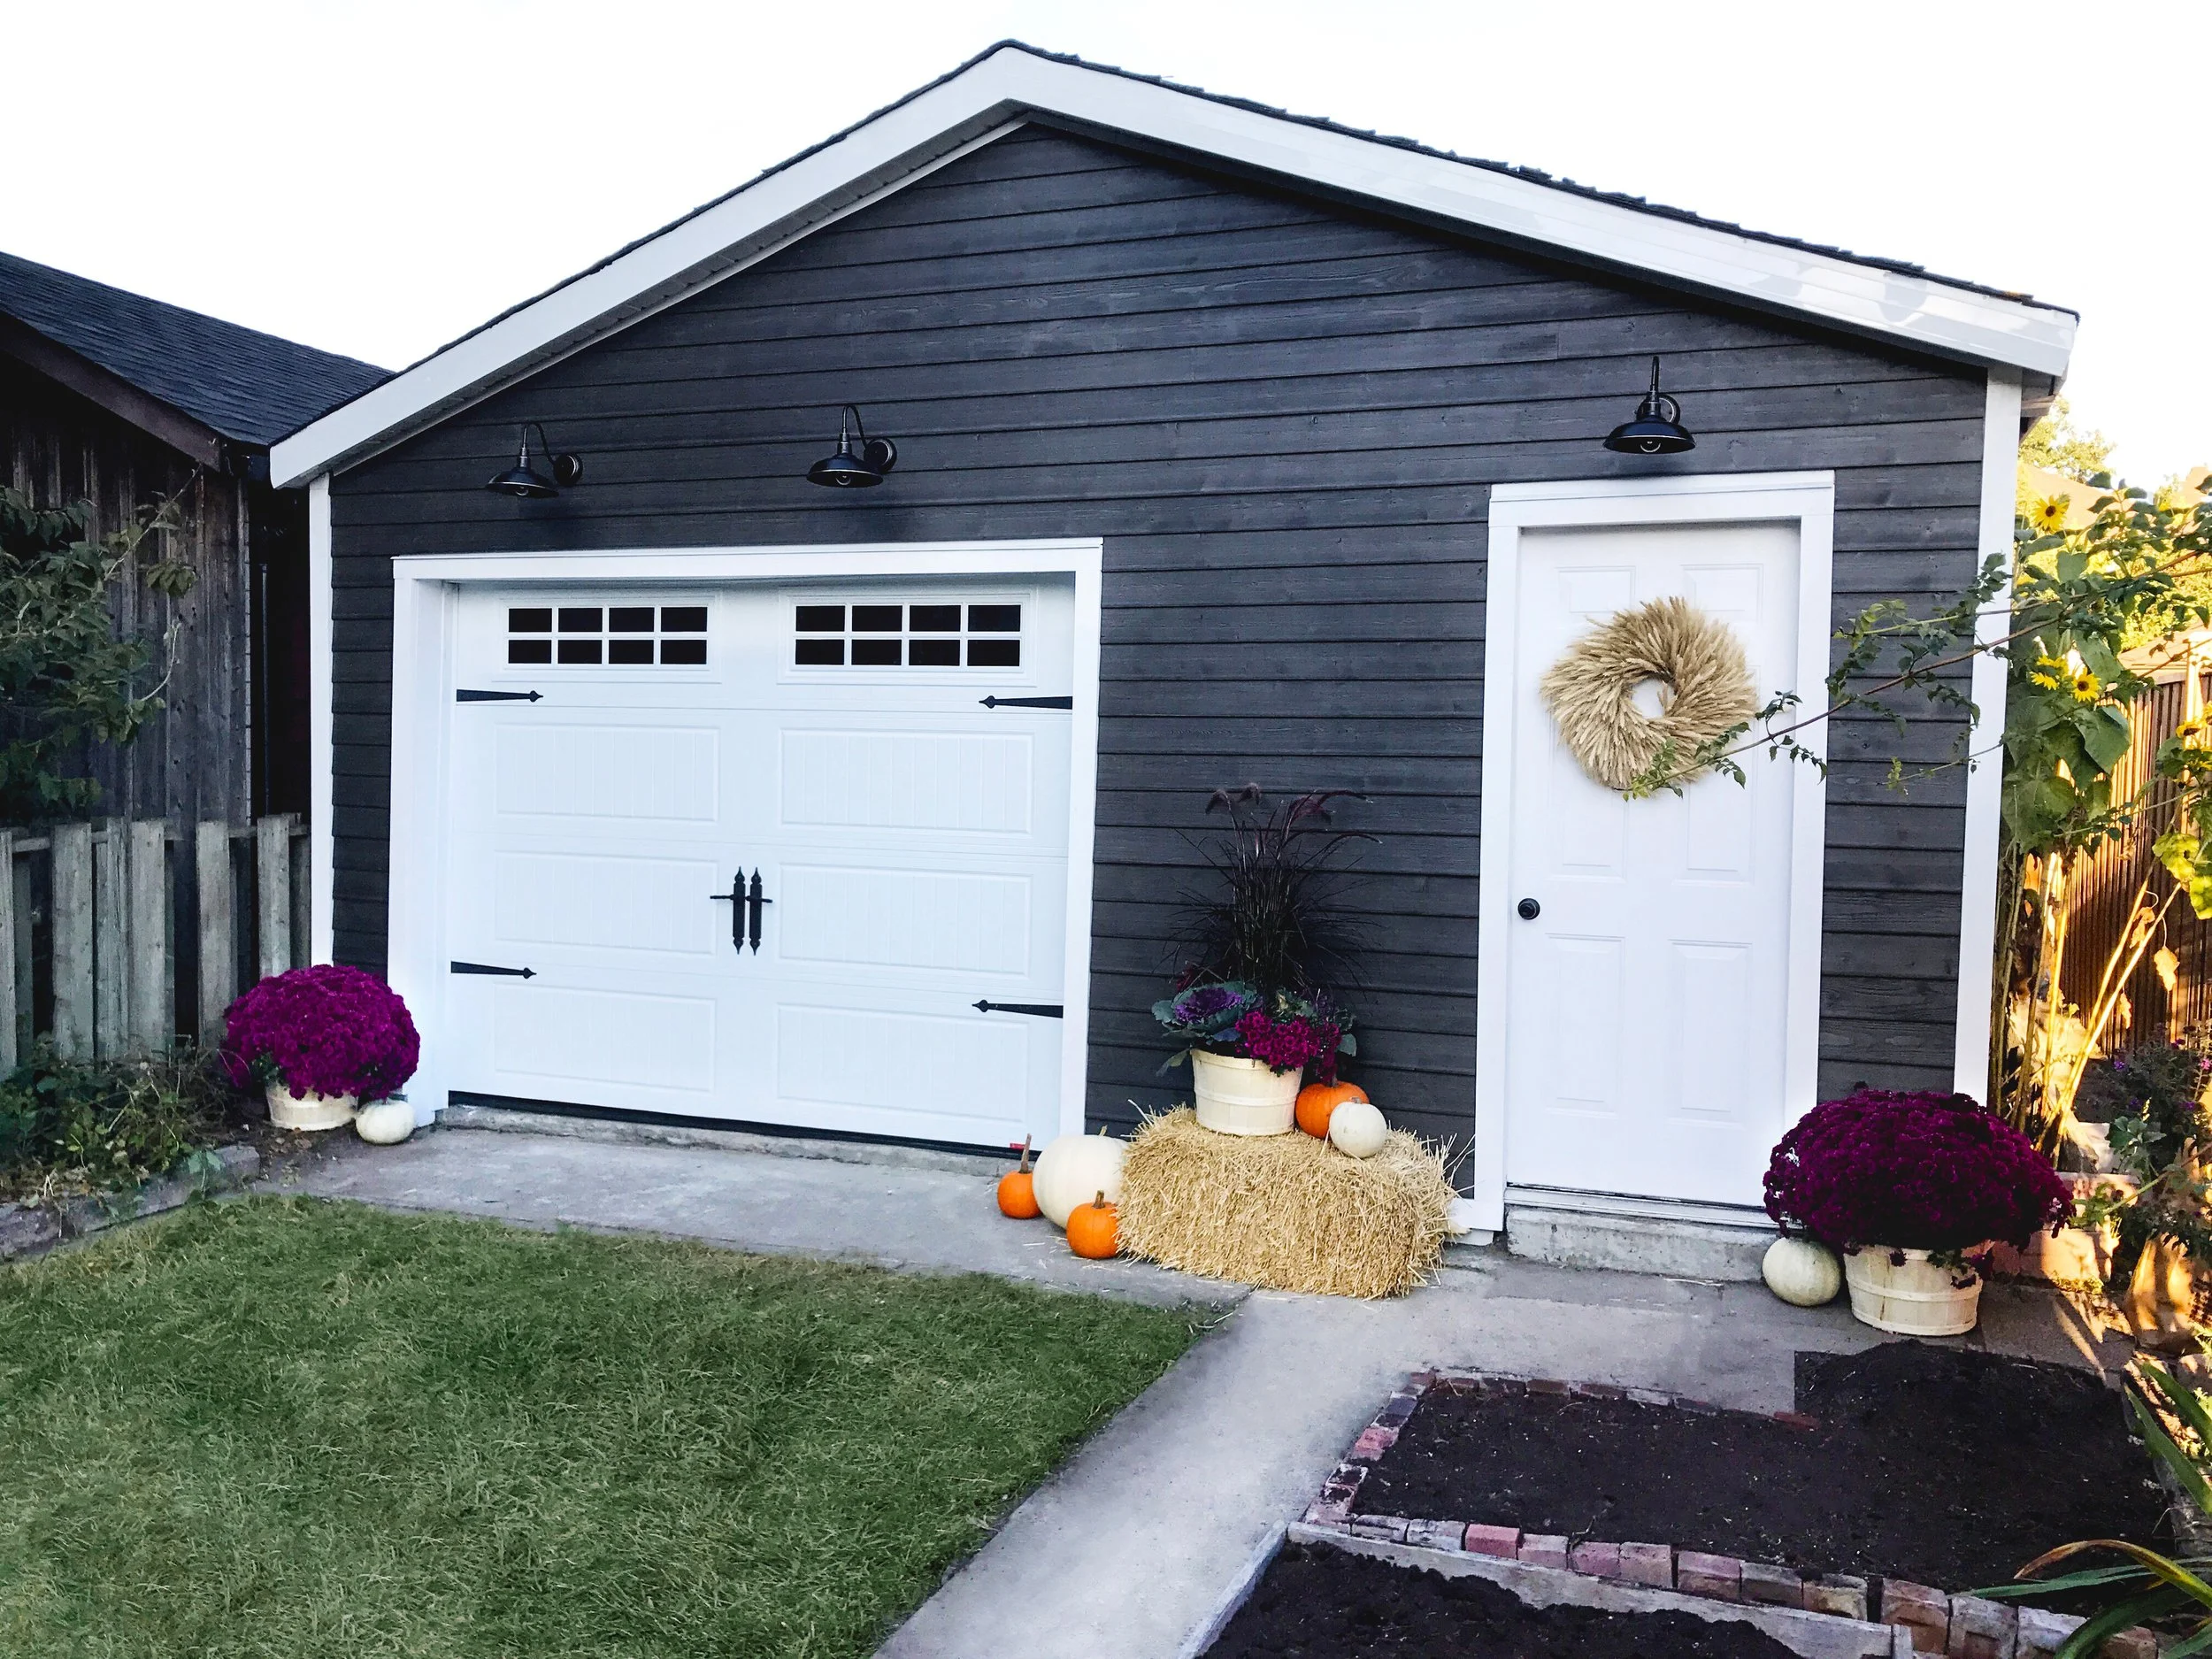
It's finally here, the day I get to share our garage makeover reveal with you. This project took a lot longer than we anticipated due to delays with materials and summer plans, but in the end it has all come together beautifully. Check out this before and after to see a truly amazing transformation.
It's finally here, the day I get to share our garage makeover reveal with you. This project took a lot longer than we anticipated due to delays with materials and summer plans, but in the end it has all come together beautifully. Check out this before and after to see a truly amazing transformation.

Some things I learned doing this reno:
1. Renos ALWAYS take longer than anticipated. Even small projects have delays, so you just have to roll with it. I try to remind myself that we are incredibly fortunate to have a place to renovate, and the means to do so.
2. Making reno choices is really hard. Who knew? As someone who hasn't done much of this stuff I found it really tough. There are so many choices for finishes, colours, textures...plus the budget! I was so happy to be able to bounce ideas off of our friend Krista of KMSalter Design & Diana at The Garage Door Depot. I now know why people hire designers, especially on big projects. Thanks ladies!
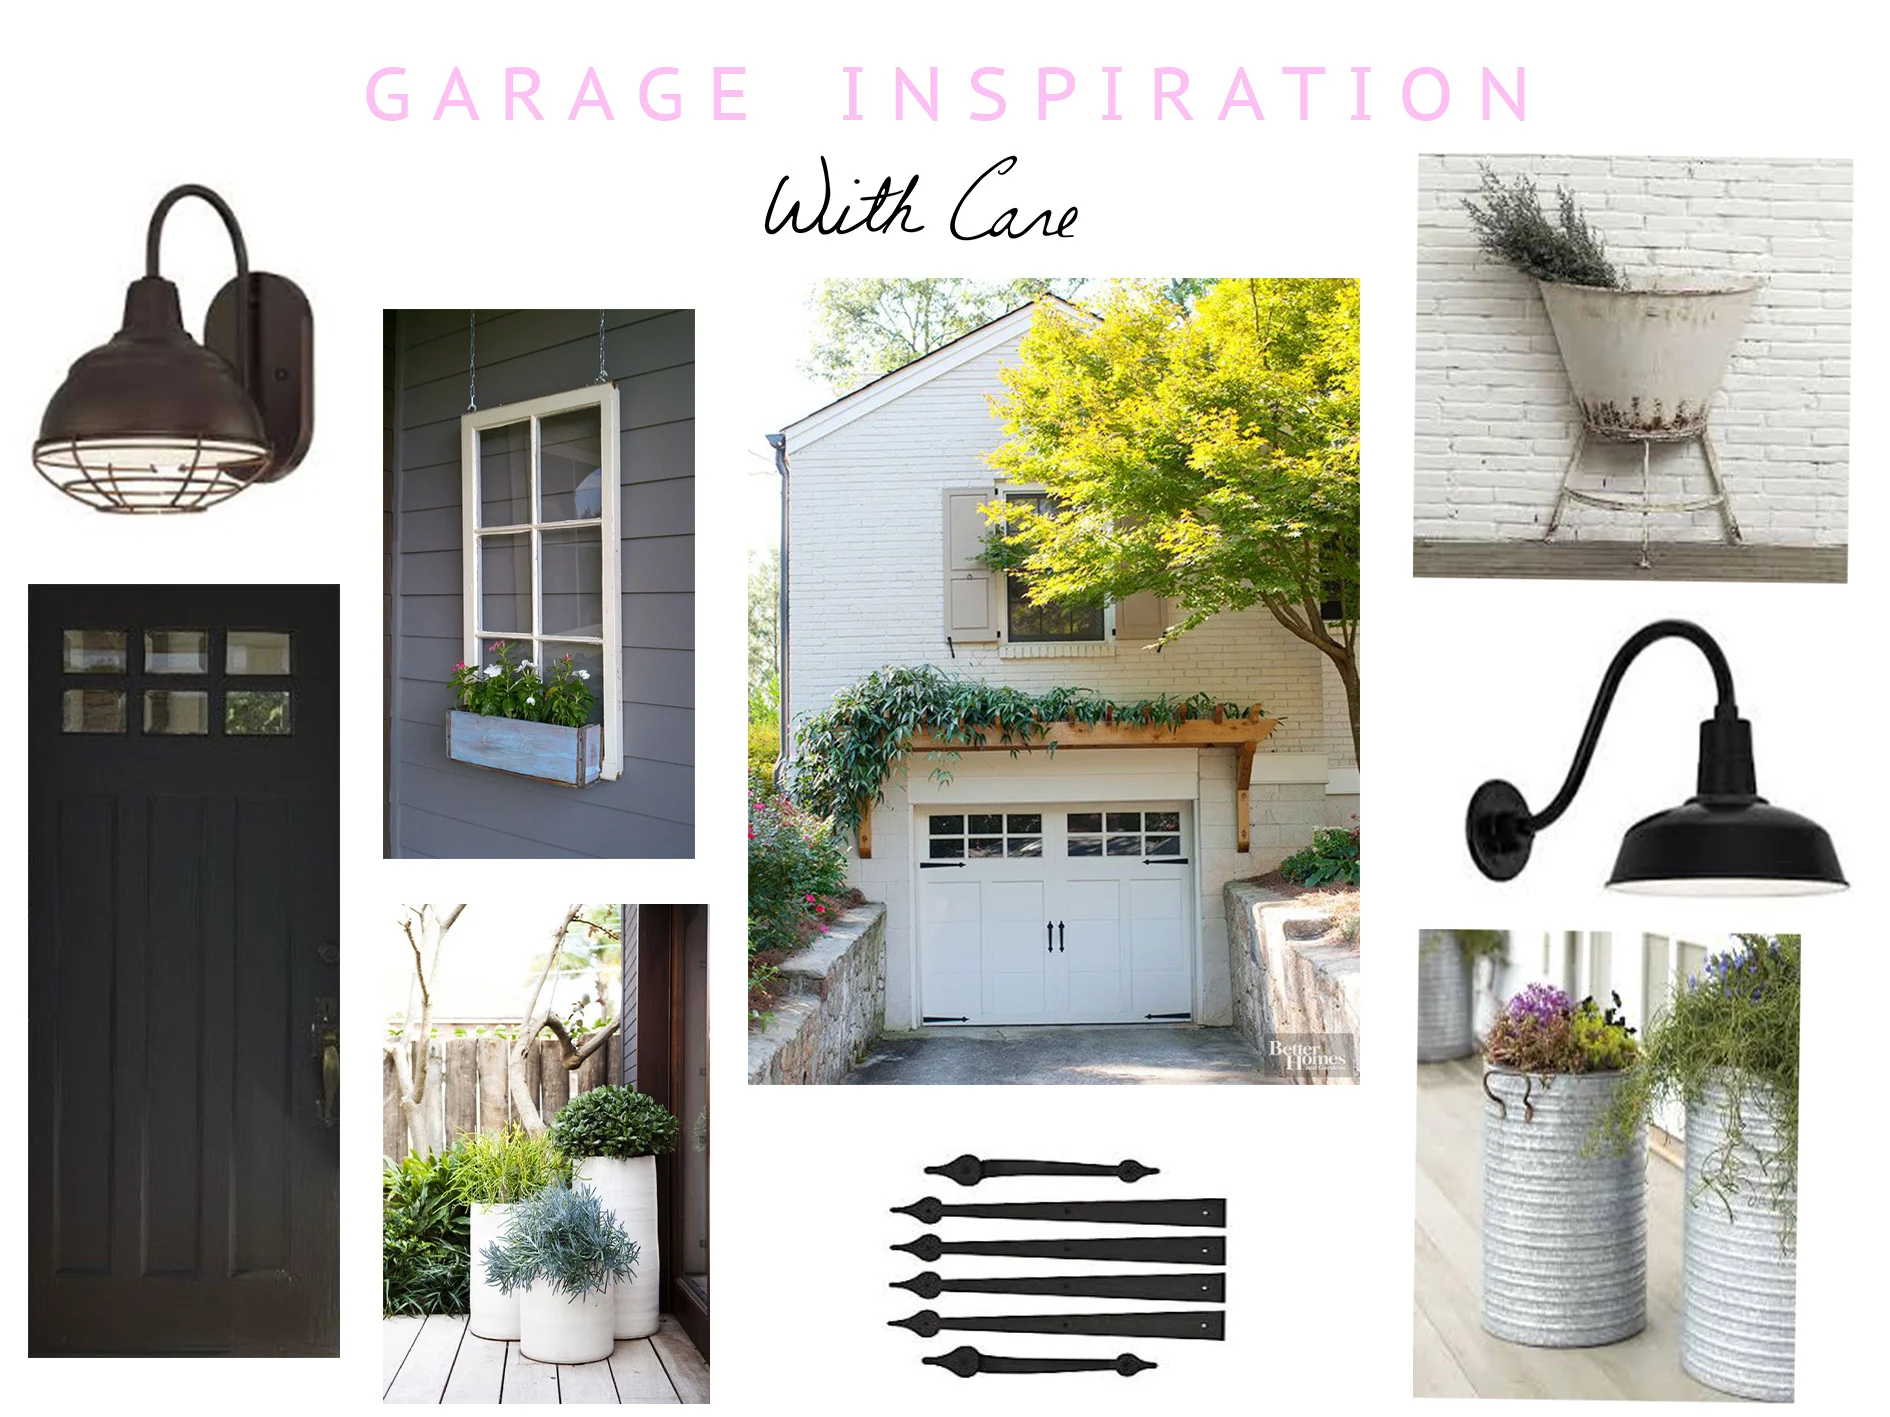
Here is my original inspiration from earlier this spring:
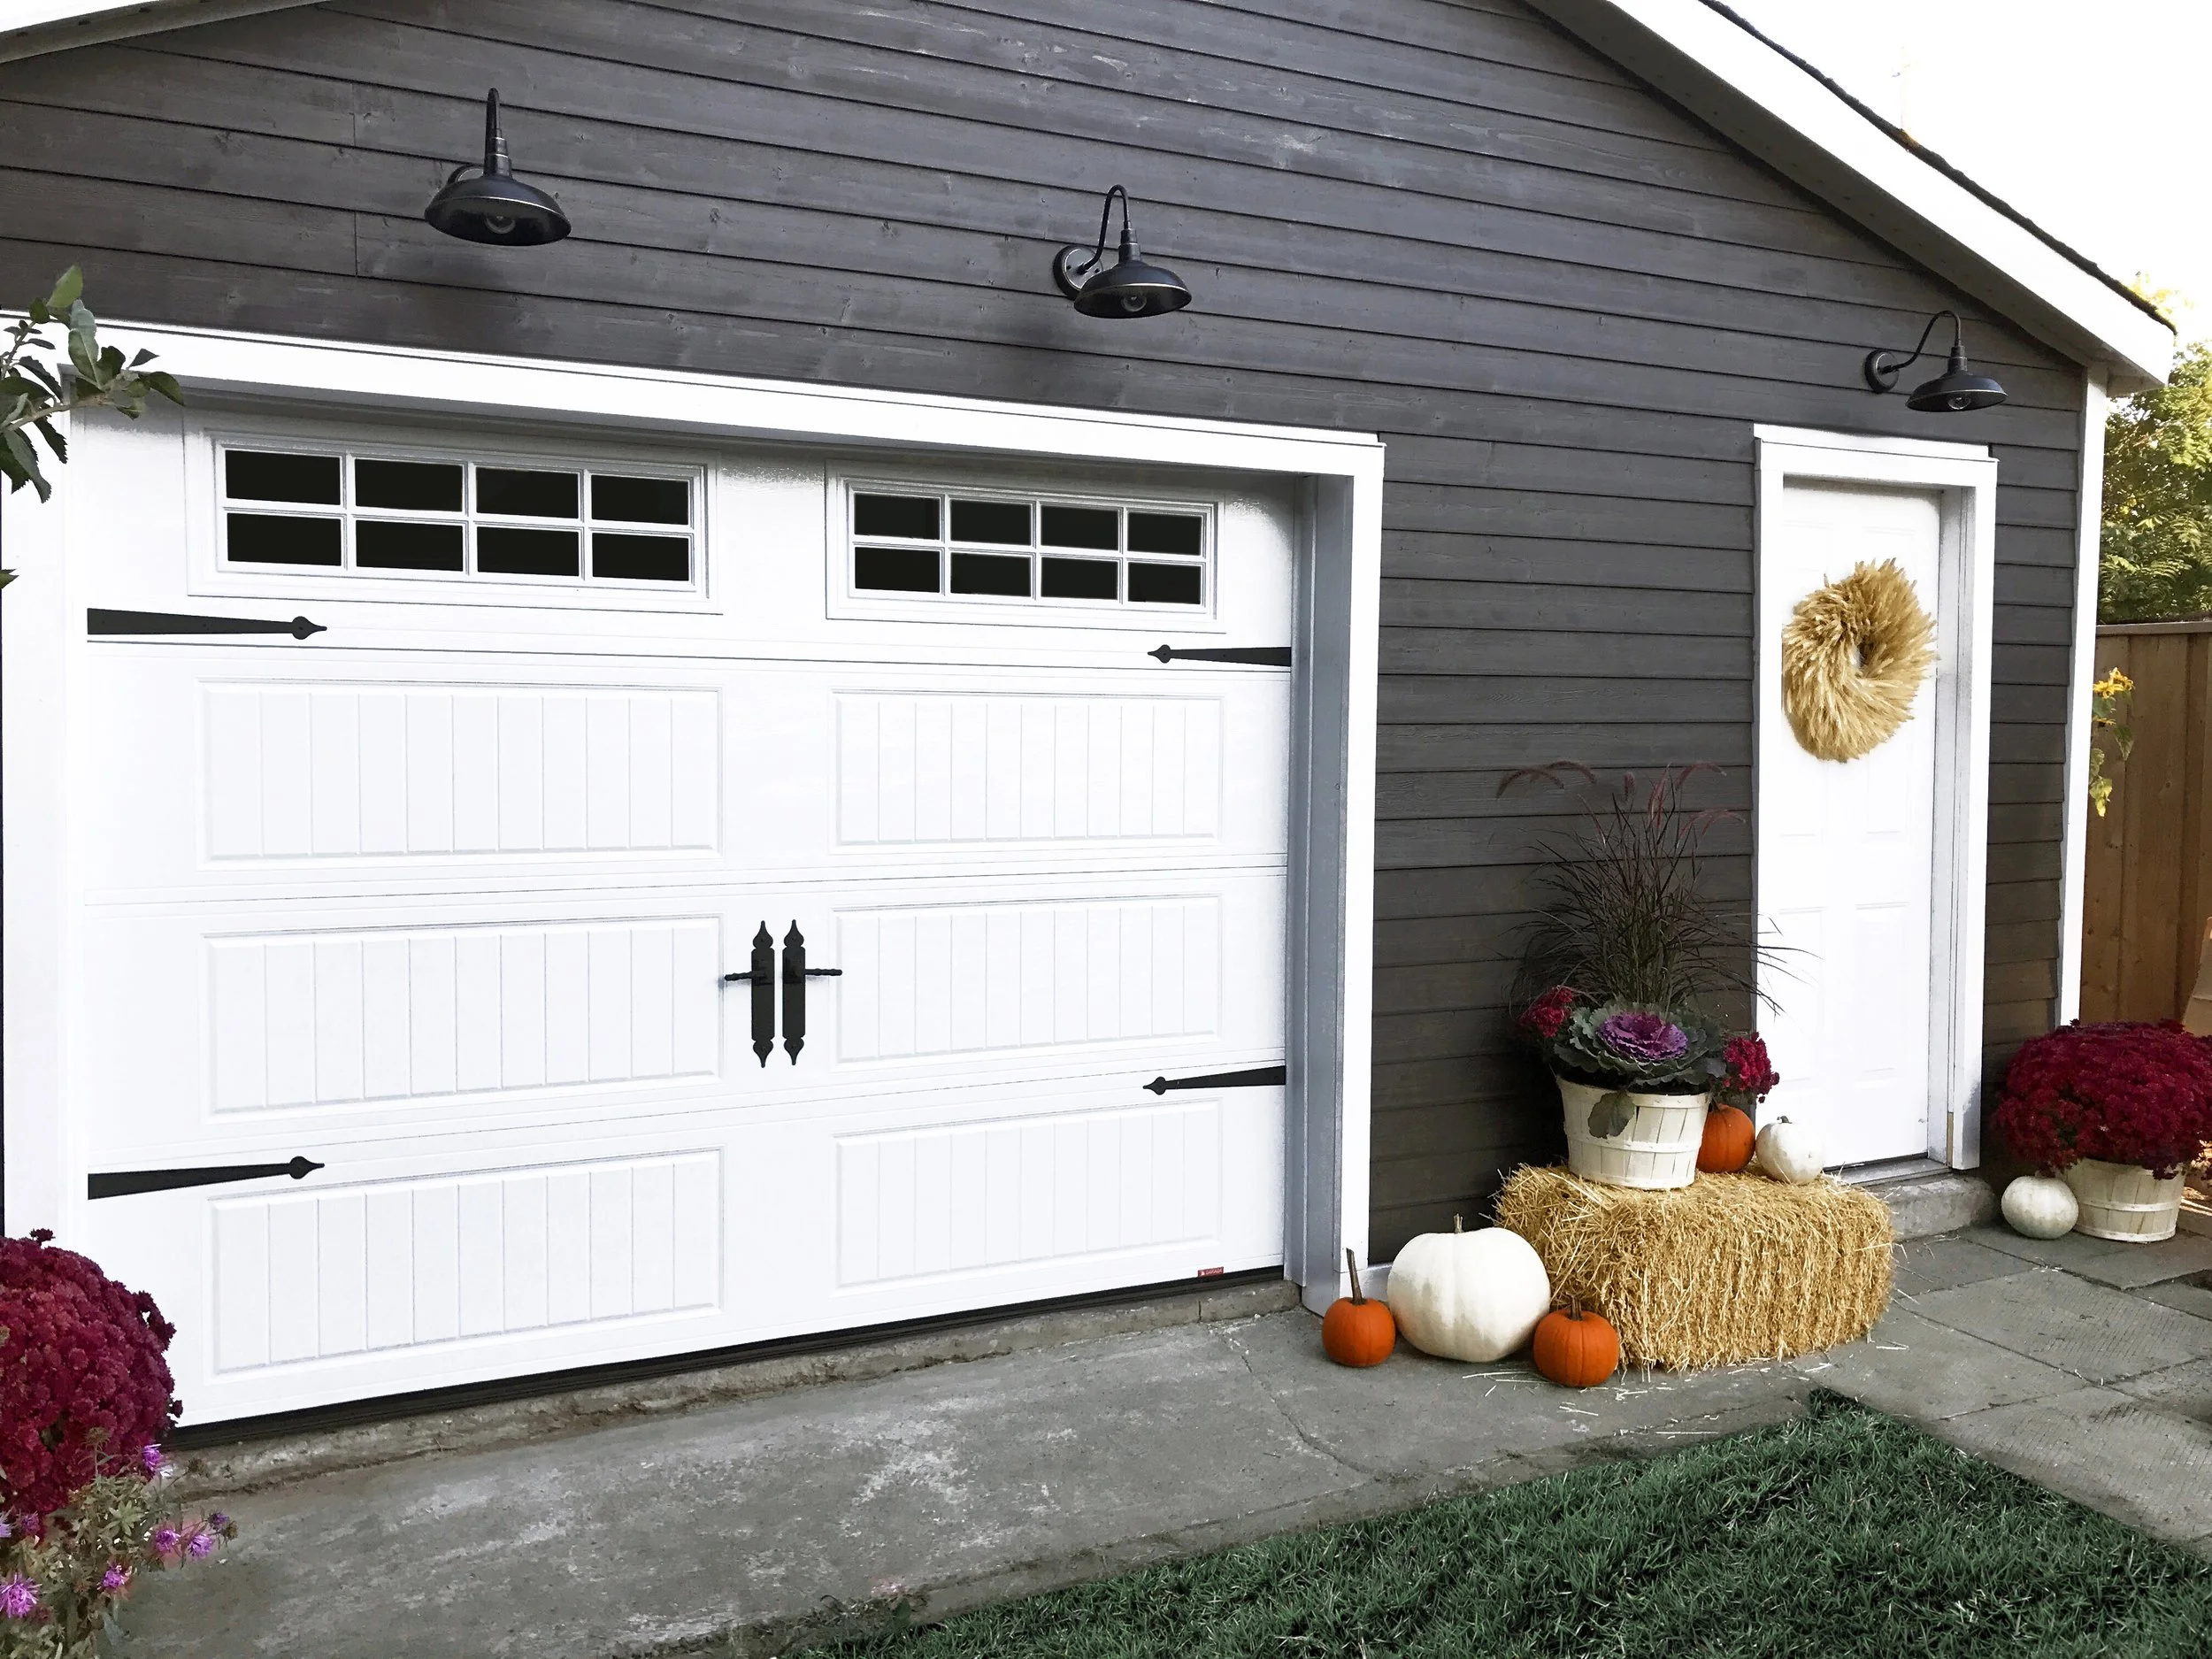
Looking out on our backyard now brings me the biggest smile. The garage turned out better than I ever could have imagined.

Not only is the garage beautiful and totally changes the look of our yard, but the garage door actually works! Like really really works. It's almost effortless to open and close, which makes it way easier to clean up the kids toys and bikes at the end of a long day. I know I sound like a nerd, but I love this door. I was so impressed by The Garage Door Depot's customer service from start to finish. The way they helped me design, measure and tailor the door to suit our needs was amazing.
Originally I was thinking of a pretty basic door, but after looking at the options and chatting with Diana I decided on a gorgeous carriage style door (Acadia North Hatley by Garaga). I figured it's an investment and something we will be looking at for a long time (comes with a limited lifetime warranty after all), so we should go with one that we love. I'm obsessed with all the little details on this door. The windows, iron handles and hinges give it such a classic look. Plus I love that it's Canadian made.
I usually enjoy a good DIY, but our new garage door was one thing I definitely wanted professionally installed. There is something about a large piece of metal suspended from the ceiling that makes me vote for a pro. The installers with Garage Door Depot were incredibly knowledgeable and worked efficiently to get our door installed and ready to use. Plus they cleaned up the area before leaving. I know that sounds silly, but as a busy mama who is always cleaning up after someone, I aways appreciate when in-home service providers leave the space as they found it. *If you're in need of a new garage door mention With Care for 10% off Insulated Garage Doors with The Garage Door Depot Toronto
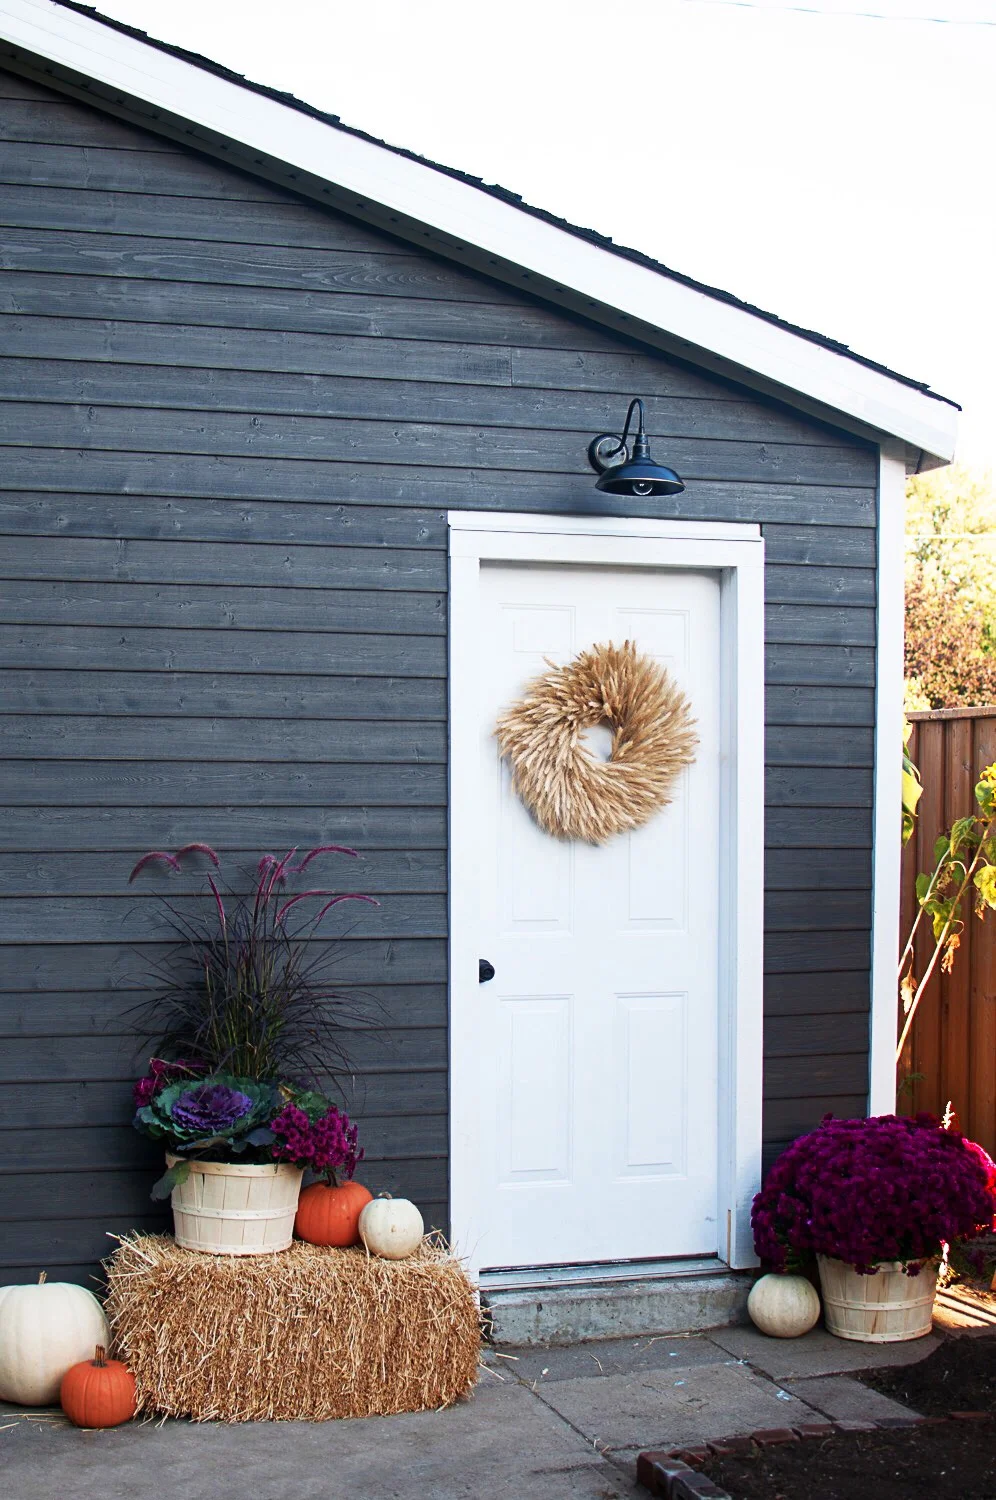
We debated simply painting the metal siding on the garage, but after learning how much work was involved for a short term fix, we decided to change up the siding and go for something eco-friendly and local. We chose Canadian-made stained wood siding from Maibec. We eventually want to refinish our screened in porch at the front of our house to match and wanted the classic look of wood, without all the the upkeep. This stuff is warranted for rot for 50 years, and the stains are warrantied for anywhere from 8-15 years depending on what you choose. I absolutely love this natural tone charcoal grey that we picked to compliment the existing brick facade of our home.
Please note that we installed the siding ourselves because of our budget, and because we're those kind of people ; ), but if it's in your budget, I would always recommend hiring someone for large jobs like this. Especially with kids under foot. If you are someone who likes a challenge, is handy, has the right tools, a little help, and some extra time, it's doable (make sure you choose the em+ installation system if you're going DIY and read through the whole installation guide so you can plan your project). We hope to do the front of our house next year (ahh it would look gorgeous!), so maybe I'll write out a little DIY guide if we do.
For now I'm just excited to enjoy time in our backyard and smile at this beauty of a garage...and maybe start dreaming up ways to make the inside prettier and more functional. I can already hear Brian (my partner) rolling his eyes from here ; )
If you're planning a garage makeover don't hesitate to get in touch, or check out some of the amazing products and services I used below.
Care
In this Post:
Garage Door Depot Toronto (Mention With Care for 10% off Insulated Doors): Acadia North Hatley Garage Door by Garaga | Maibec: Coastal Charcoal URBAHN Brushed Wood Siding in Rabbeted Bevel | Plant World: Hay Bail, Planters, Pumpkins + Wreath | Wayfair: Goosneck Light Fixtures
*This is a sponsored post which means I was provided compensation and/or product for this post. All thoughts and opinions are 100% my own. I only partner with products and services that I genuinely love and want to recommend.

Garage Makeover Inspiration + GIVEAWAY! Enter to WIN a "Smart Garage Door System" with Garaga
When we were looking to buy a home in Toronto we never thought we would get lucky enough to have a garage, let alone the big 2 car garage we managed to snag. The only issue was that it was a bit of an eyesore with peeling paint, old sharp metal siding and an ugly broken garage door that faces directly into our yard. Fixing up the garage has been on our wish list for the last 4 years, and finally this year we decided to do it. We love our gardens so much, and want to enjoy our beautiful backyard with a fresh backdrop.
When we were looking to buy a home in Toronto we never thought we would get lucky enough to have a garage, let alone the big 2 car garage we managed to snag. The only issue was that it was a bit of an eyesore with peeling paint, old sharp metal siding and an ugly broken garage door that faces directly into our yard. Fixing up the garage has been on our wish list for the last 4 years, and finally this year we decided to do it. We love our gardens so much, and want to enjoy our beautiful backyard with a fresh backdrop.
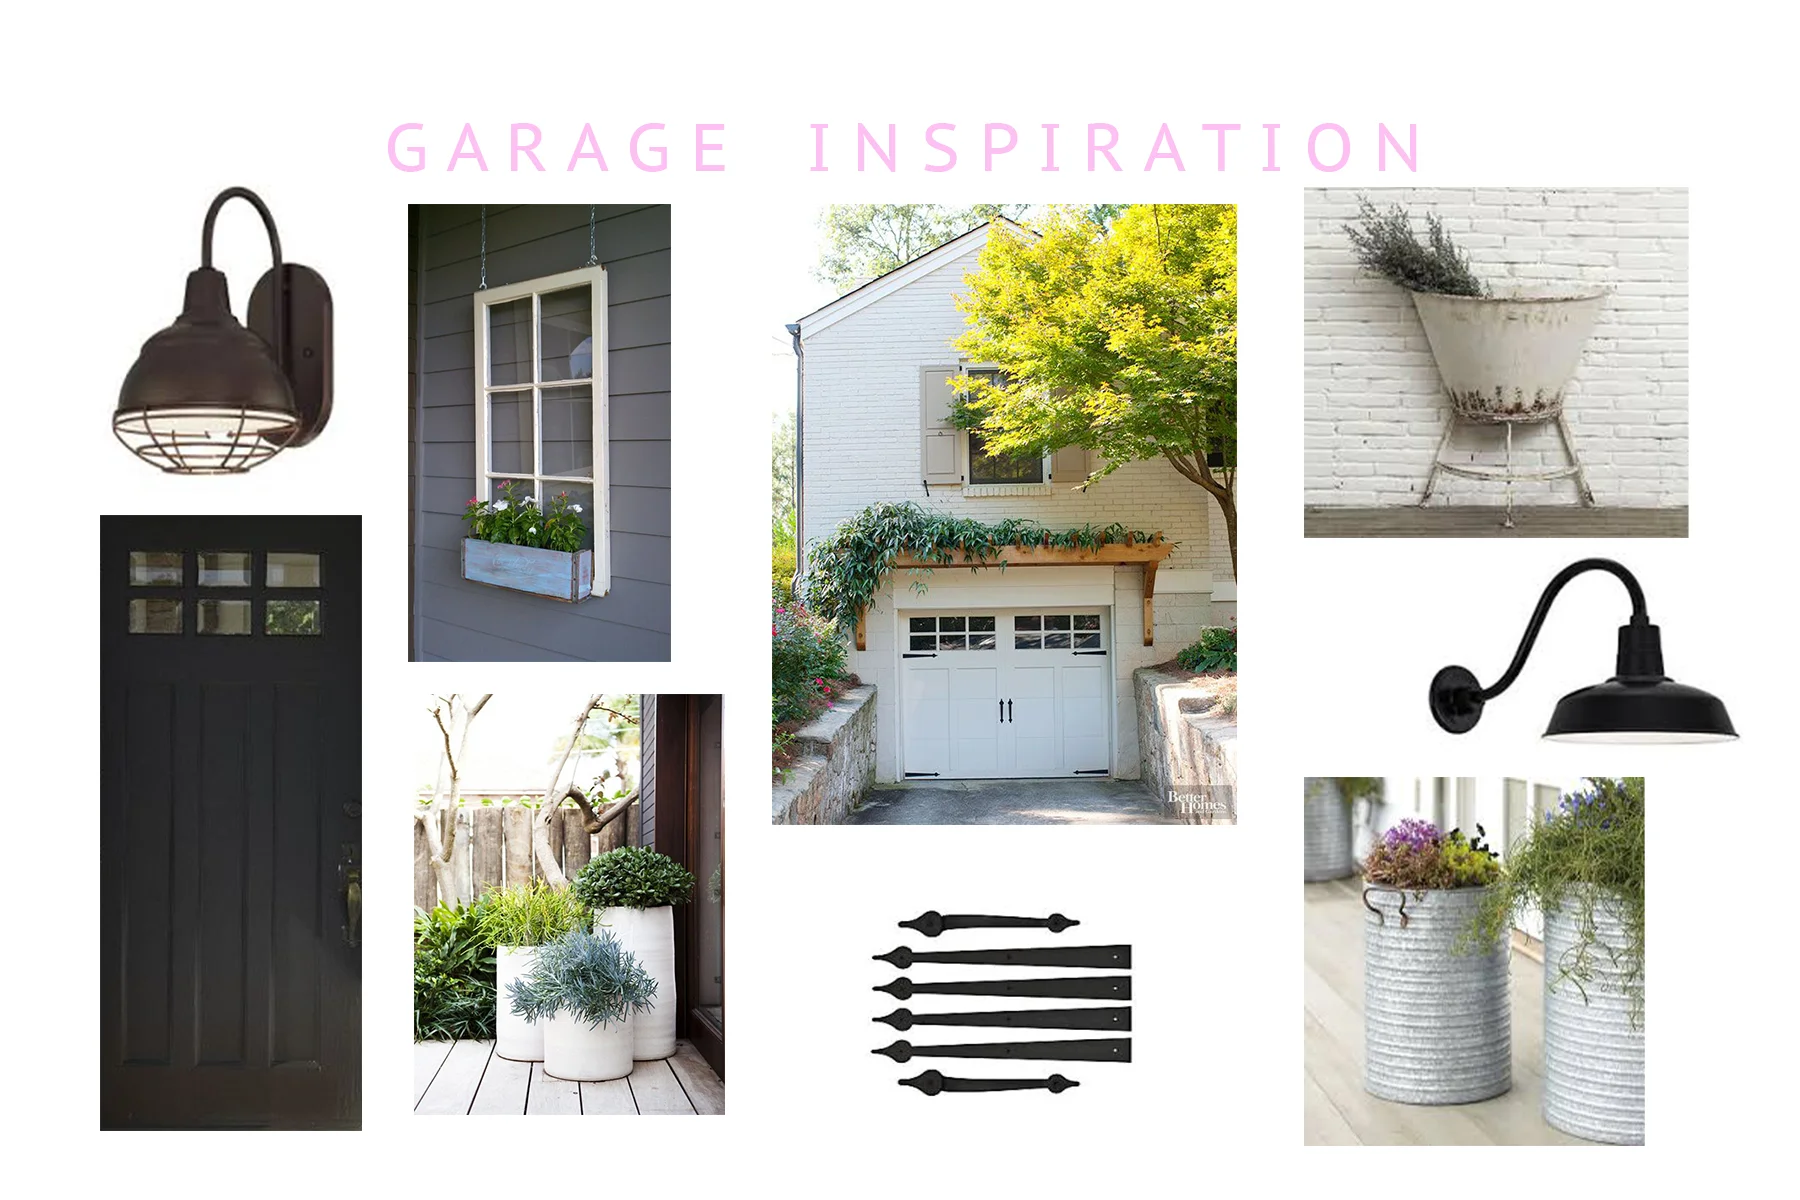
I've been gathering inspiration for our makeover on Pinterest, but it's been tough. I love a combination of old and new, and was originally thinking of going with a sleek contemporary look. After playing around with the options on Garaga's Design Centre I realized that I wanted to go with more of a country rustic vibe. I absoloutely love that you can add your own photo to their online designer to get a realistic sense of what it will look like. For someone like me who isn't as visual, this was a huge help.
Here's the super rough mockup of what we're thinking (I'm definitely not a photoshop expert, but it gives a good idea of the fresh look I'm going for). I'm still debating if we should add windows in the top panels of the door. Any thoughts? I'm also still deciding on what siding to use. I have some beautiful wood siding samples on the way from from Maibec to check out.

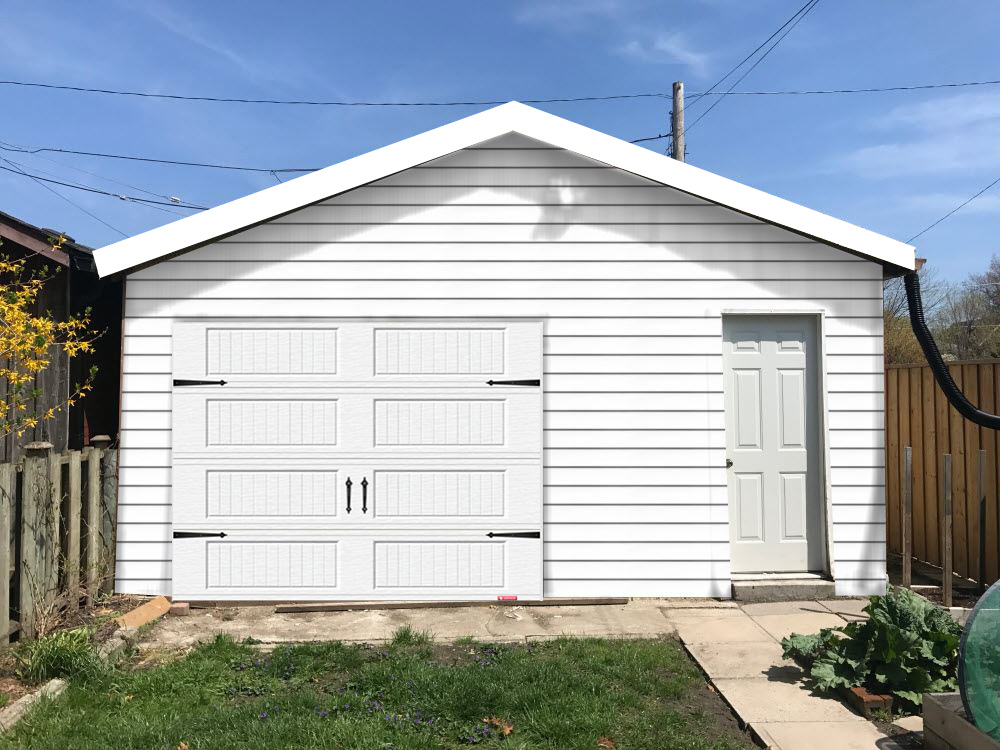
I will be adding a new light fixture and some type of planter for the wall where the window used to be. I'm also debating painting the regular door black or keeping it white. Comment with your vote! Here's some of my inspiration. You can see more on Pinterest.
If you have a garage that could use a little pick me up, check out this AMAZING Giveaway Garaga is hosting. You could Win the Garage Door of your dreams plus a Smart Garage System. AKA a garage door you can control from your smart phone! Genius for people like me who always question whether you actually closed the garage. The contest ends June 28th, so don't wait! See Garaga for full contest details. Enter by simply clicking here and following through to design your dream garage door and fill out your information.
Huge thanks to Diana and the rest of the team at The Garage Door Depot (Local Toronto company who will be installing our new door) for all of your help narrowing down the choices and figuring out what we need.
Stay tuned for our Garage Makeover Reveal this summer and don't forget to Enter Garaga's Smart Garage Giveaway!
Care
*This is a sponsored post which means I was provided compensation and/or product for this post. All thoughts and opinions are 100% my own.
Simple No Knead Artisan Bread
I often yearn for fresh baked bread as the fall weather settles in and we start making more soups, stews and warm hearty meals. My mom introduced me to Artisan bread baking years ago when I was in university, but at the time I didn't truly appreciate how amazing and easy the method was.

I often yearn for fresh baked bread as the fall weather settles in and we start making more soups, stews and warm hearty meals. My mom introduced me to Artisan bread baking years ago when I was in university, but at the time I didn't truly appreciate how amazing and easy the method was. Last week a fellow babywearing Instagram mom of 3 @ellerowley (owner of Sollybaby Wraps) shared her favourite simple artisan bread recipe and it peaked my interest. I had to try it. **Please note: the original recipe used is no longer available. Here is a similar 4 ingredient no-knead artisan bread recipe version.
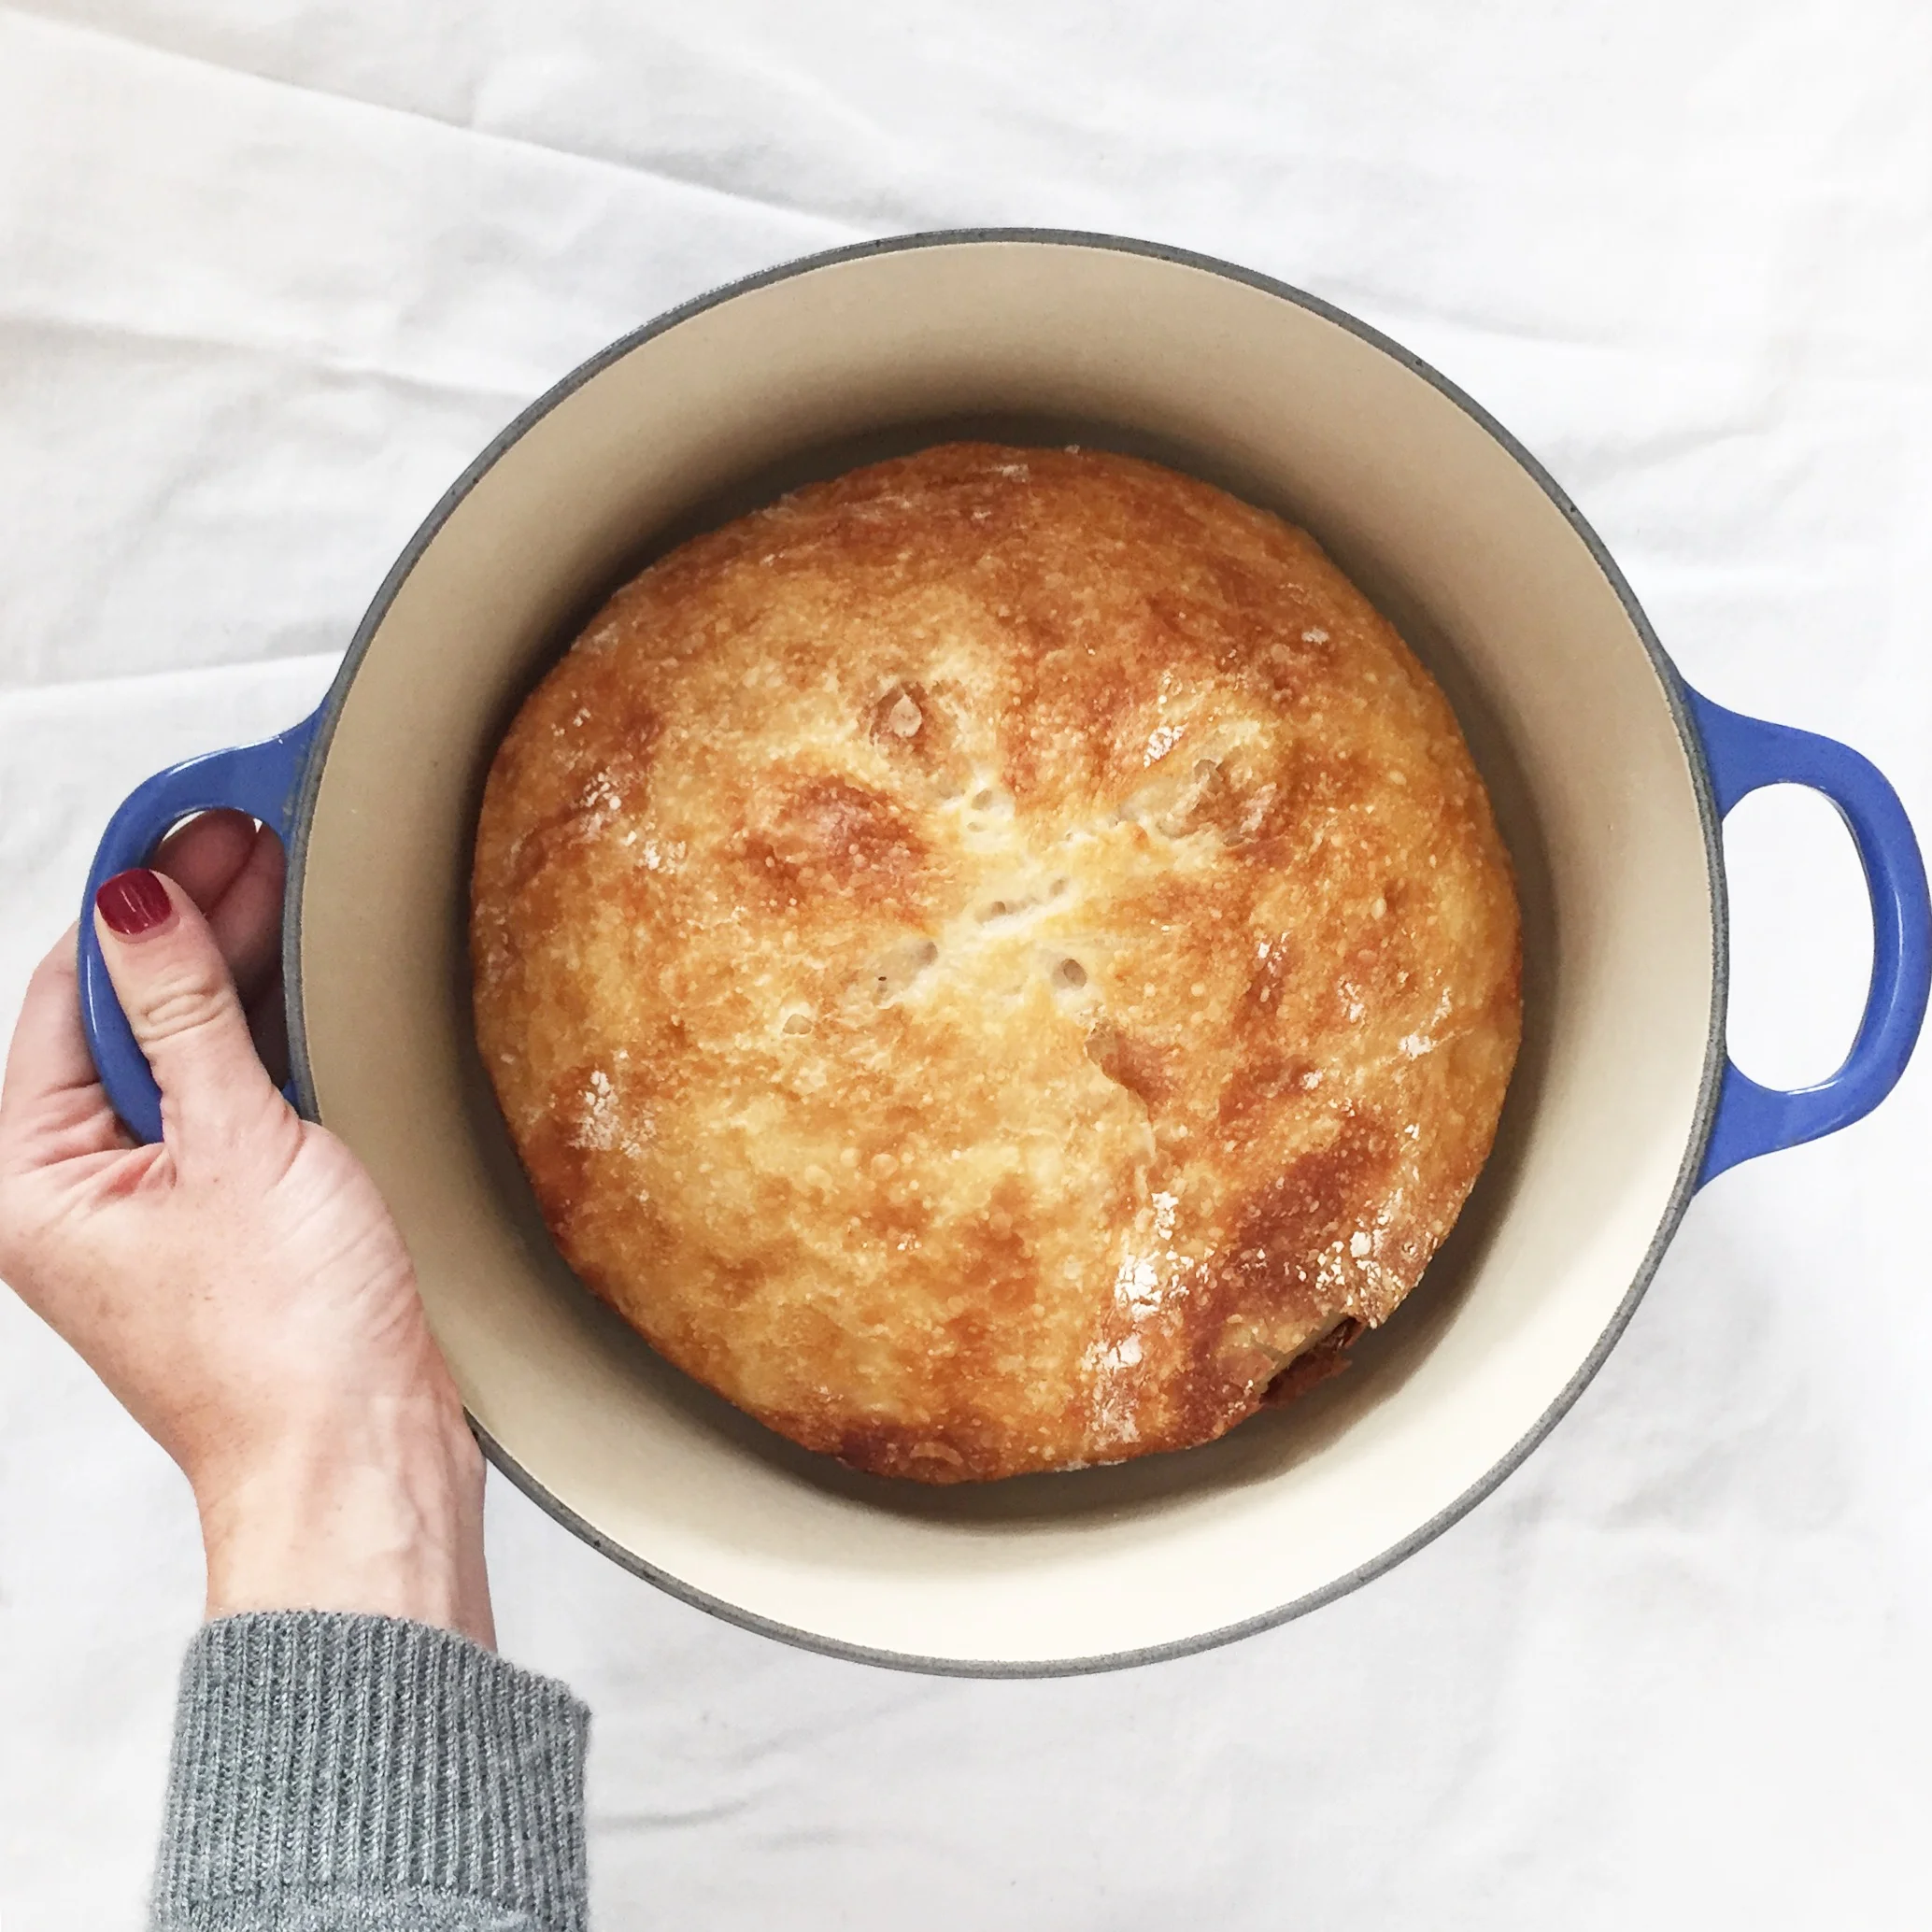
Last night I made a batch of dough (a 5 minute process that involves mixing 4 ingredients with a spoon, no kneading!), I let it rise overnight, and today I baked it. All I can say is, you won't be disappointed if you make this bread. It is absolutely delicious. It has a perfect crusty shell with a soft light centre that melts in your mouth. Plus your house will smell like a french bakery. Mmm...
I baked the bread it in our Le Creuset Enamel Cast Iron French Oven. I was concerned about the handle of the lid and couldn't find solid advice on whether it could withstand the 475 degree temp, so I decided to play it safe and used tin foil to cover the pot instead. It worked brilliantly. Hope your family enjoys this bread as much as ours did.
Happy Baking!
- Care
*In case you need something to go with your bread...Here's a delicious Roasted Squash Soup recipe from a few years ago that is still a favourite in our house. Enjoy!
DIY Baby Bum Balm Recipe
If you've ever battled a bad diaper rash with you little one, you know how difficult it can be to clear them up. After having a few with our kids over the years, and not loving any of the creams I bought, I decided to start making my own. This DIY bum balm makes a great thick barrier for sore bottoms and will help clear up even the worst diaper rash.
If you've ever battled a bad diaper rash with you little one, you know how difficult it can be to clear them up. After having a few with our kids over the years, and not loving any of the creams I bought, I decided to start making my own. This DIY bum balm makes a great thick barrier for sore bottoms and will help clear up even the worst diaper rash. It was adapted from a recipe handed down to me from my aunt, who makes it for her grandkids, and has healed more sore bottoms and cracked hands than I can count. I whipped some up over the weekend to help with Lucy's sore bum and within 12 hours it had worked its magic. It's that good!
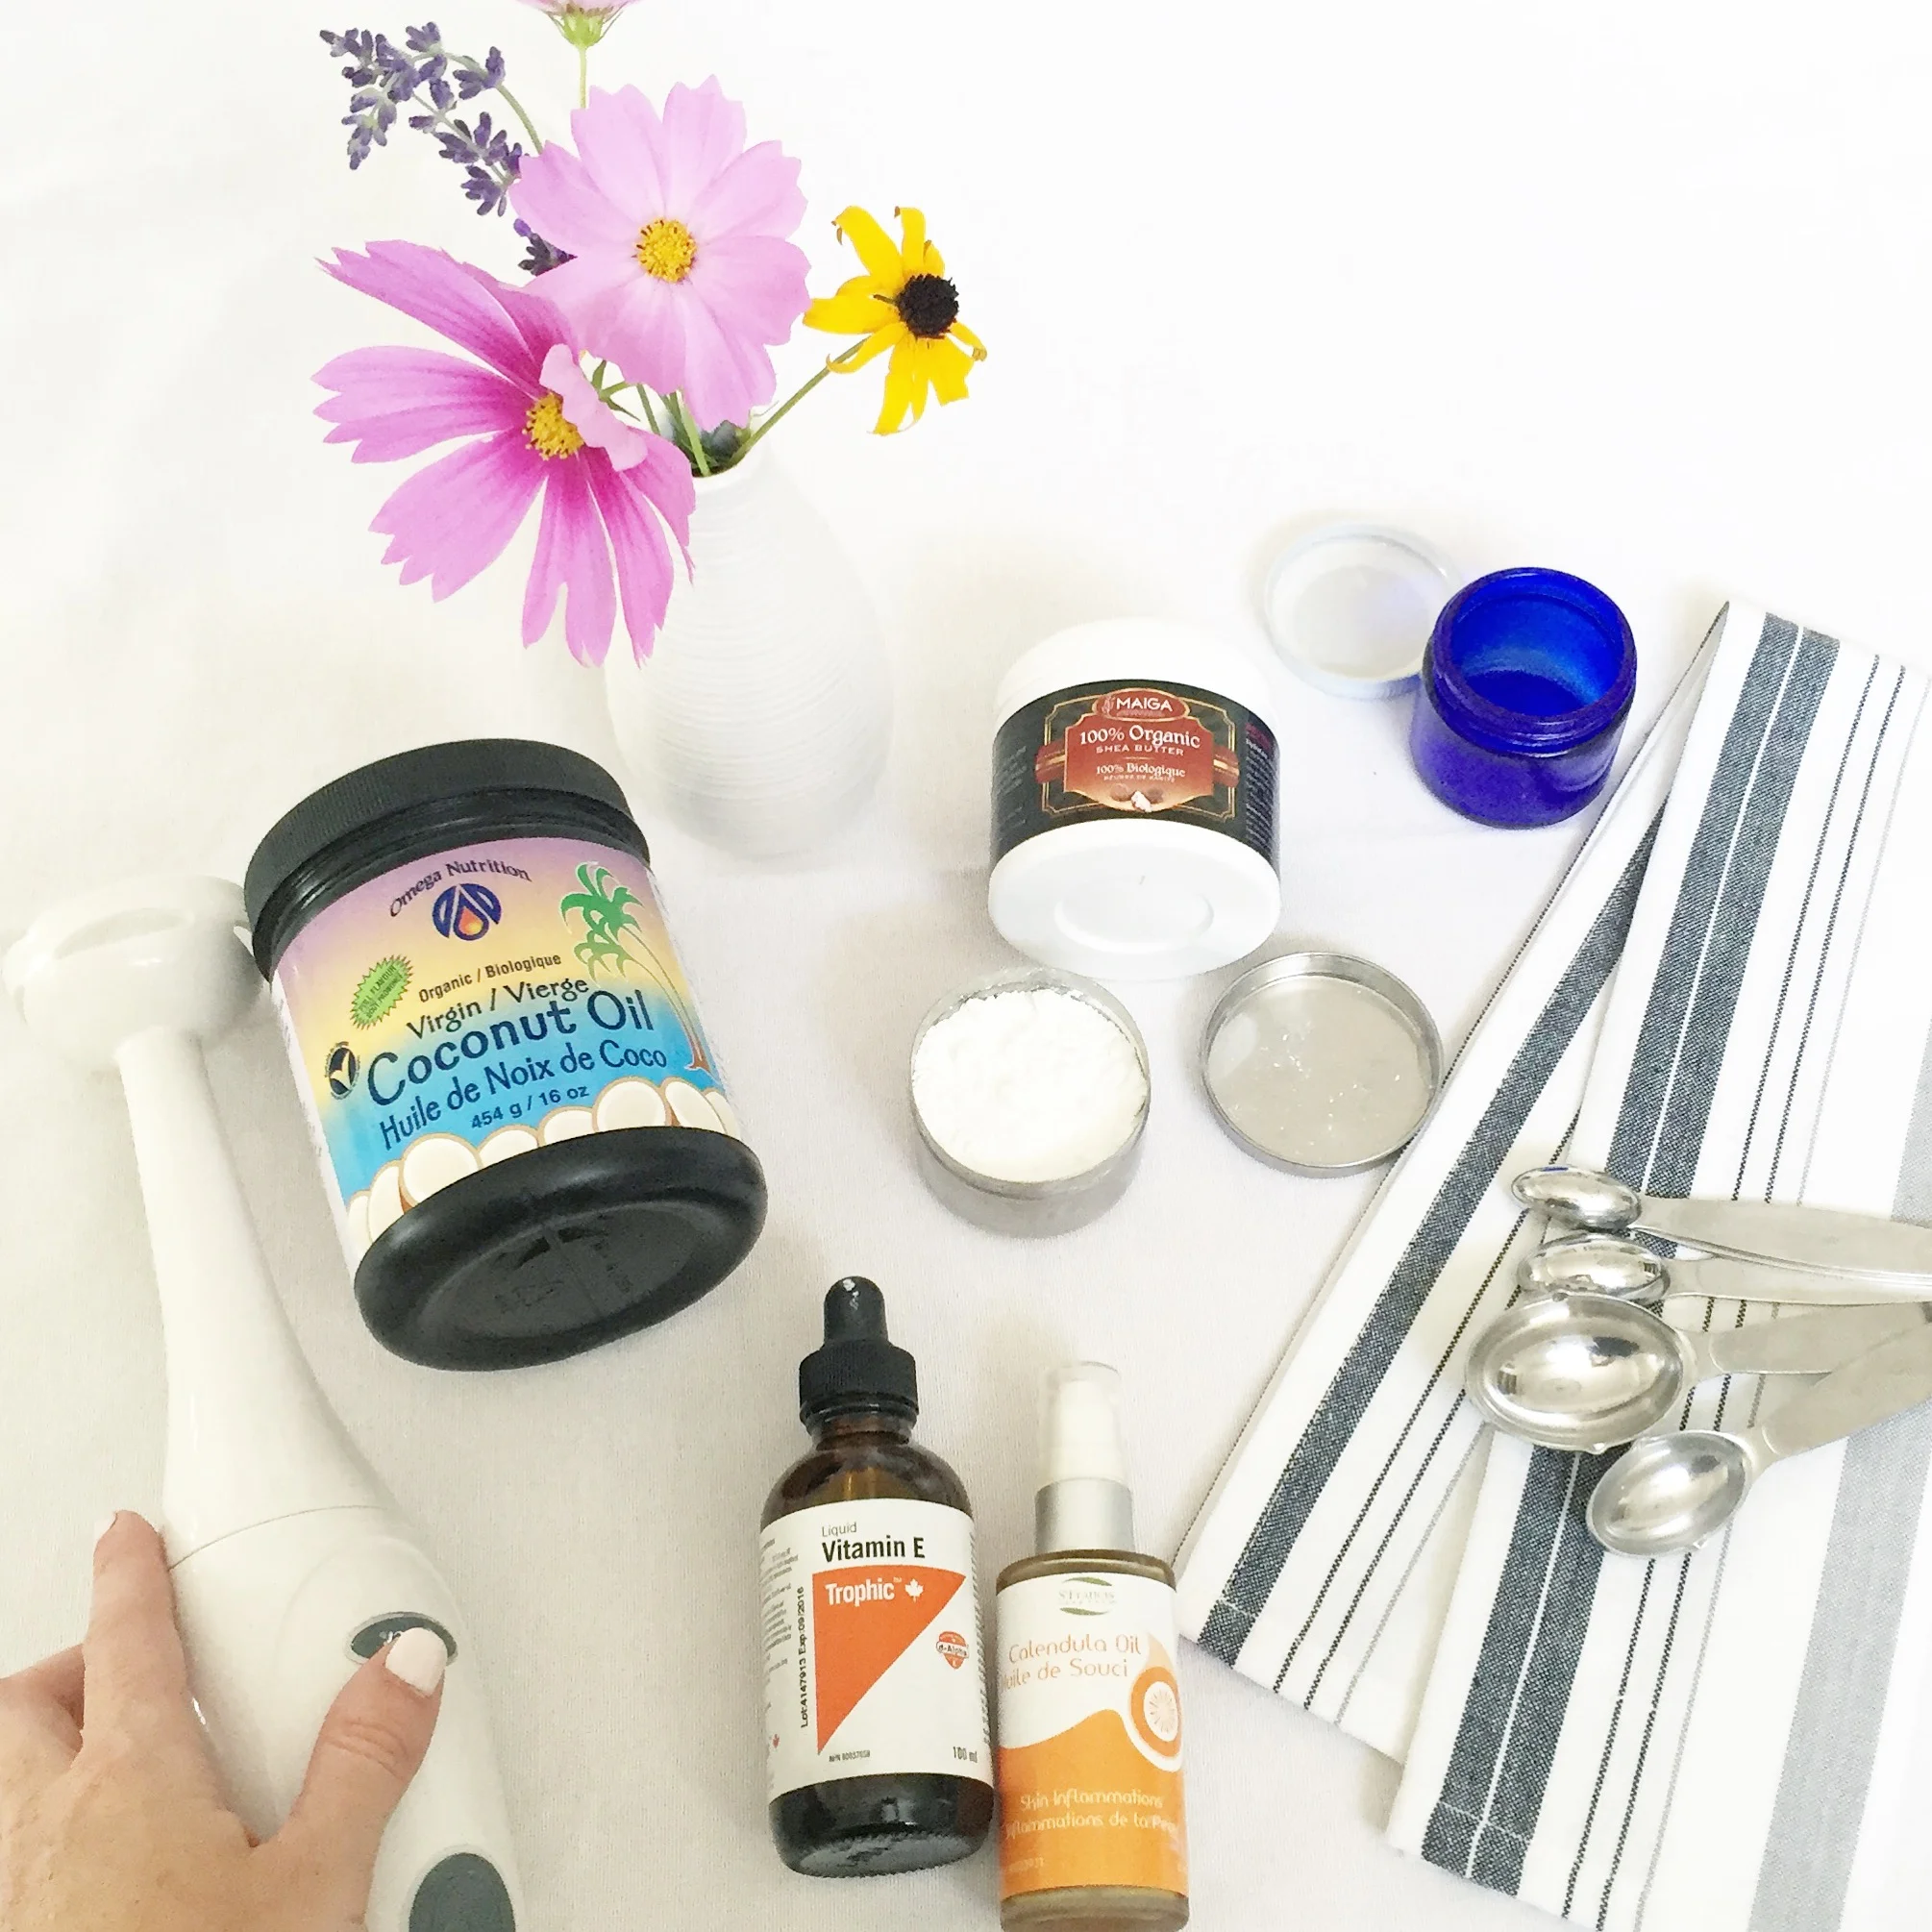
This recipe is made up of a few simple ingredients and only takes minutes to make. I buy all my bulk ingredients at Anarres Natural Health right here in Toronto, but most can be found at your local health food store. The only issue making it, is that your handheld blender will be a mess after. Make sure to wipe off as much cream with a paper towel before attempting to wash it with soap and water.
Ingredients:

- 3 Tbsp Shea Butter
- 2 tsp Zinc Oxide Powder *Please be cautious adding your Zinc Oxide powder, as it is dangerous if inhaled. Putting wet ingredients on top of the powder before mixing helps to decrease the risk.
- 1 Tbsp Coconut oil
- 1/2 tsp Calendula Oil
- 1/2 tsp Liquid Vitamin E
*Makes 1 small mason jar of cream
Directions:
Add all ingredients to a small bowl and mix well with immersion blender. You can add more Coconut Oil if you would like to make it slightly runnier, or more Shea Butter if you would like it thicker. Scrape out bowl with spatula and store in a small mason jar or any other small jar with a tight fitting lid.
Apply to Baby’s diaper area when red or irritated, or use regularly as a preventative cream. Please always remember to use a diaper liner for cloth diapers when using any diaper cream with Zinc Oxide.
Hope this helps your family as much as it has helped ours.
- Care