

Grandma's Homemade Cinnamon Bread & Chelsea Recipe
Every year on Christmas Eve my mom would spend the day baking the most delicious cinnamon bread, buns, and chelsea to enjoy on Christmas day. It was always such a wonderful treat and a tradition I looked forward to every year, and I am so happy I get to continue it with my kiddos.
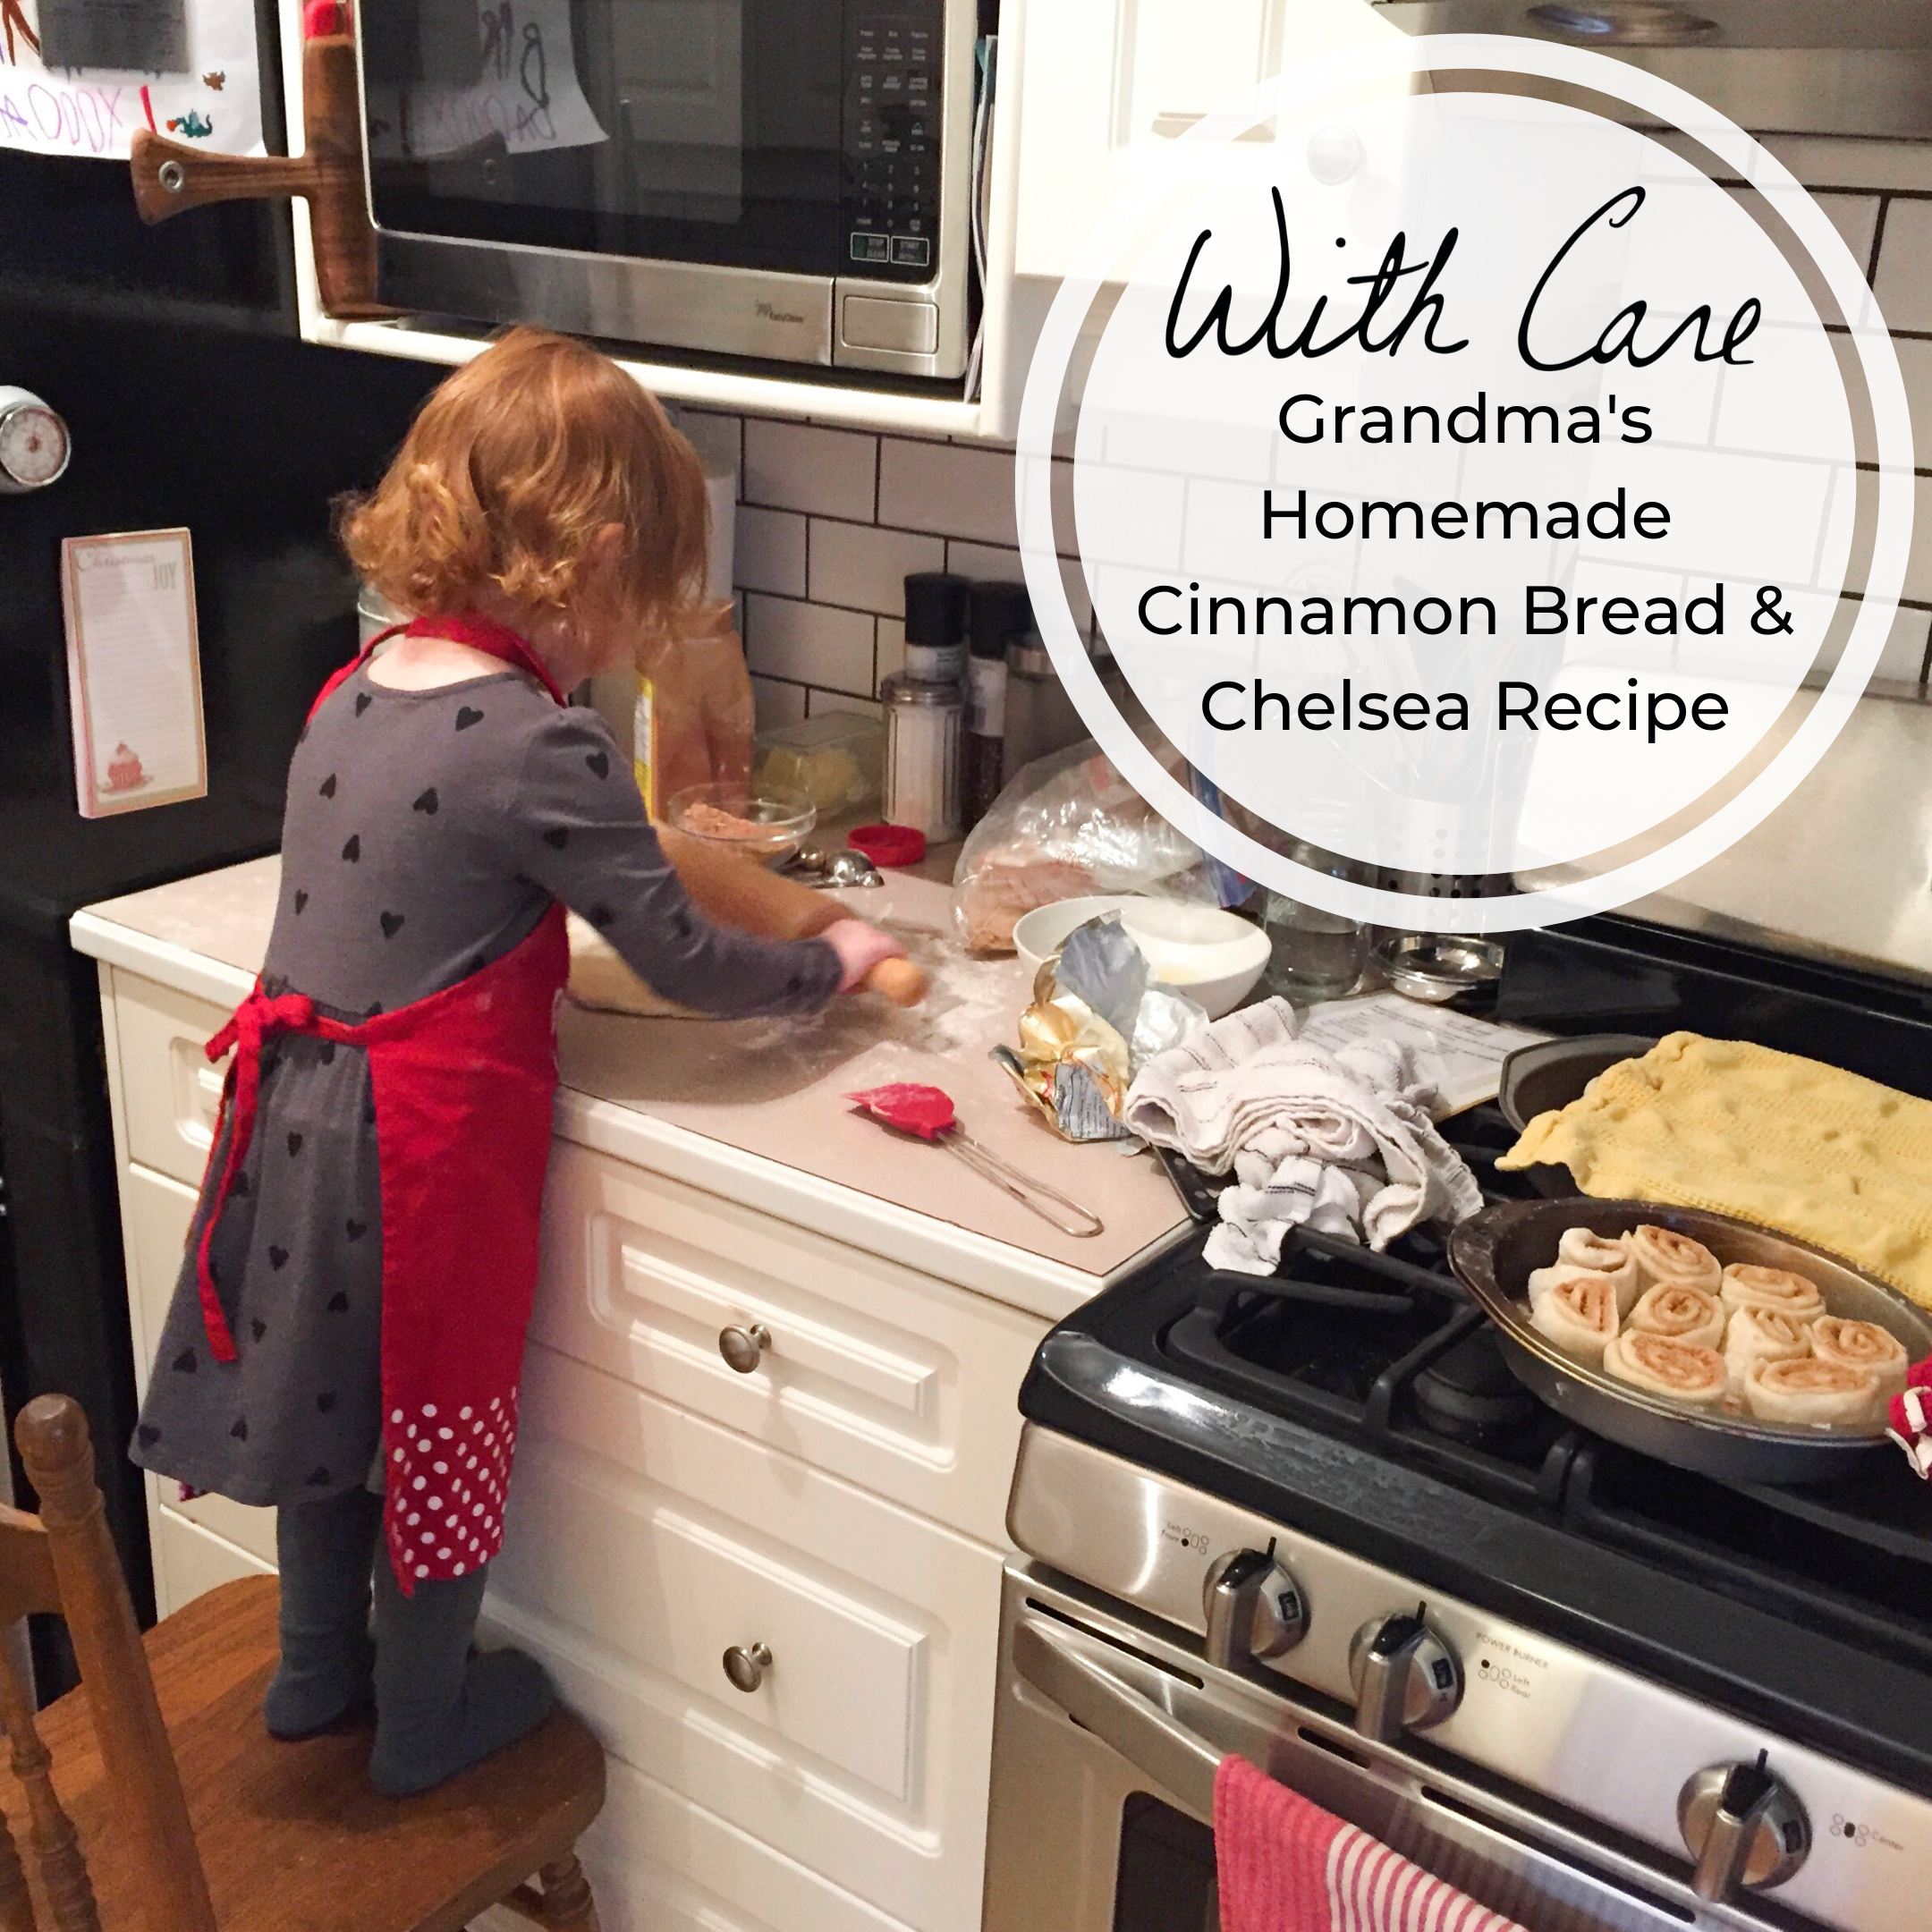
Every year on Christmas Eve my mom would spend the day baking the most delicious cinnamon bread, buns, and Chelsea to enjoy on Christmas day. A recipe passed down from her mother. It was always such a wonderful treat, and a tradition I’m so happy I get to continue it with my kiddos.
The recipe is a basic sweet dough and can be made into regular buns, cinnamon bread, or chelsea buns (aka cinnamon buns). It isn’t difficult to make, but the steps take 5 hours in total because of multiple risings. You won’t be working that whole time, but it’s usually best to start early in the day and work your schedule around the different steps. You might be thinking, what the heck? Just buy some freaking bread and call it a day! … and to you I say “Go for it!” If this isn’t your thing and you want something a little quicker check out my 6 Simple Last Minute DIY Holiday Gifts. There is some serious deliciousness in there, and all it takes is melting and blending. If you’re looking for something with a little more time commitment give this family recipe a try and let me know what you think.


For all the parents out there wondering how I bake with 4 kiddos, let me start by saying that I choose very specific baking tasks for each kid to assist with (at their particular level eg. Penny at 3.5 years old spreads sugar, but Ben at 8 year old helps measure stuff and make the dough) and Daddy is there to keep the other's occupied. Also, it’s not all cupcakes and sprinkles, but it’s pretty amazing to watch their excitement when they eat something they helped make.
I hope you enjoy whatever sweet traditions you do with your loved ones this holiday season.
- Care

Family Friendly Homemade Meatballs - Perfect Iron Rich Recipe for Starting Solids
Meatballs are a great option for a healthy family dinner and a perfect way to start incorporating iron rich meats into your baby's diet. They can be paired with a whole grain pasta, tomato sauce and veggies, or some roasted or steamed veggies for a quick dinner. I usually make a double batch with fresh ground beef, and freeze a bunch for future evenings when we need a fast healthy meal.
Meatballs are a great option for a healthy family dinner and a perfect way to start incorporating iron rich meats into your baby's diet. They can be paired with a whole grain pasta, tomato sauce and veggies, or some roasted or steamed veggies for a quick dinner. I usually make a double batch with fresh ground beef, and freeze a bunch for future evenings when we need a fast healthy meal.
Meatballs are great because they can be made out of a variety of types of ground meats, plus you can add finely chopped herbs and greens without most kids being bothered by them. The one thing my kids always complained about was the diced onion, so I recently started grating the onion and it has worked wonders. They never know it's in there, but the meatballs still get the onion flavour and moisture. #momwin

Family Friendly Meatball Recipe
Prep Time: 10 mins Cooktime: 17-20 mins Makes about 20 meatballs
INGREDIENTS:
1 lb lean ground beef (or alternative ground meat)
1 whole egg (or flax egg)
1/2 cup whole grain bread crumbs soaked in 3 tbs milk (I make them with the end of a loaf of bread in the vitamix)
1-2 garlic cloves mashed (depending on preference)
1/4 cup onion grated (small onion or ~1/3 large red onion)
2 Tbsp finely chopped fresh oregano
2 Tbsp finely chopped fresh parsley
2 Tbsp finely chopped fresh basil
handful of spinach finely chopped *optional
salt & pepper to taste
2 drops of tabasco sauce *optional
INSTRUCTIONS:
Preheat Oven to 400°F
Place all ingredients in a large mixing bowl and mix by hand until combined. Do not overwork meat.
Scoop out 1 generous Tbsp at a time and roll into meatballs (you can always change the shape or size of these meatballs to suit your needs, just remember to adjust the baking time accordingly)
*If your ground beef is fresh you can freeze raw meatballs for future use
Bake meatballs on a rack over a baking pan for 17-20 mins. Turn once while baking.
Remove from oven and serve immediately, or allow to cool and refrigerate or freeze
I absolutely love paring these iron rich meatballs with homemade vitamin C rich tomato sauce. I'll be sure to share my favourite sauce recipe soon.
Don't hesitate to ask any questions below. Hope your family enjoys these as much as ours does.
Care
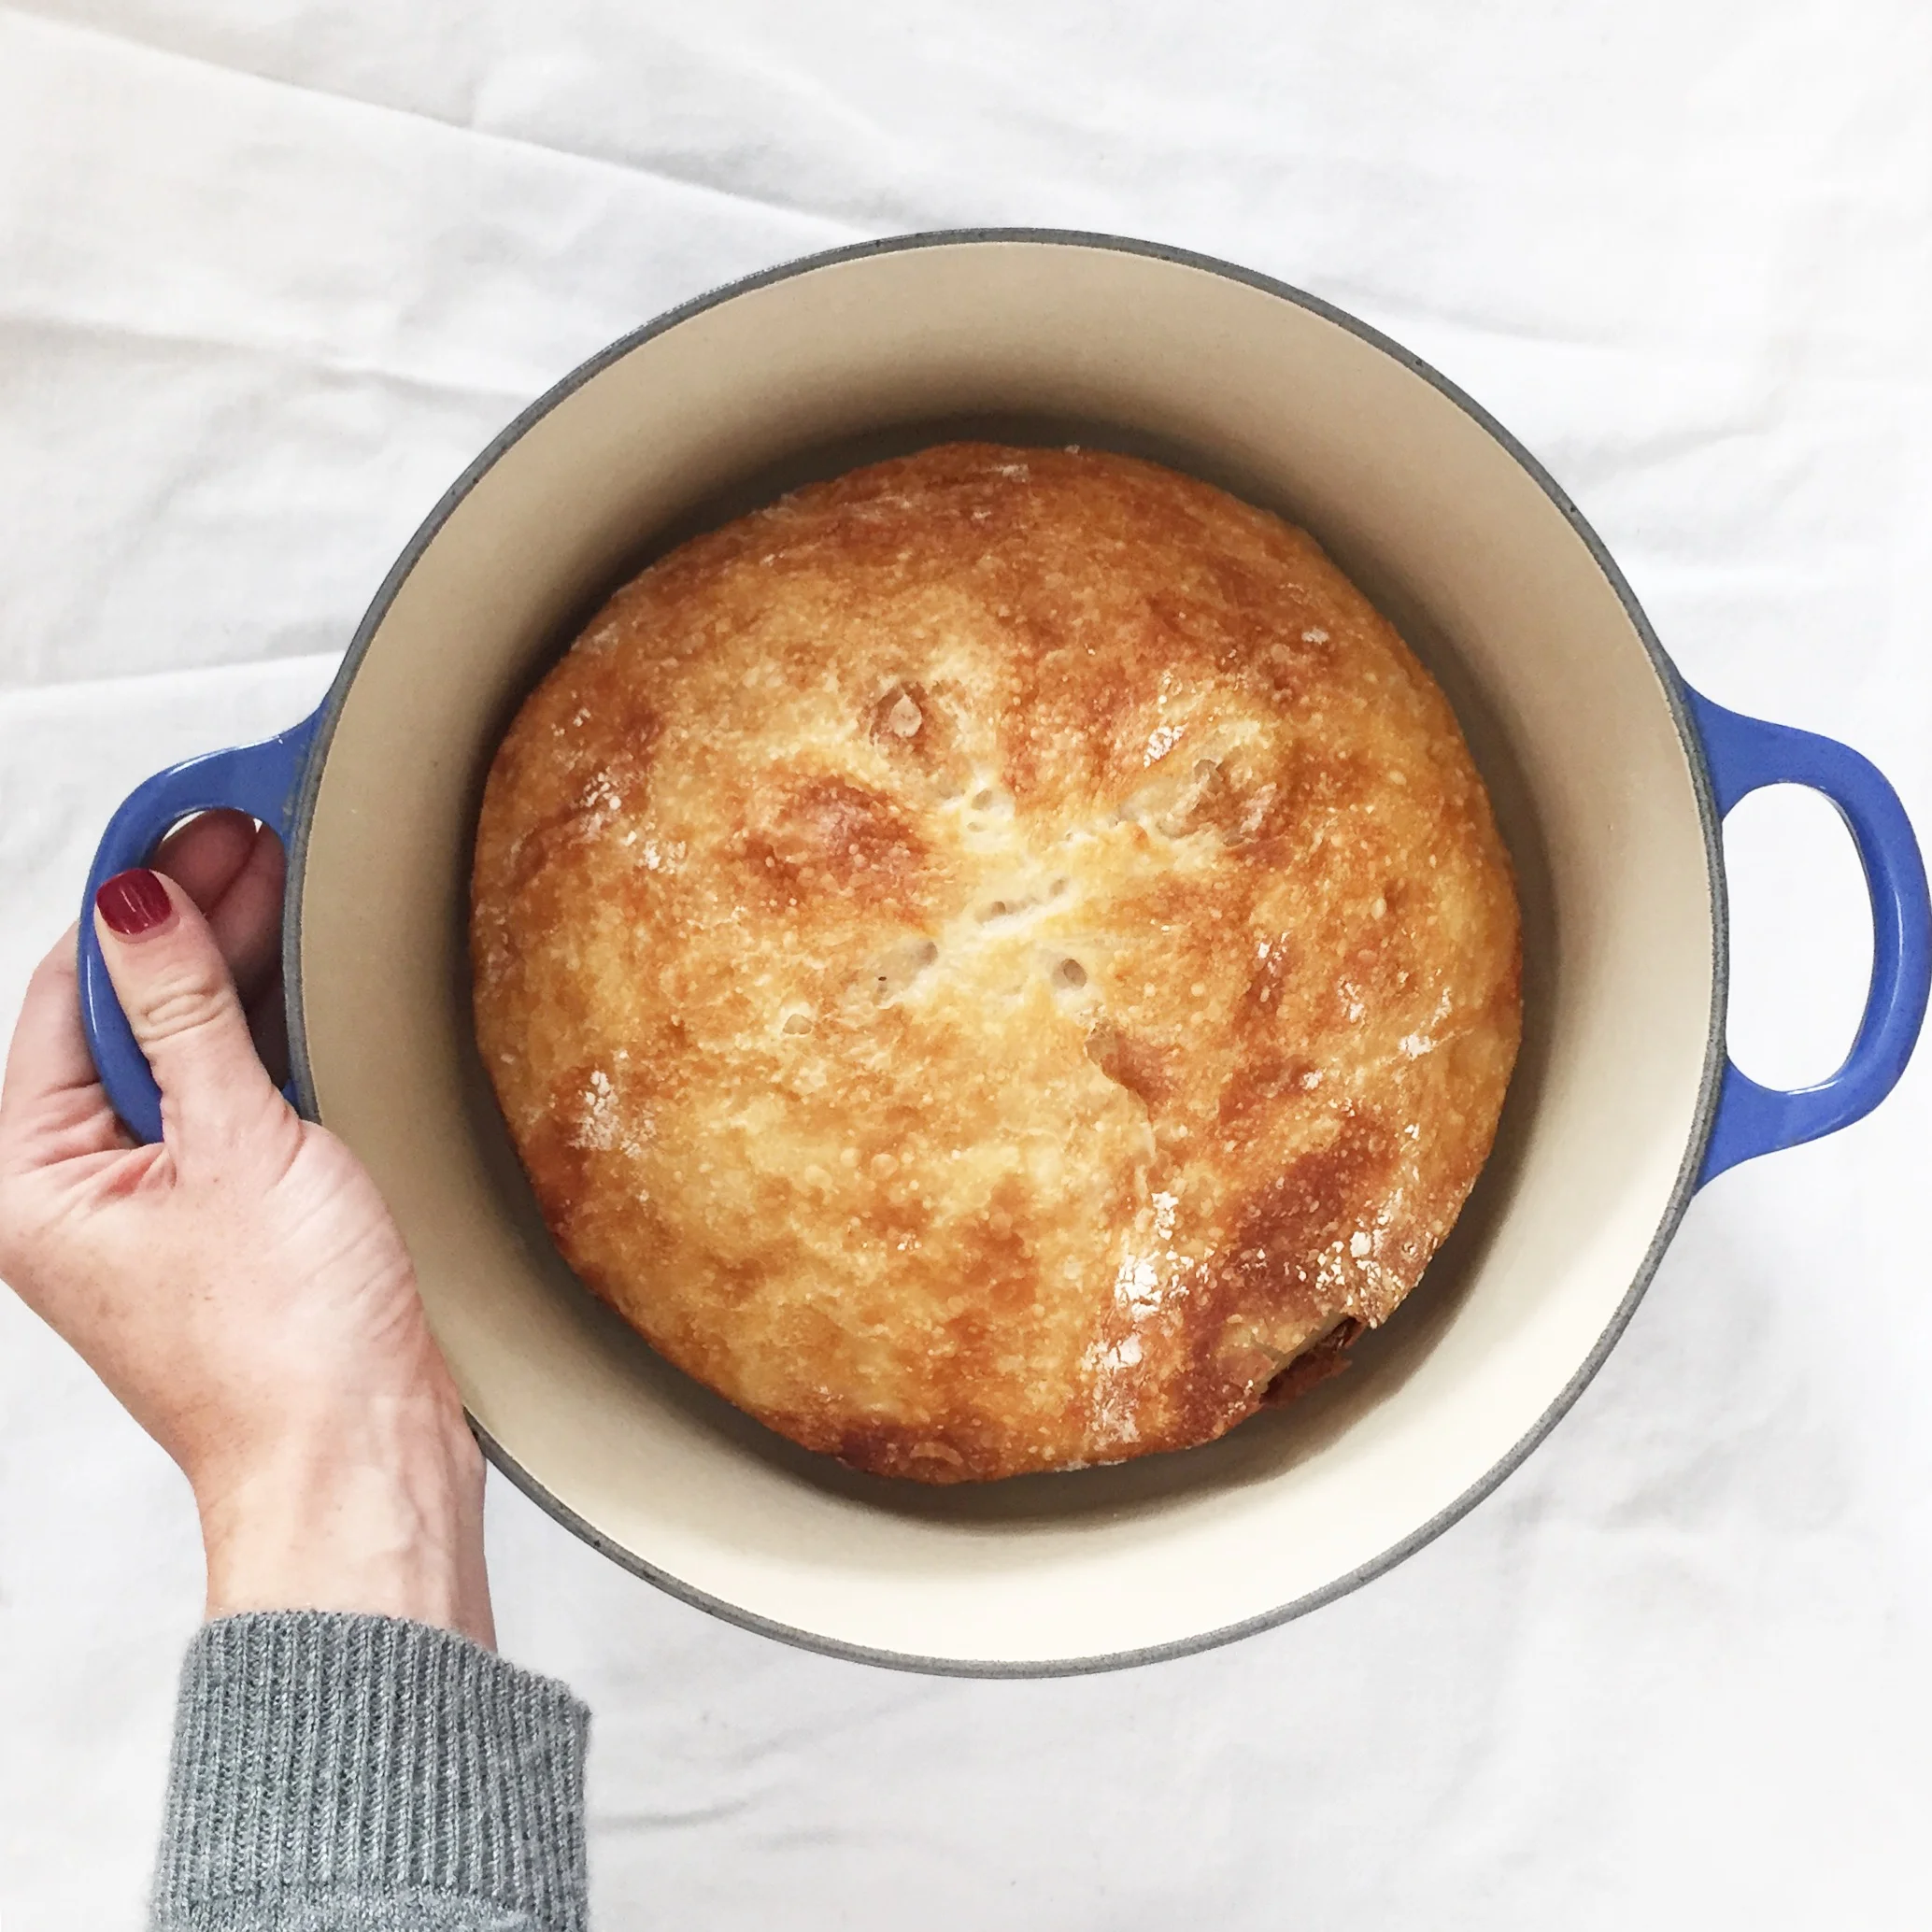
Simple No Knead Artisan Bread
I often yearn for fresh baked bread as the fall weather settles in and we start making more soups, stews and warm hearty meals. My mom introduced me to Artisan bread baking years ago when I was in university, but at the time I didn't truly appreciate how amazing and easy the method was.

I often yearn for fresh baked bread as the fall weather settles in and we start making more soups, stews and warm hearty meals. My mom introduced me to Artisan bread baking years ago when I was in university, but at the time I didn't truly appreciate how amazing and easy the method was. Last week a fellow babywearing Instagram mom of 3 @ellerowley (owner of Sollybaby Wraps) shared her favourite simple artisan bread recipe and it peaked my interest. I had to try it. **Please note: the original recipe used is no longer available. Here is a similar 4 ingredient no-knead artisan bread recipe version.
Last night I made a batch of dough (a 5 minute process that involves mixing 4 ingredients with a spoon, no kneading!), I let it rise overnight, and today I baked it. All I can say is, you won't be disappointed if you make this bread. It is absolutely delicious. It has a perfect crusty shell with a soft light centre that melts in your mouth. Plus your house will smell like a french bakery. Mmm...
I baked the bread it in our Le Creuset Enamel Cast Iron French Oven. I was concerned about the handle of the lid and couldn't find solid advice on whether it could withstand the 475 degree temp, so I decided to play it safe and used tin foil to cover the pot instead. It worked brilliantly. Hope your family enjoys this bread as much as ours did.
Happy Baking!
- Care
*In case you need something to go with your bread...Here's a delicious Roasted Squash Soup recipe from a few years ago that is still a favourite in our house. Enjoy!
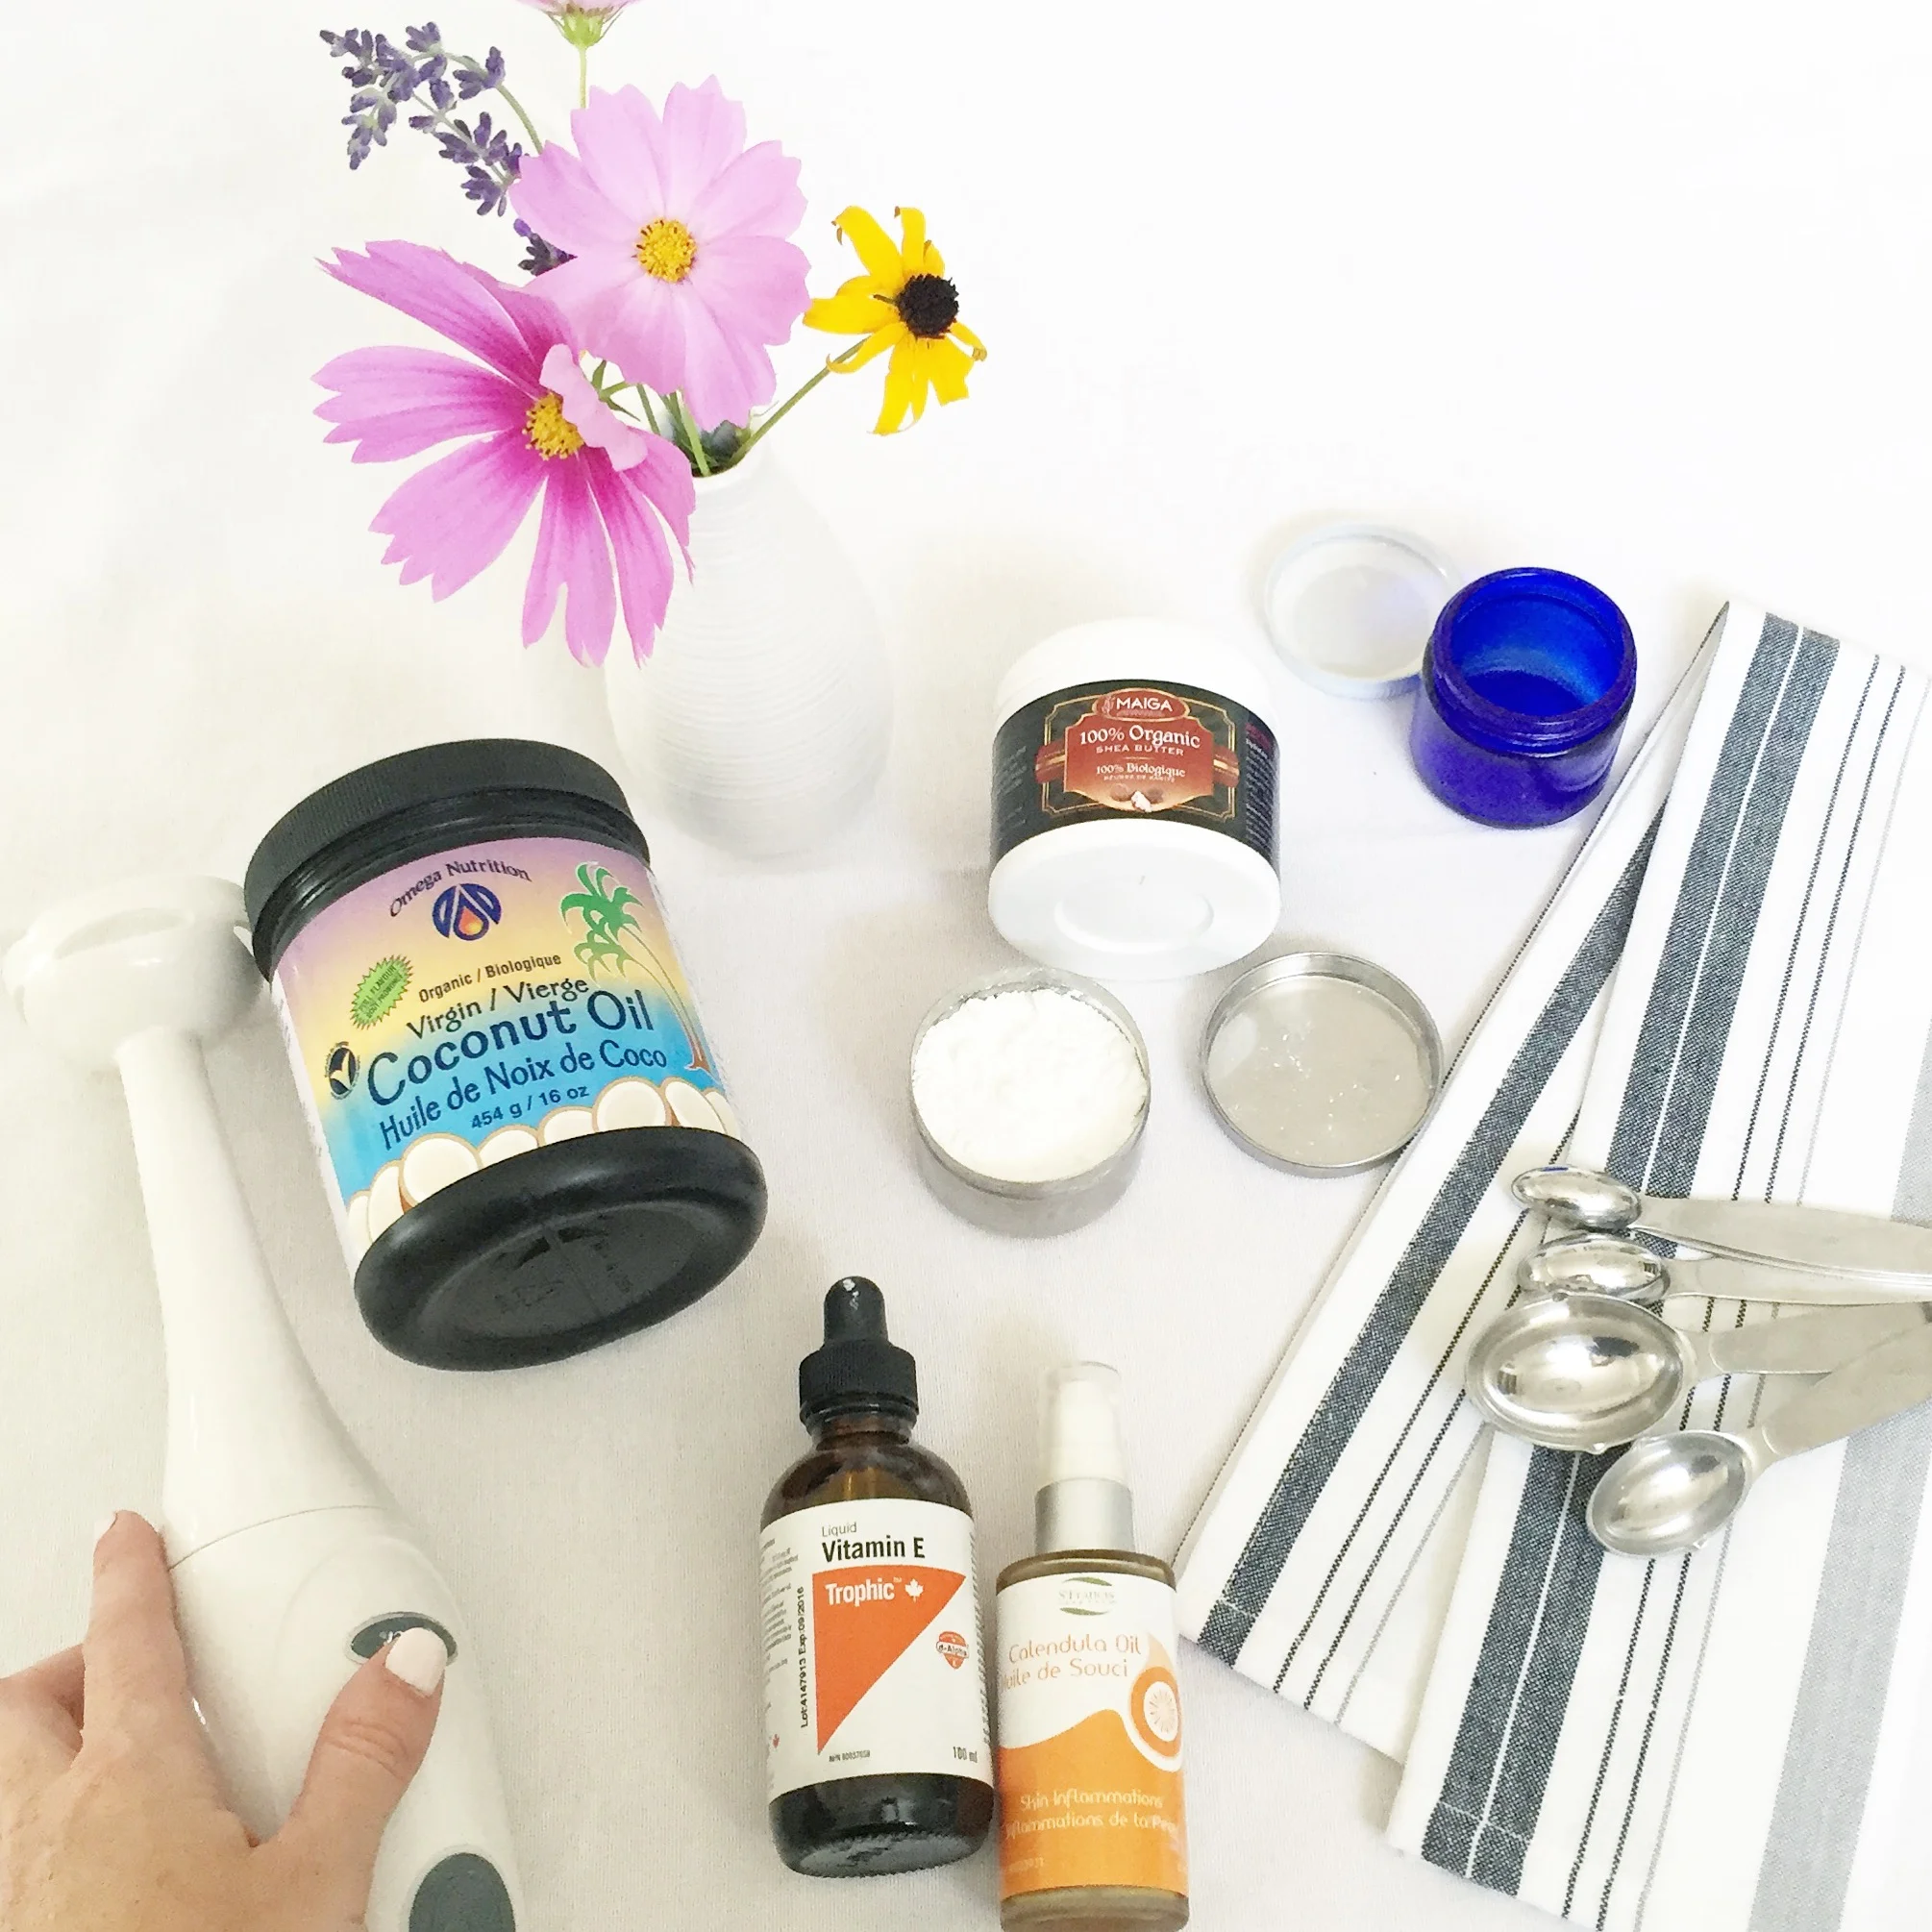
DIY Baby Bum Balm Recipe
If you've ever battled a bad diaper rash with you little one, you know how difficult it can be to clear them up. After having a few with our kids over the years, and not loving any of the creams I bought, I decided to start making my own. This DIY bum balm makes a great thick barrier for sore bottoms and will help clear up even the worst diaper rash.
If you've ever battled a bad diaper rash with you little one, you know how difficult it can be to clear them up. After having a few with our kids over the years, and not loving any of the creams I bought, I decided to start making my own. This DIY bum balm makes a great thick barrier for sore bottoms and will help clear up even the worst diaper rash. It was adapted from a recipe handed down to me from my aunt, who makes it for her grandkids, and has healed more sore bottoms and cracked hands than I can count. I whipped some up over the weekend to help with Lucy's sore bum and within 12 hours it had worked its magic. It's that good!
This recipe is made up of a few simple ingredients and only takes minutes to make. I buy all my bulk ingredients at Anarres Natural Health right here in Toronto, but most can be found at your local health food store. The only issue making it, is that your handheld blender will be a mess after. Make sure to wipe off as much cream with a paper towel before attempting to wash it with soap and water.
Ingredients:

- 3 Tbsp Shea Butter
- 2 tsp Zinc Oxide Powder *Please be cautious adding your Zinc Oxide powder, as it is dangerous if inhaled. Putting wet ingredients on top of the powder before mixing helps to decrease the risk.
- 1 Tbsp Coconut oil
- 1/2 tsp Calendula Oil
- 1/2 tsp Liquid Vitamin E
*Makes 1 small mason jar of cream
Directions:
Add all ingredients to a small bowl and mix well with immersion blender. You can add more Coconut Oil if you would like to make it slightly runnier, or more Shea Butter if you would like it thicker. Scrape out bowl with spatula and store in a small mason jar or any other small jar with a tight fitting lid.
Apply to Baby’s diaper area when red or irritated, or use regularly as a preventative cream. Please always remember to use a diaper liner for cloth diapers when using any diaper cream with Zinc Oxide.
Hope this helps your family as much as it has helped ours.
- Care

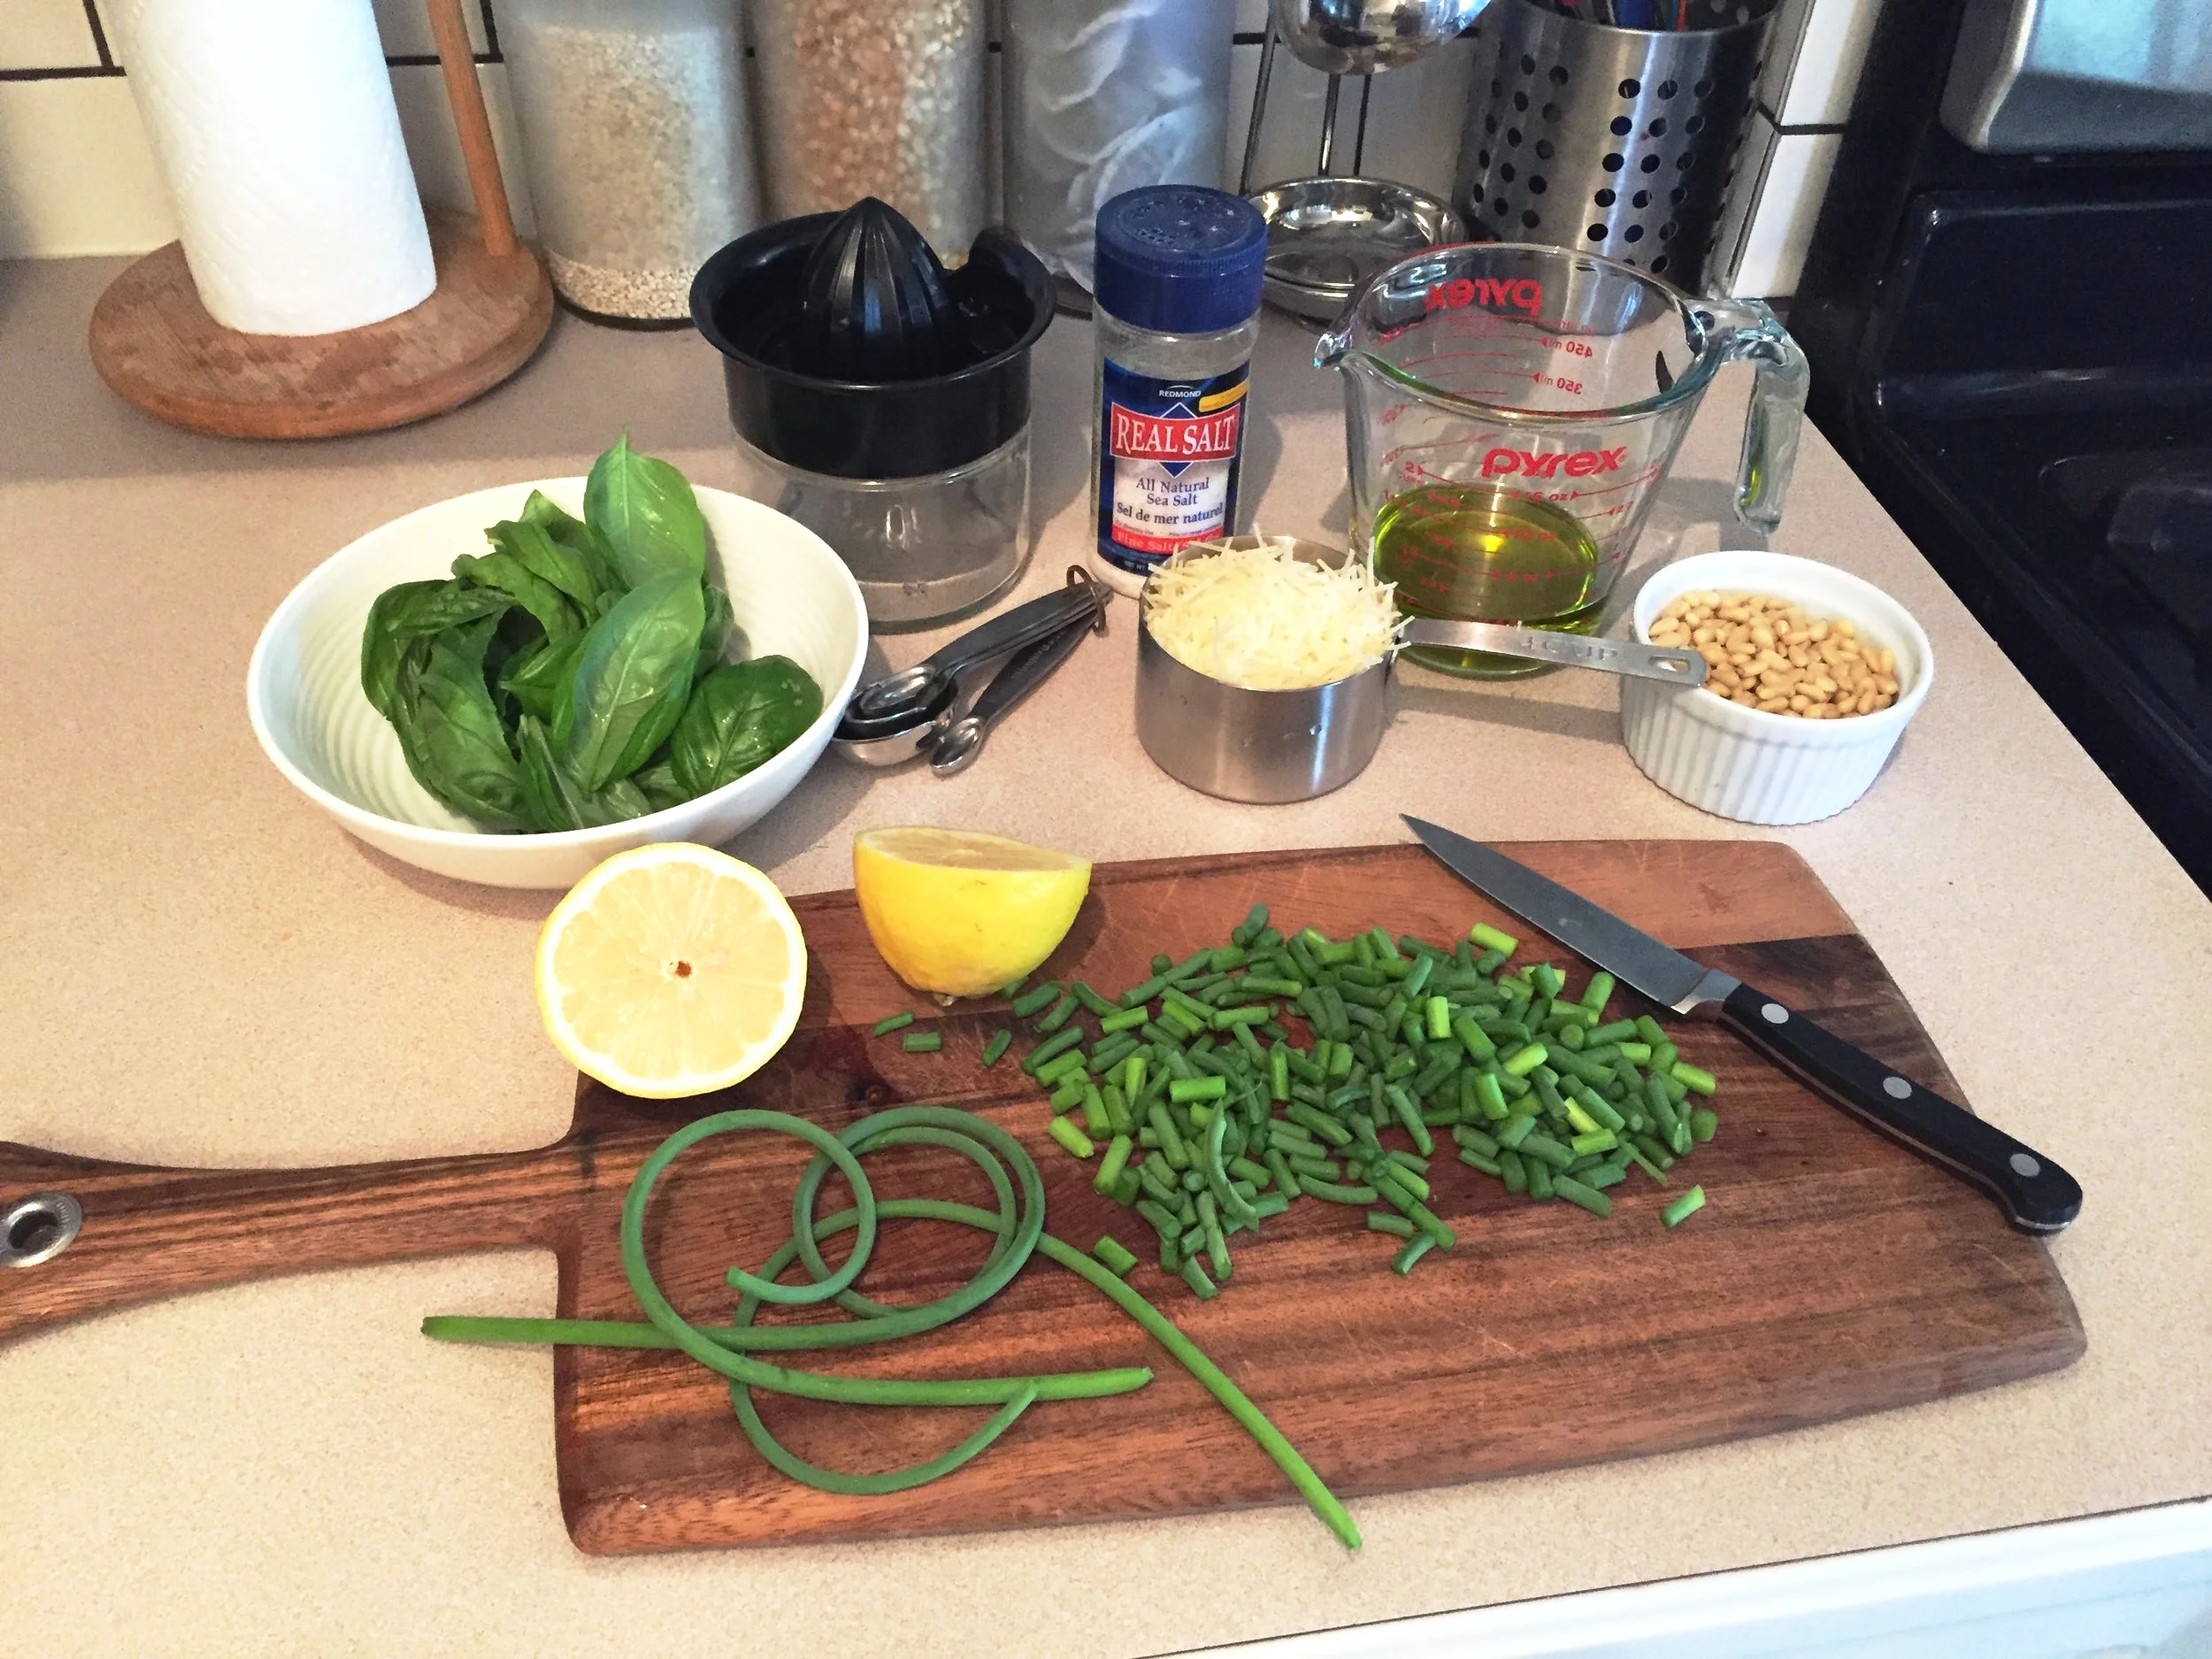
Garlic Scape Basil Pesto
It's Garlic Scape season, so I thought I would share a yummy scape recipe with all of you. It's our first year with homegrown scapes, so after harvesting them, I busily researched all of the great things you can make with these delicious garlic greens. I decided to make pesto, so that the scapes could be preserved and savoured later in the year when they're long gone.
It's Garlic Scape season, so I thought I would share a yummy scape recipe with all of you. It's our first year with homegrown scapes, so after harvesting them, I busily researched all of the great things you can make with these delicious garlic greens. I decided to make pesto, so that the scapes could be preserved and savoured later in the year when they're long gone.
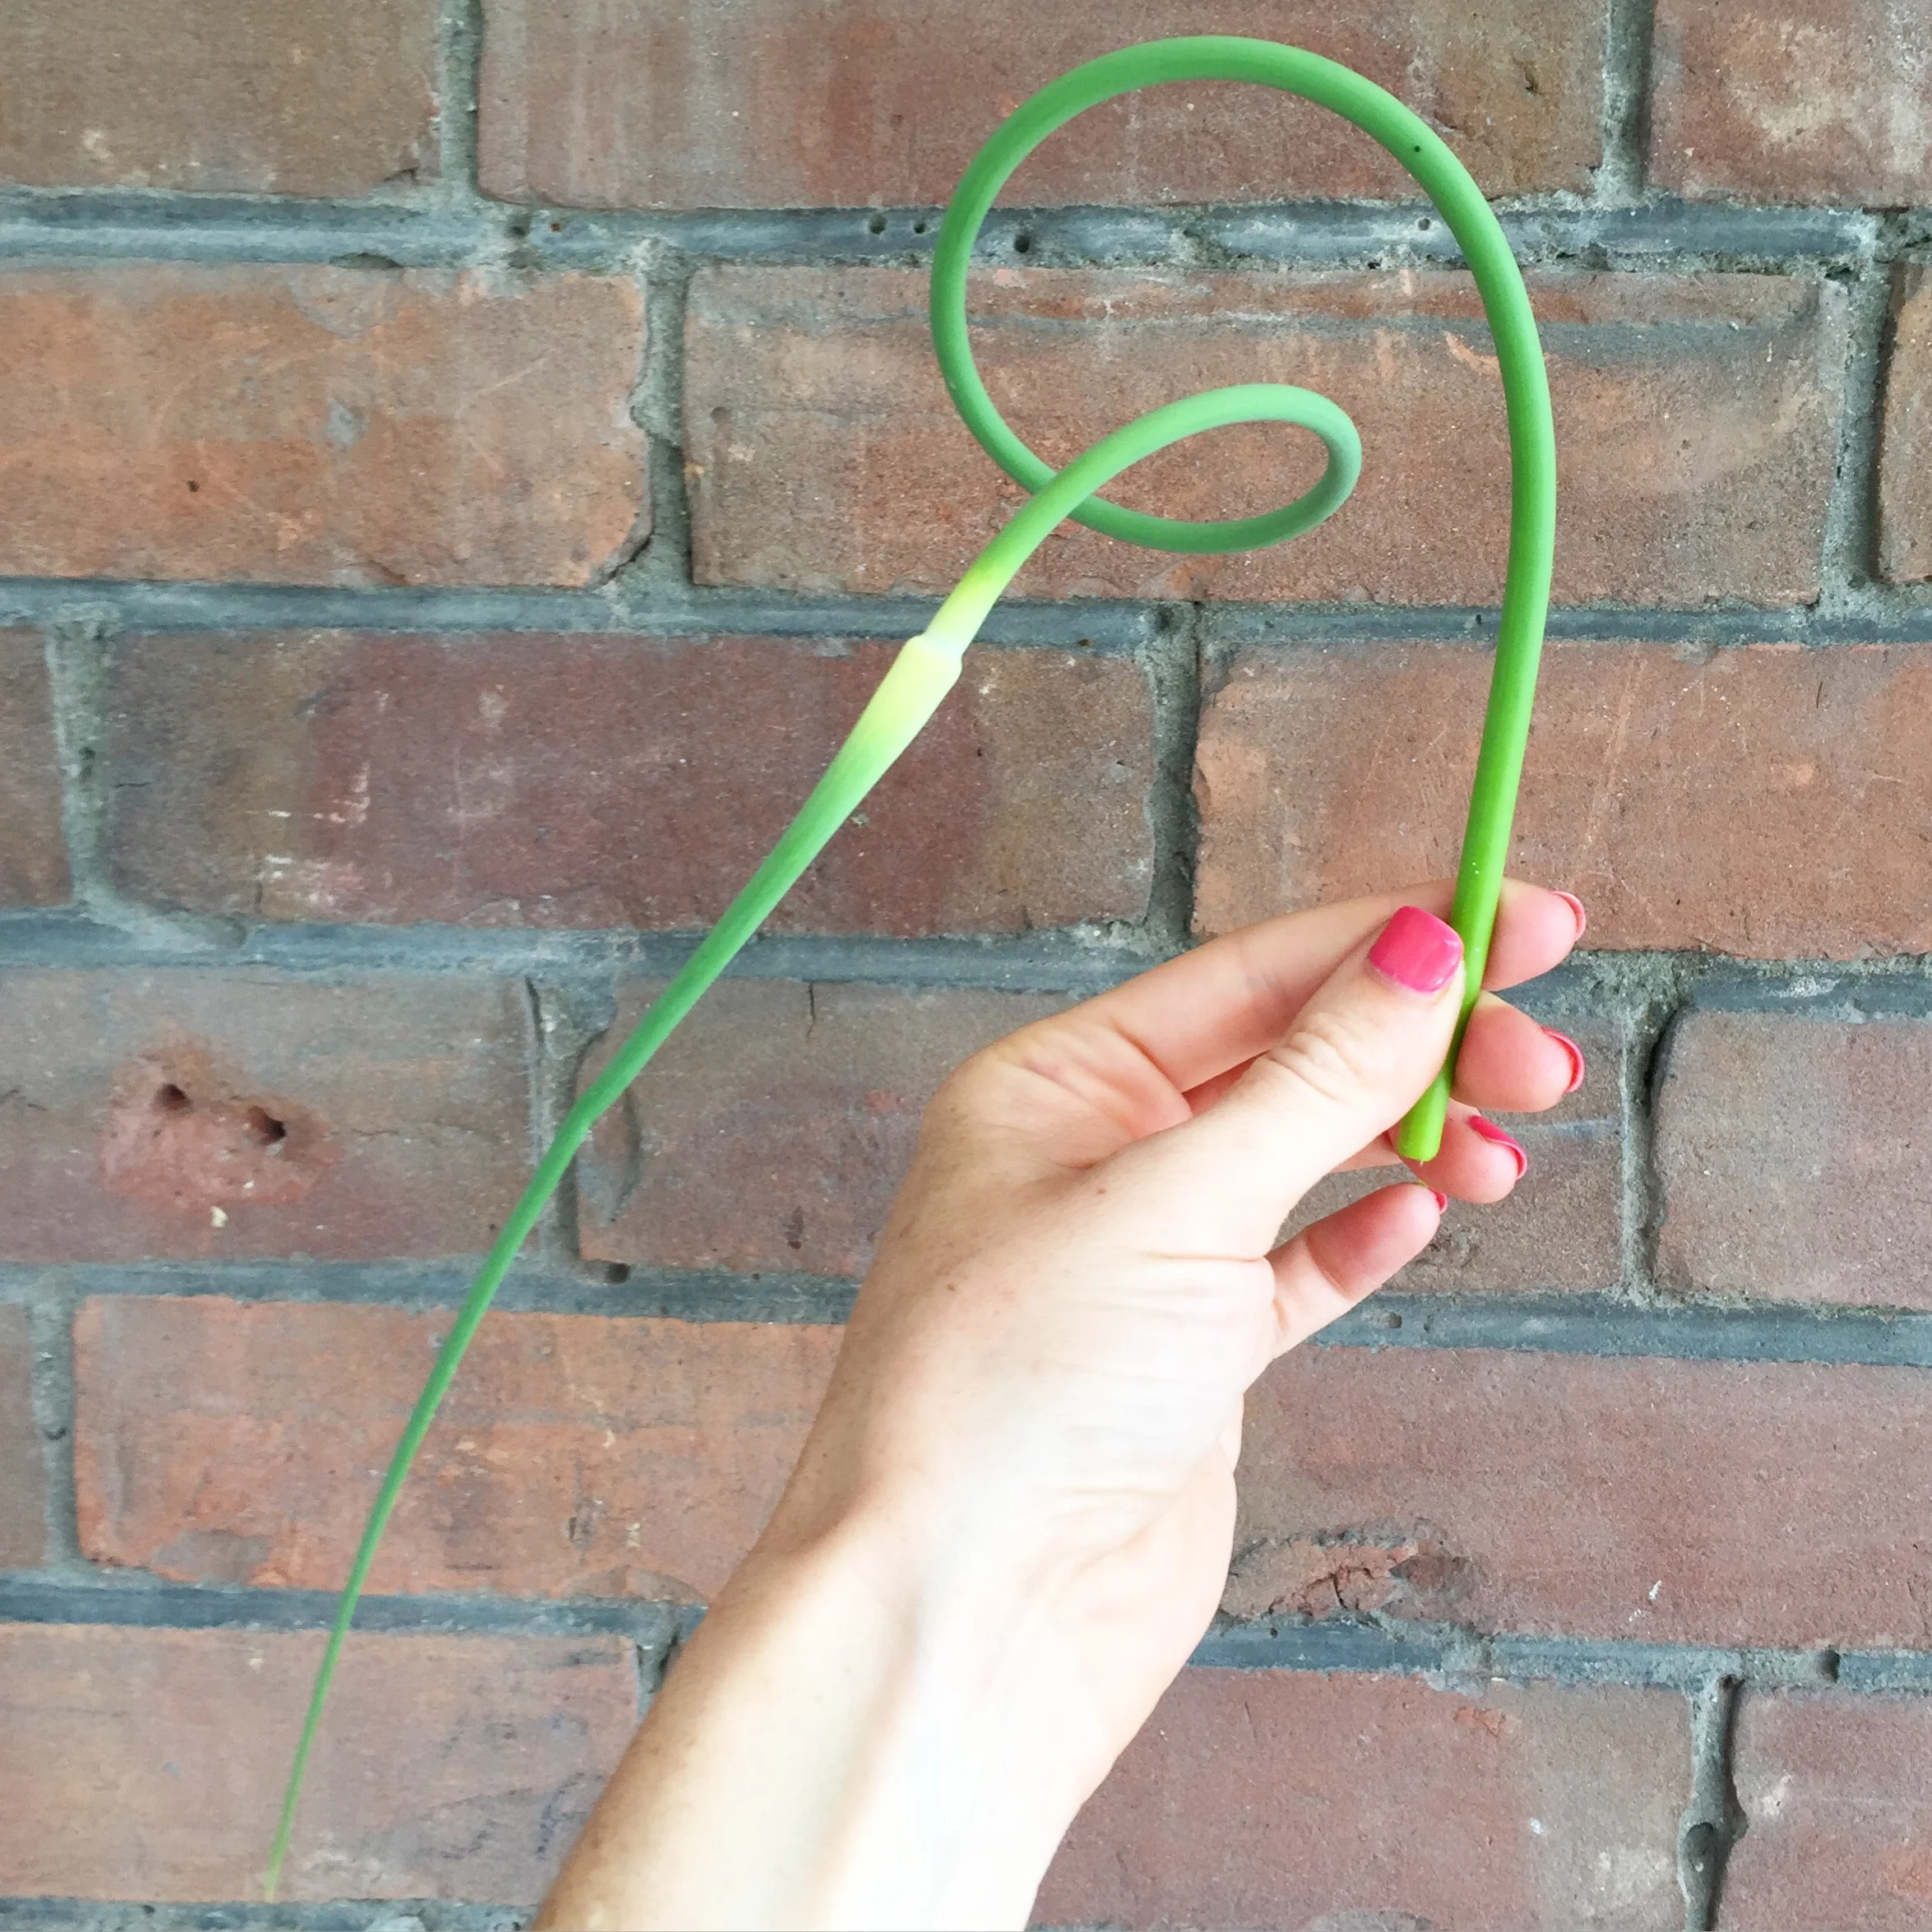
Although I found several versions of garlic scape pesto online, none were exactly what I wanted, so I combined a few to create this recipe. It's hands down one of the most delicious things I've ever made. I'm extra proud since we grew the scapes & basil ourselves. If you have some scapes lying around in your garden, or find some at you local farmers market I highly recommend making this. You won't regret it! Best part, it uses 7 simple ingredients and takes only minutes to mix up.
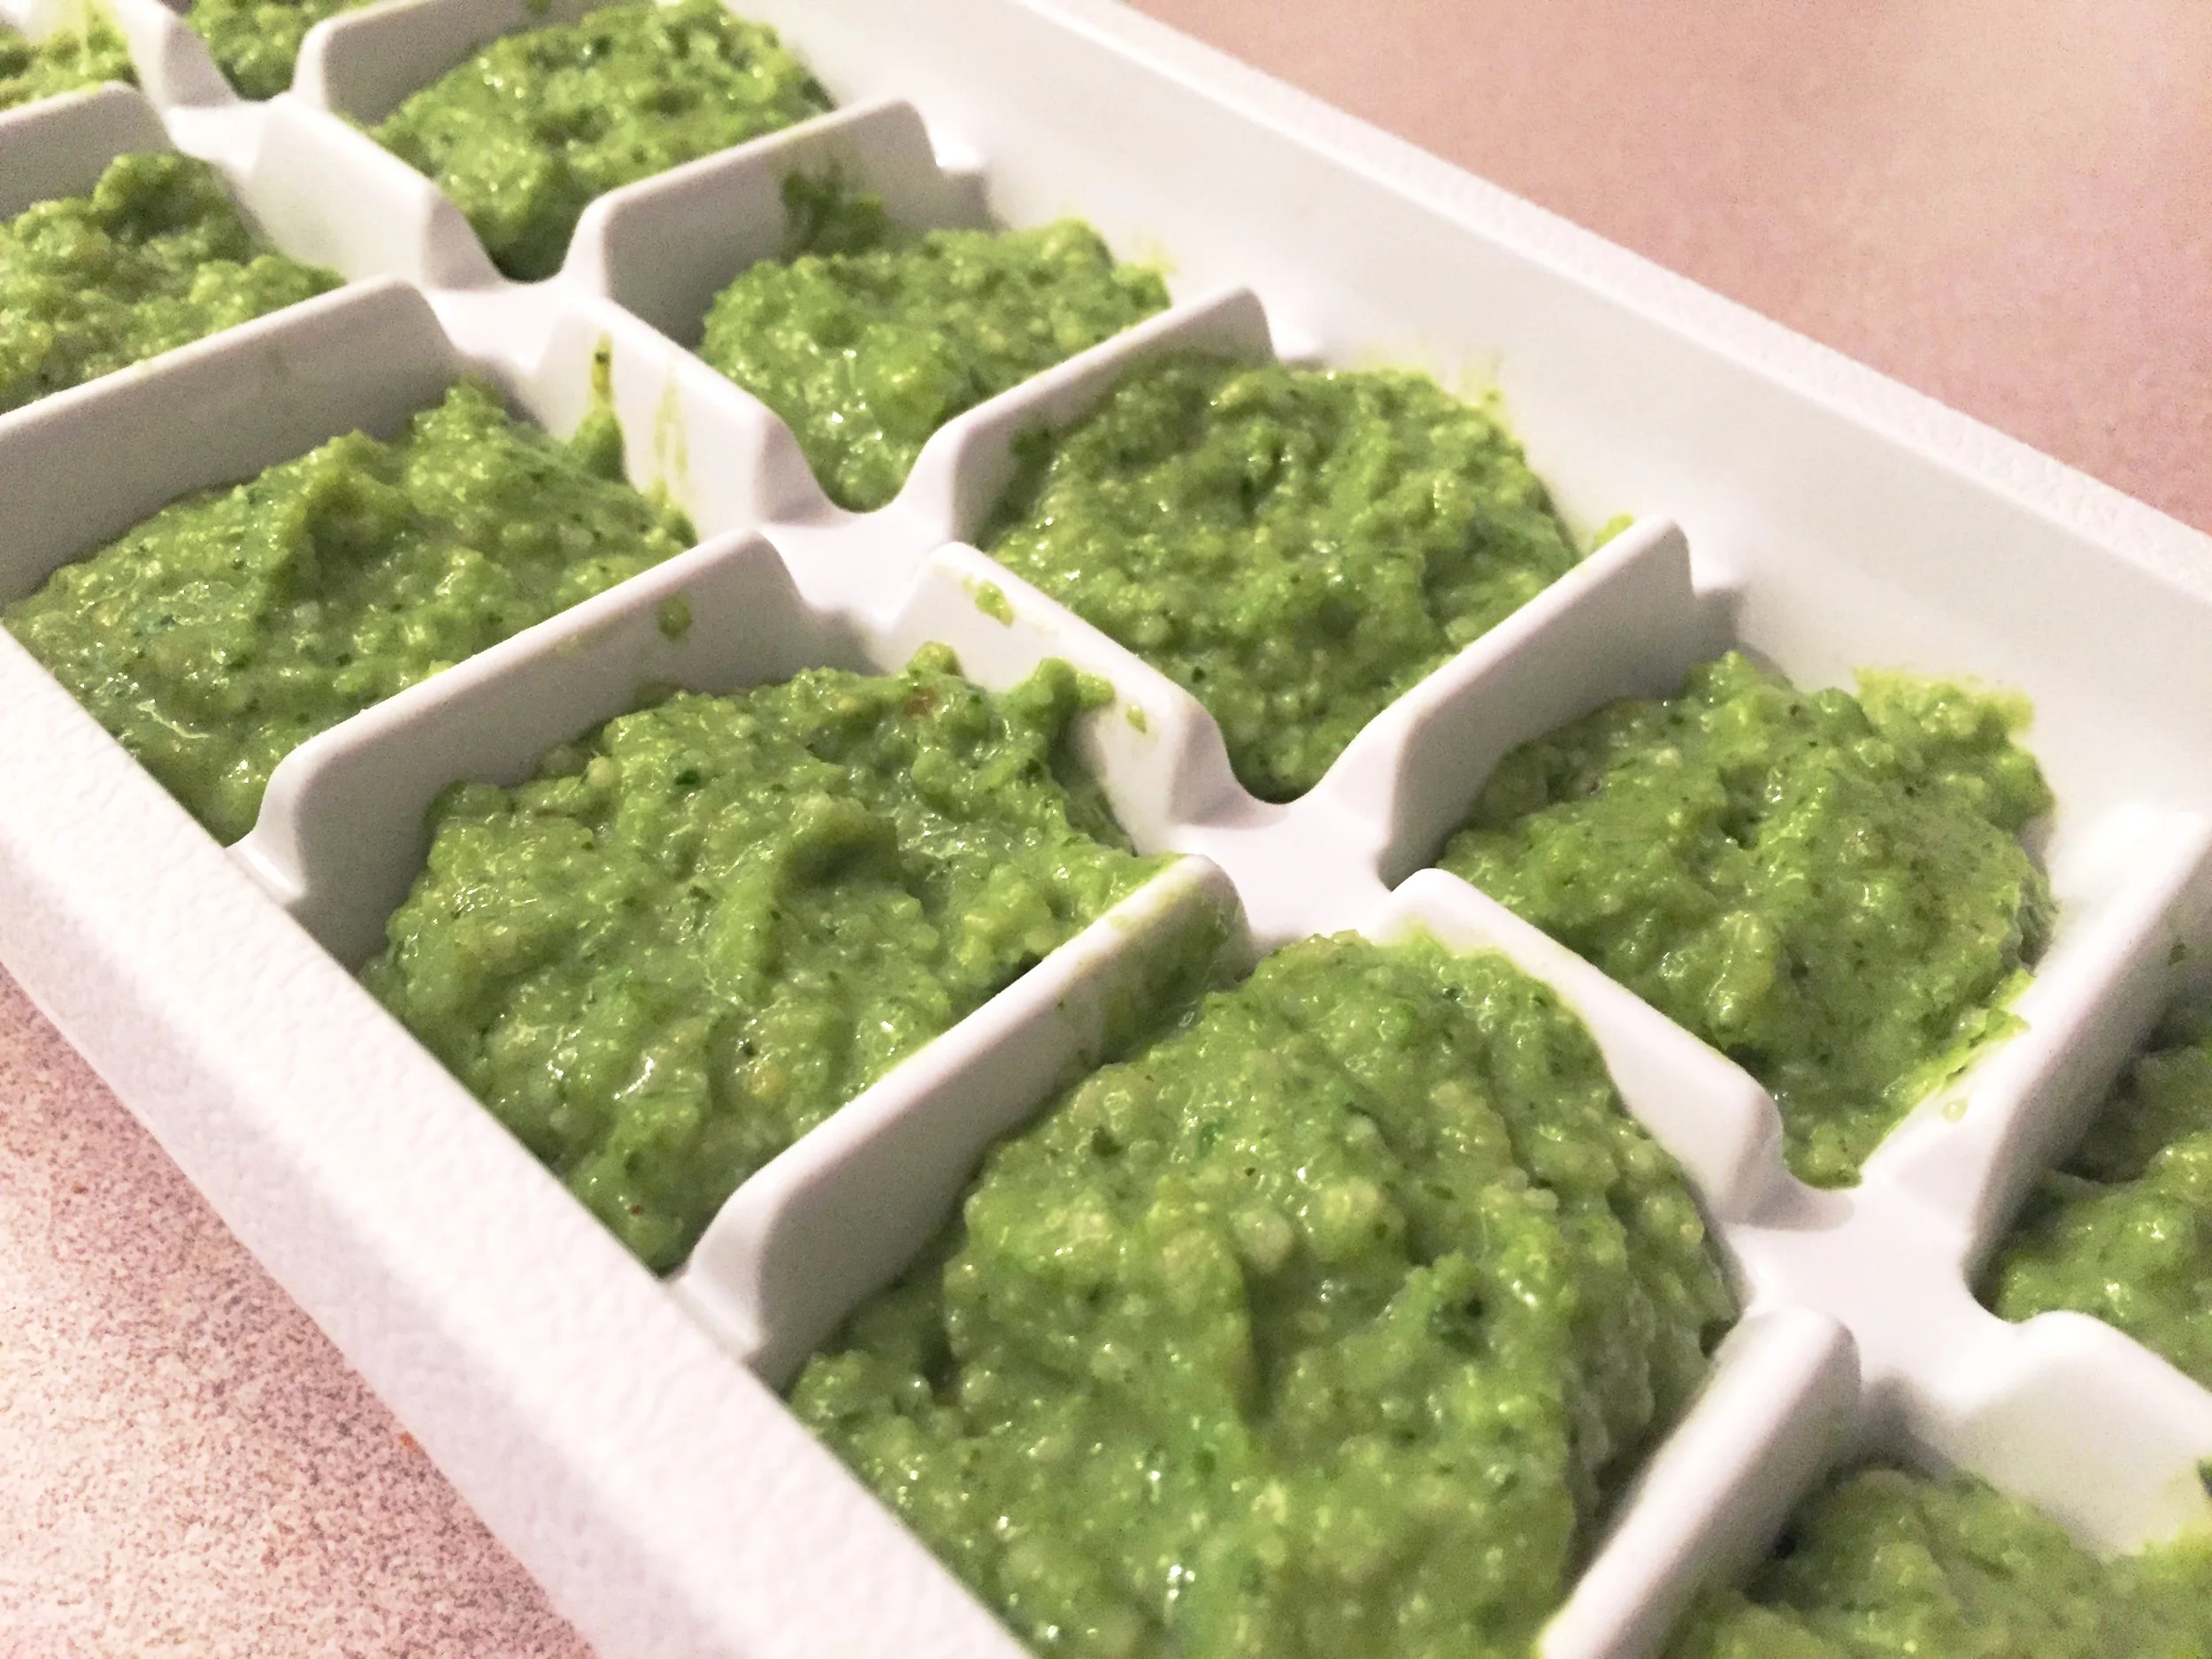
*Note: Freeze your pesto in an ice cube tray and then pop out cubes and store in an airtight freezer safe container or freezer bag. Ideal for single use on sandwiches, salads or pasta.
Ingredients:
- 1 cup fresh clean basil leaves
- 10 garlic scapes, cleaned, bud removed, and cut into 1" pieces
- 1/4 tsp sea salt
- 1/2 of a lemon juiced
- 1/2 cup olive oil
- 1/2 cup pine nuts
- 1 cup freshly grated parmesan
Instructions:
- Add basil, garlic scapes & salt to food processor and blend until almost smooth, scrape down sides with spatula.
- Add lemon juice, olive oil, pine nuts & parmesan and blend until smooth scraping sides with spatula.
- Pour pesto into ice cube trays, freezer bags or mason jars and freeze for several months, or keep pesto in the fridge if you plan to use it within a week or so. The flavours will meld together and mellow over time when frozen.
Excellent on pastas, sandwiches, or salads. Enjoy!
- Care

Perfect Food For Fall - Roasted Squash Soup & Drop Biscuits
As the days become shorter and cooler, and sweaters and boots begin to appear, I make the transition over into fall cooking. After a summer of non-stop BBQ'ing I'm usually ready to return to my stove and my cozy kitchen to make some warm delights. Risottos, stews, roasts, casseroles, soups and biscuits are exactly what fall weather calls for.
As the days become shorter and cooler, and sweaters and boots begin to appear, I make the transition over into fall cooking. After a summer of non-stop BBQ'ing I'm usually ready to return to my stove and my cozy kitchen to make some warm delights. Risottos, stews, roasts, casseroles, soups and biscuits are exactly what fall weather calls for.
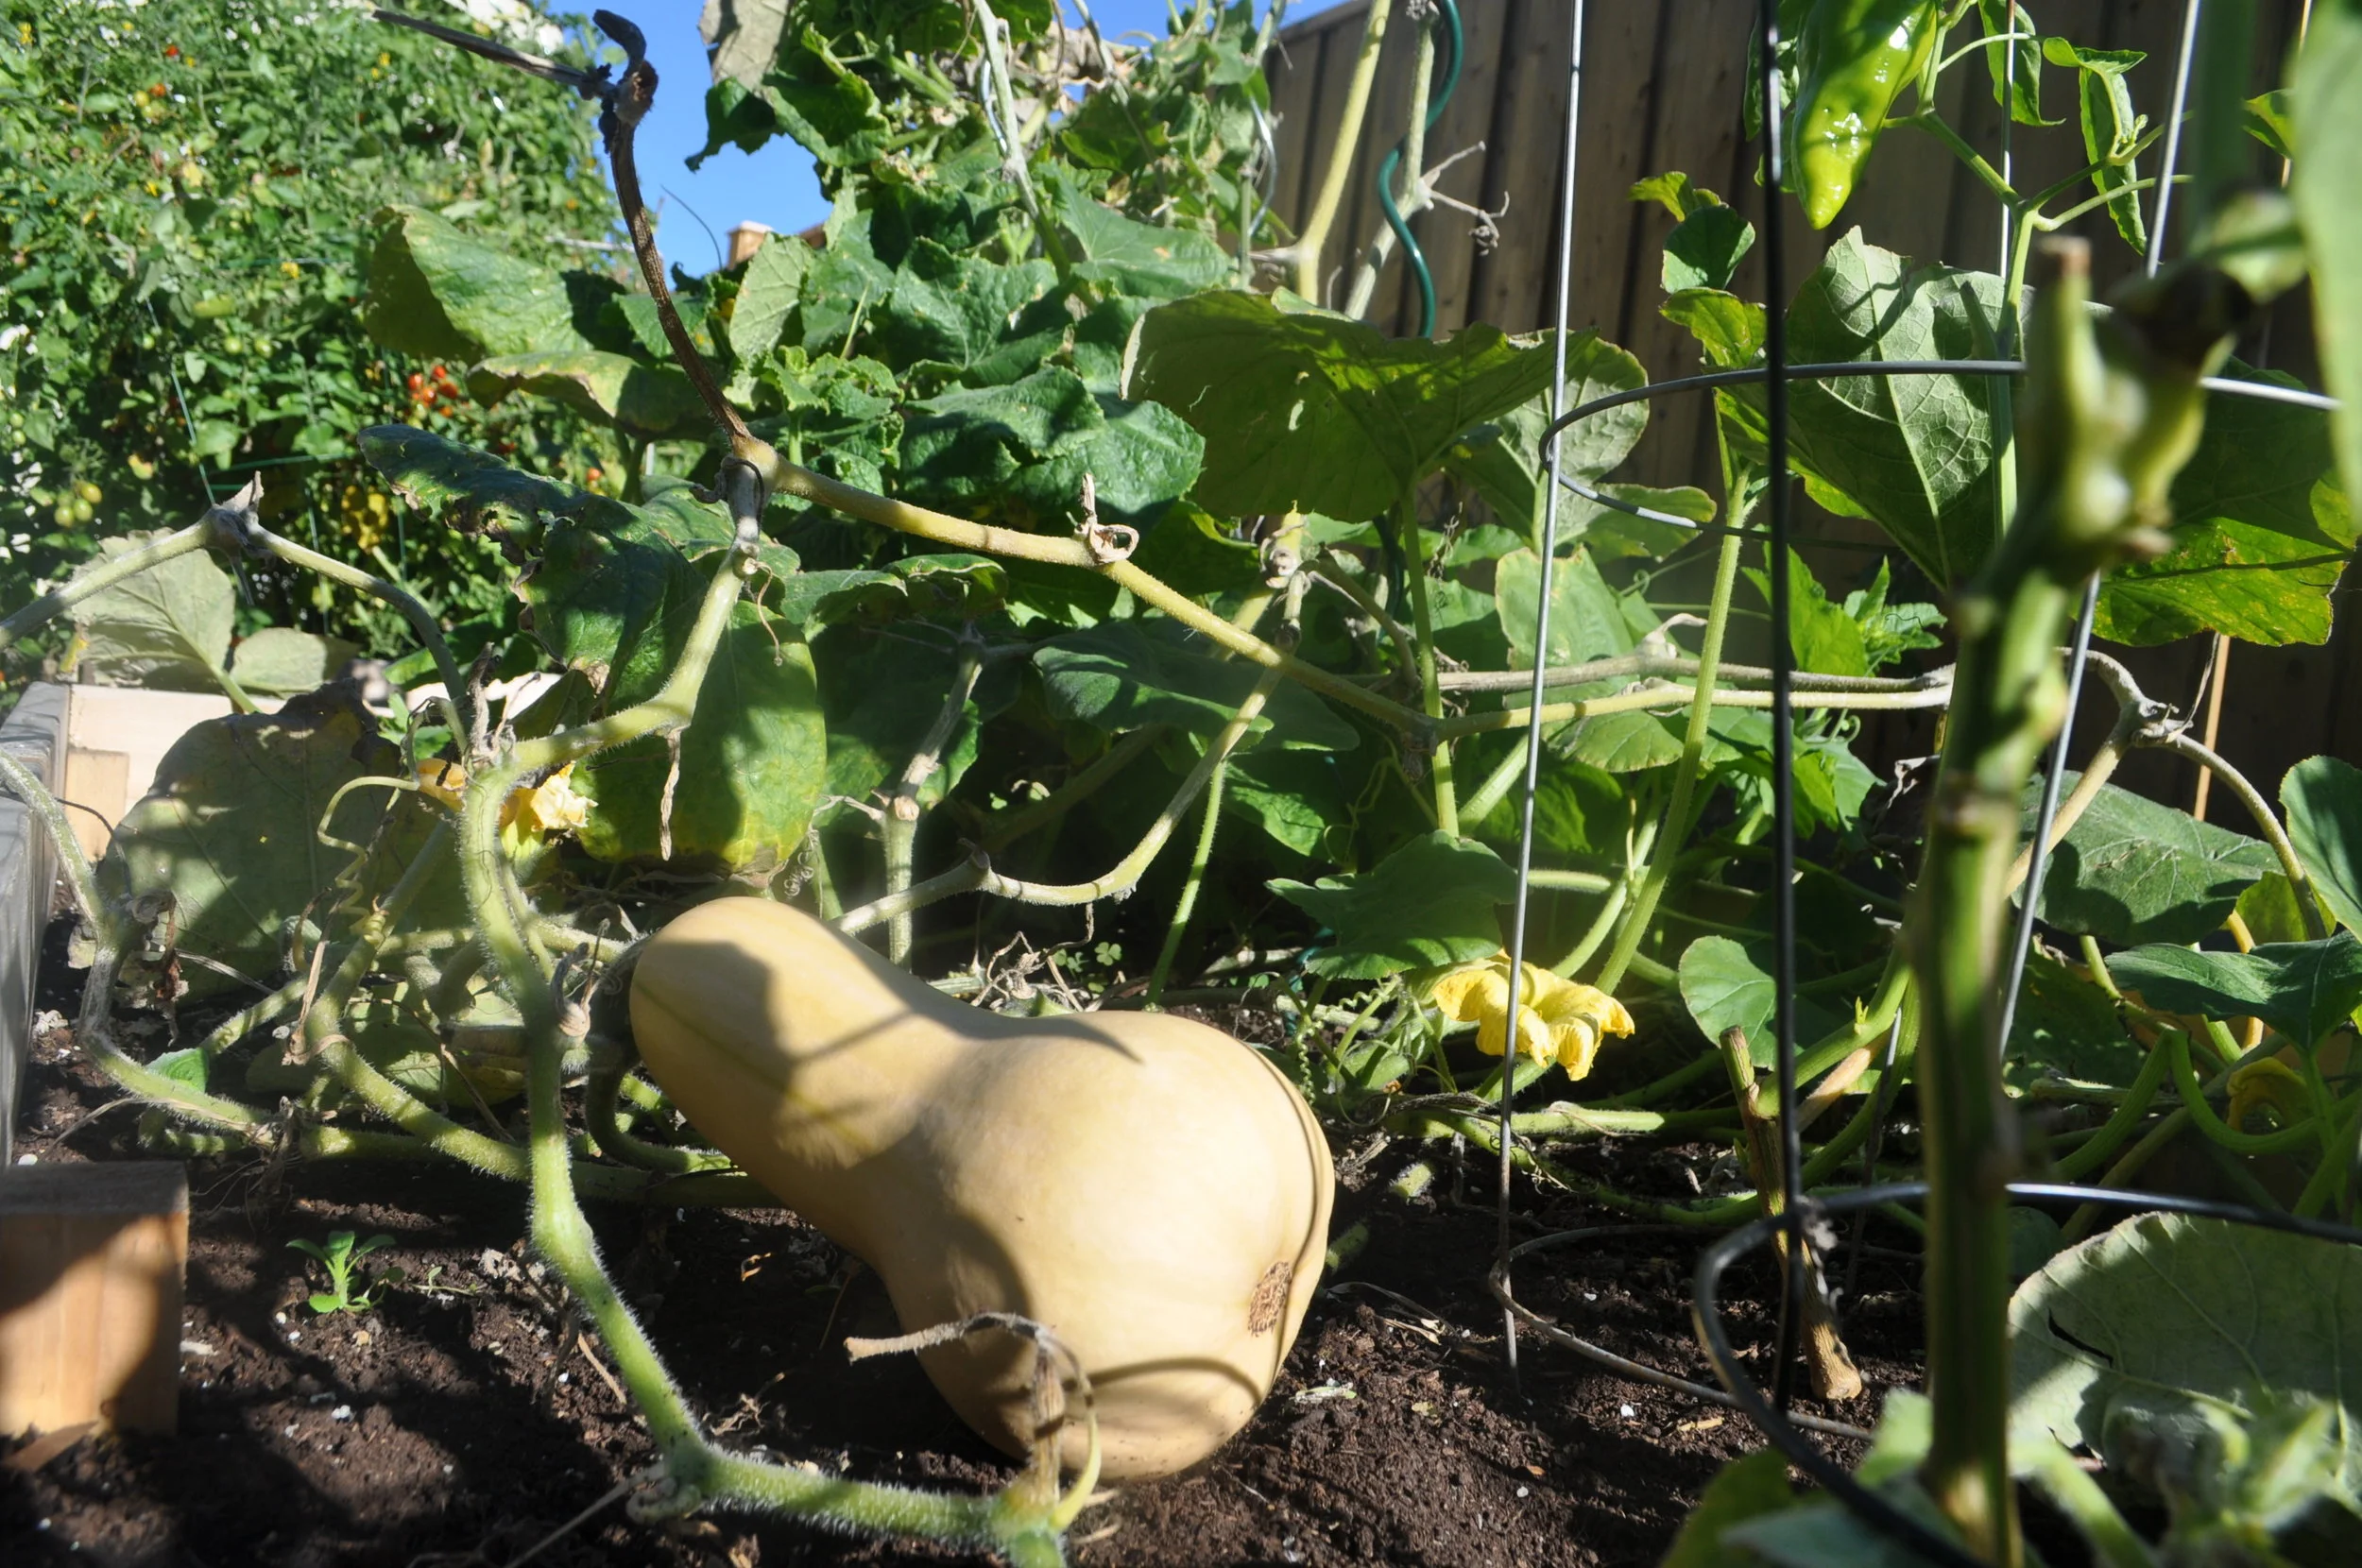
One of my family's all time favourites is this Roasted Squash & Apple Soup (recipe below). I don't remember who gave me the recipe, but it's one that I make frequently once the cold weather arrives. I'm especially excited because this year we get to make it with squash from our own garden.
I love to pair this soup with these super simple Pull Apart Drop Biscuits from Canadian Living. The first time I made these biscuits for my mom she was so impressed that she immediately gave up on her mother's recipe she had been using for 40+ years in favour of these. That's how good they are! Plus they're so simple to make. The wet dough takes minutes to prepare, and no need to cut out individual biscuits. Just break off clumps and roll in a little flour before placing on the pan to bake. So easy!
Hope your family enjoys this fall meal as much as mine.
Happy Fall Cooking!
- Care
Roasted Squash Soup
Ingredients
- 1-2 squash (butternut, acorn or buttercup)
- 1 Tbsp Olive Oil
- 1 Cup Onion Finely Diced
- 1 Tbsp Butter
- 4 Cups Vegetable or Chicken Broth
- 2 Apples, Peeled & Chopped
- 1 Cup Cream or Whole Milk
- Cinnamon to taste
- S&P to taste
Instructions
- Cut Squash in Half, remove seeds, brush with oil & sprinkle with S&P and Cinnamon. Roast in oven for 45 mins at 375
- In a large saucepan melt butter and cook onion until soft
- Add cooked squash (removed from skin) apple & broth and bring to a boil
- Reduce heat and simmer for 20 mins
- Add S&P and cinnamon to taste
- Puree with a handheld blender *optional
- Add cream & serve
- Enjoy!

Rhubarb! What to do with it? Make something delicious! Strawberry Rhubarb Cobbler
Rhubarb! It's everywhere these days. Filling local farmer's market tables & in full bloom in many neighbourhood gardens. If you're lucky enough to have Rhubarb in your yard, you better use it! Or at least give it away to the Grandma on your block...
Rhubarb! It's everywhere these days. Filling local farmer's market tables & in full bloom in many neighbourhood gardens. If you're lucky enough to have Rhubarb in your yard, you better use it! Or at least give it away to the Grandma on your block. I hate when food goes to waste and Grandmas always know what to do with random ingredients. Something about wartime era scarcity I think, but I digress. Back to Rhubarb!
When we moved into our 1st home in Bloor West Village last summer we found an abundance of Rhubarb. It hadn't been cared for and was in pretty rough shape. Since Rhubarb is a perennial vegetable I knew I would have a chance to bring it back to it's full glory the following year, and that's exactly what I've done.
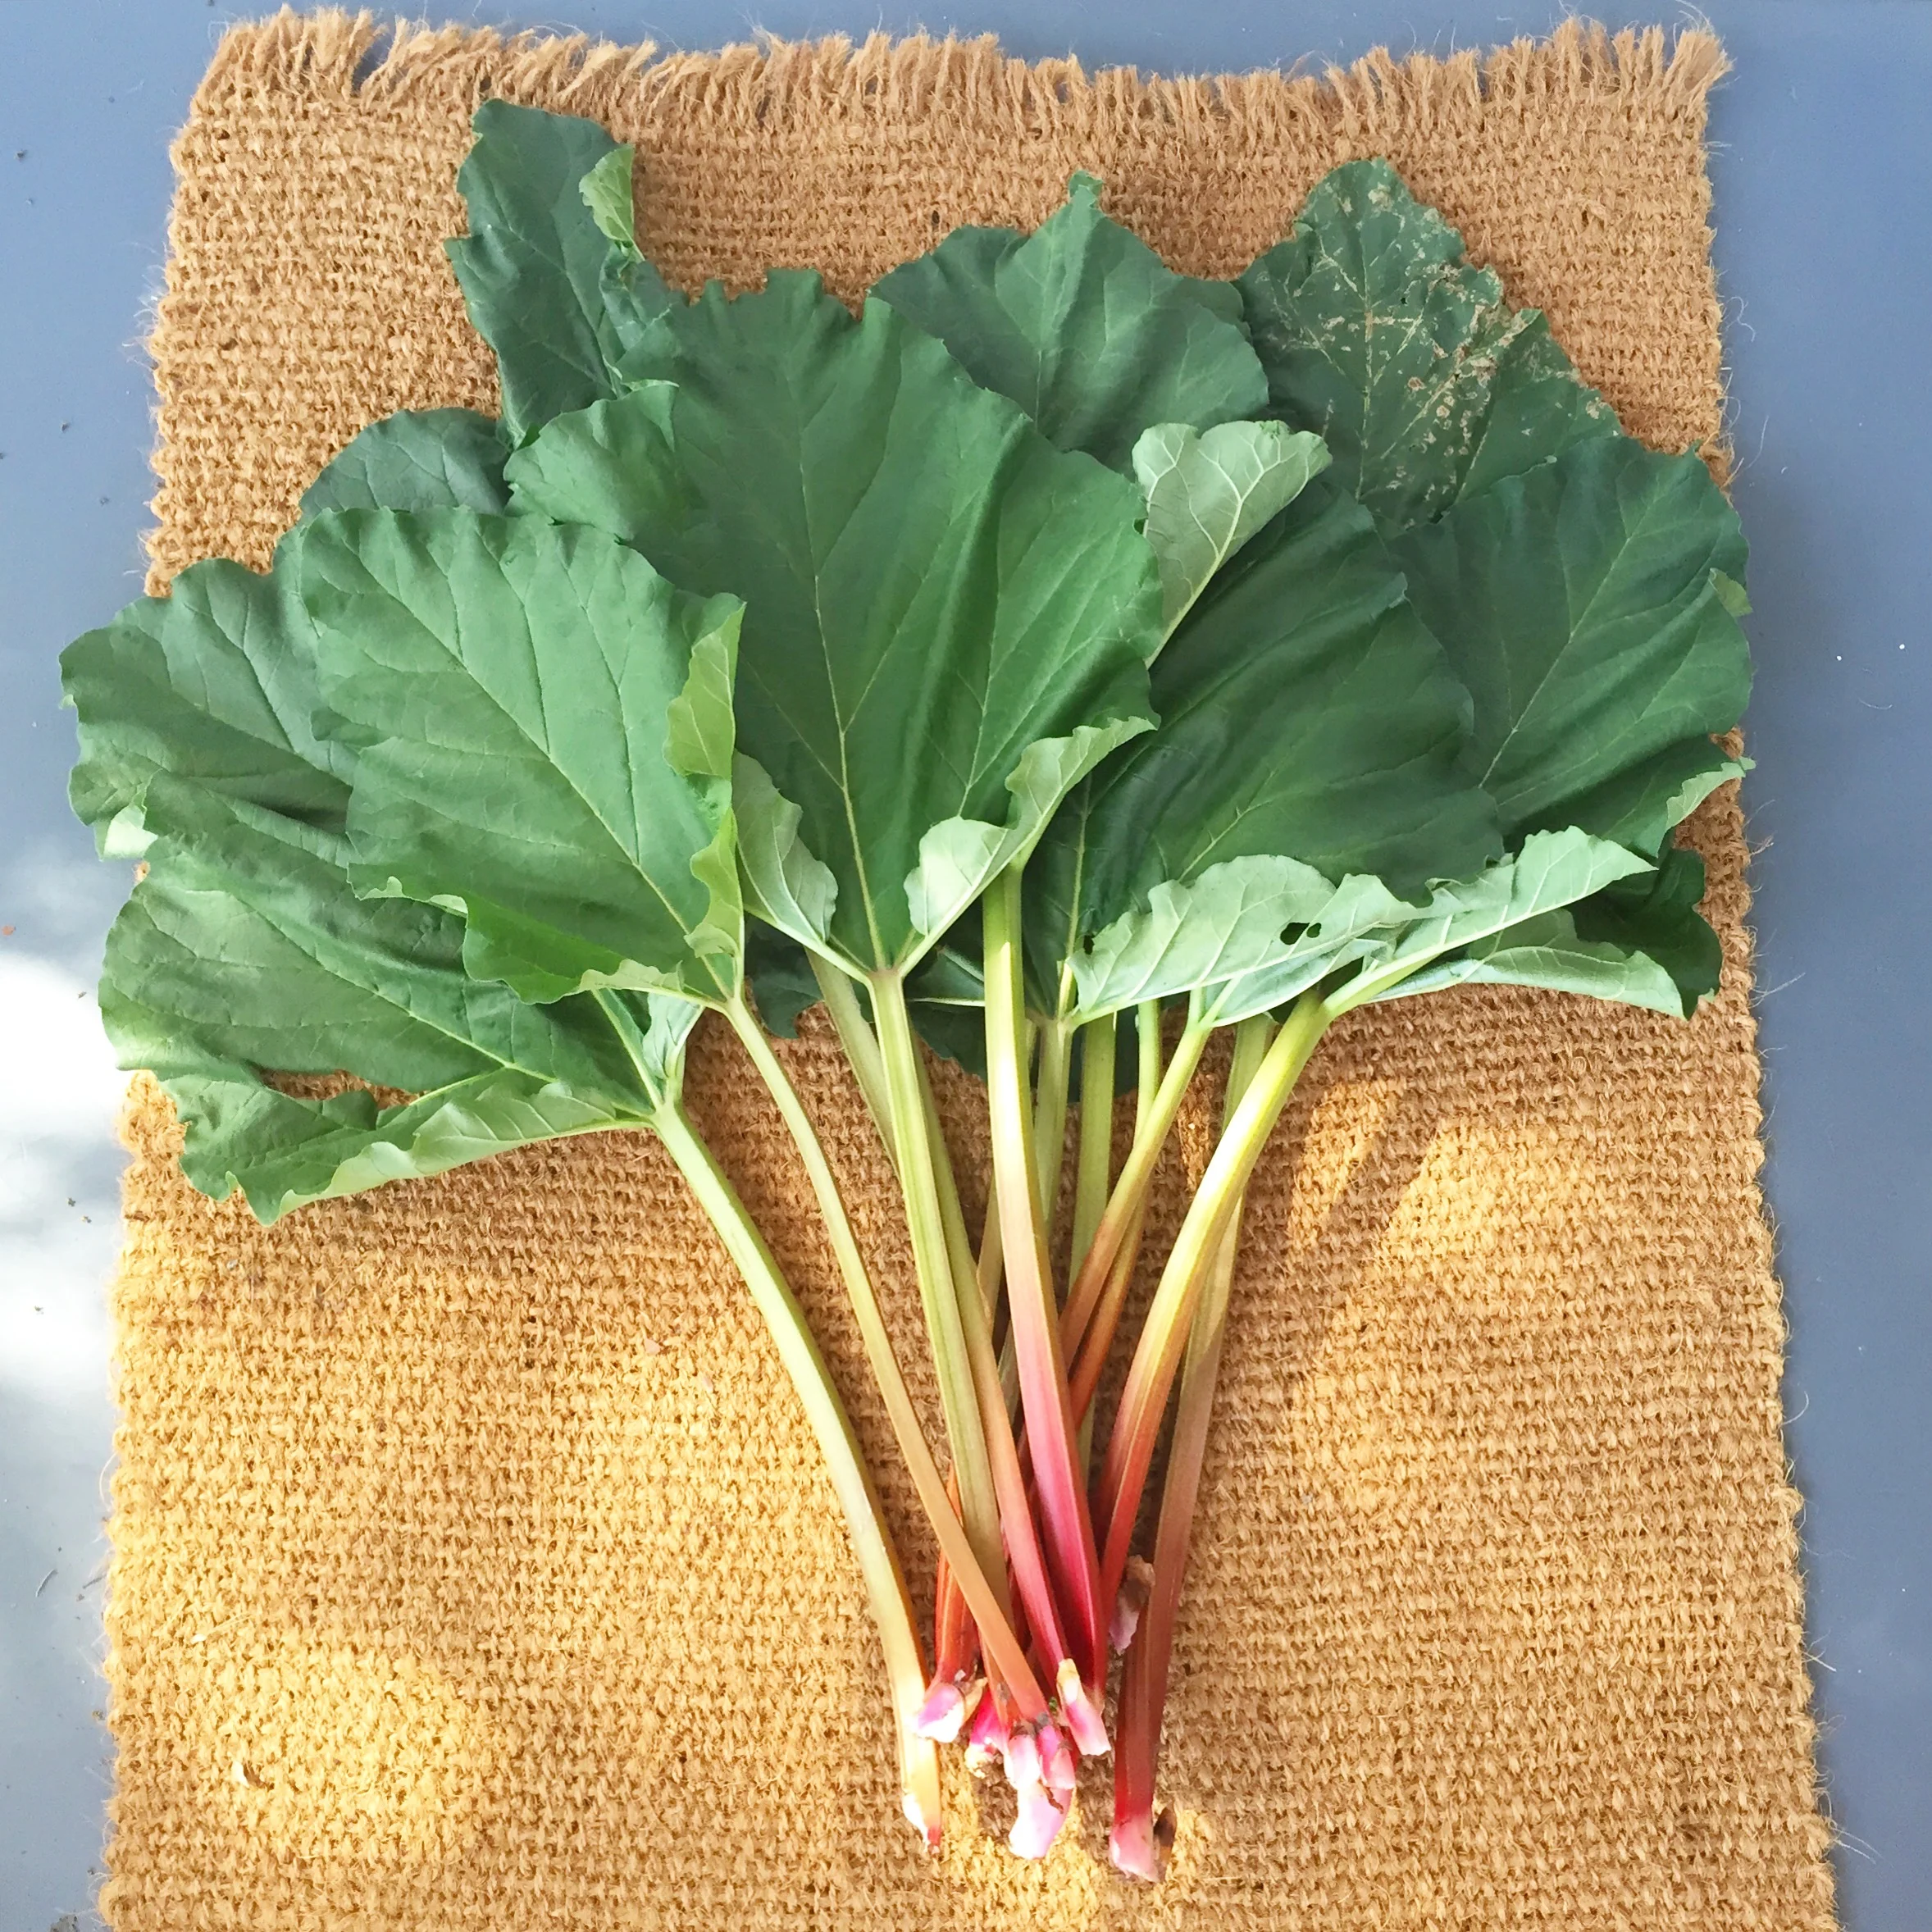
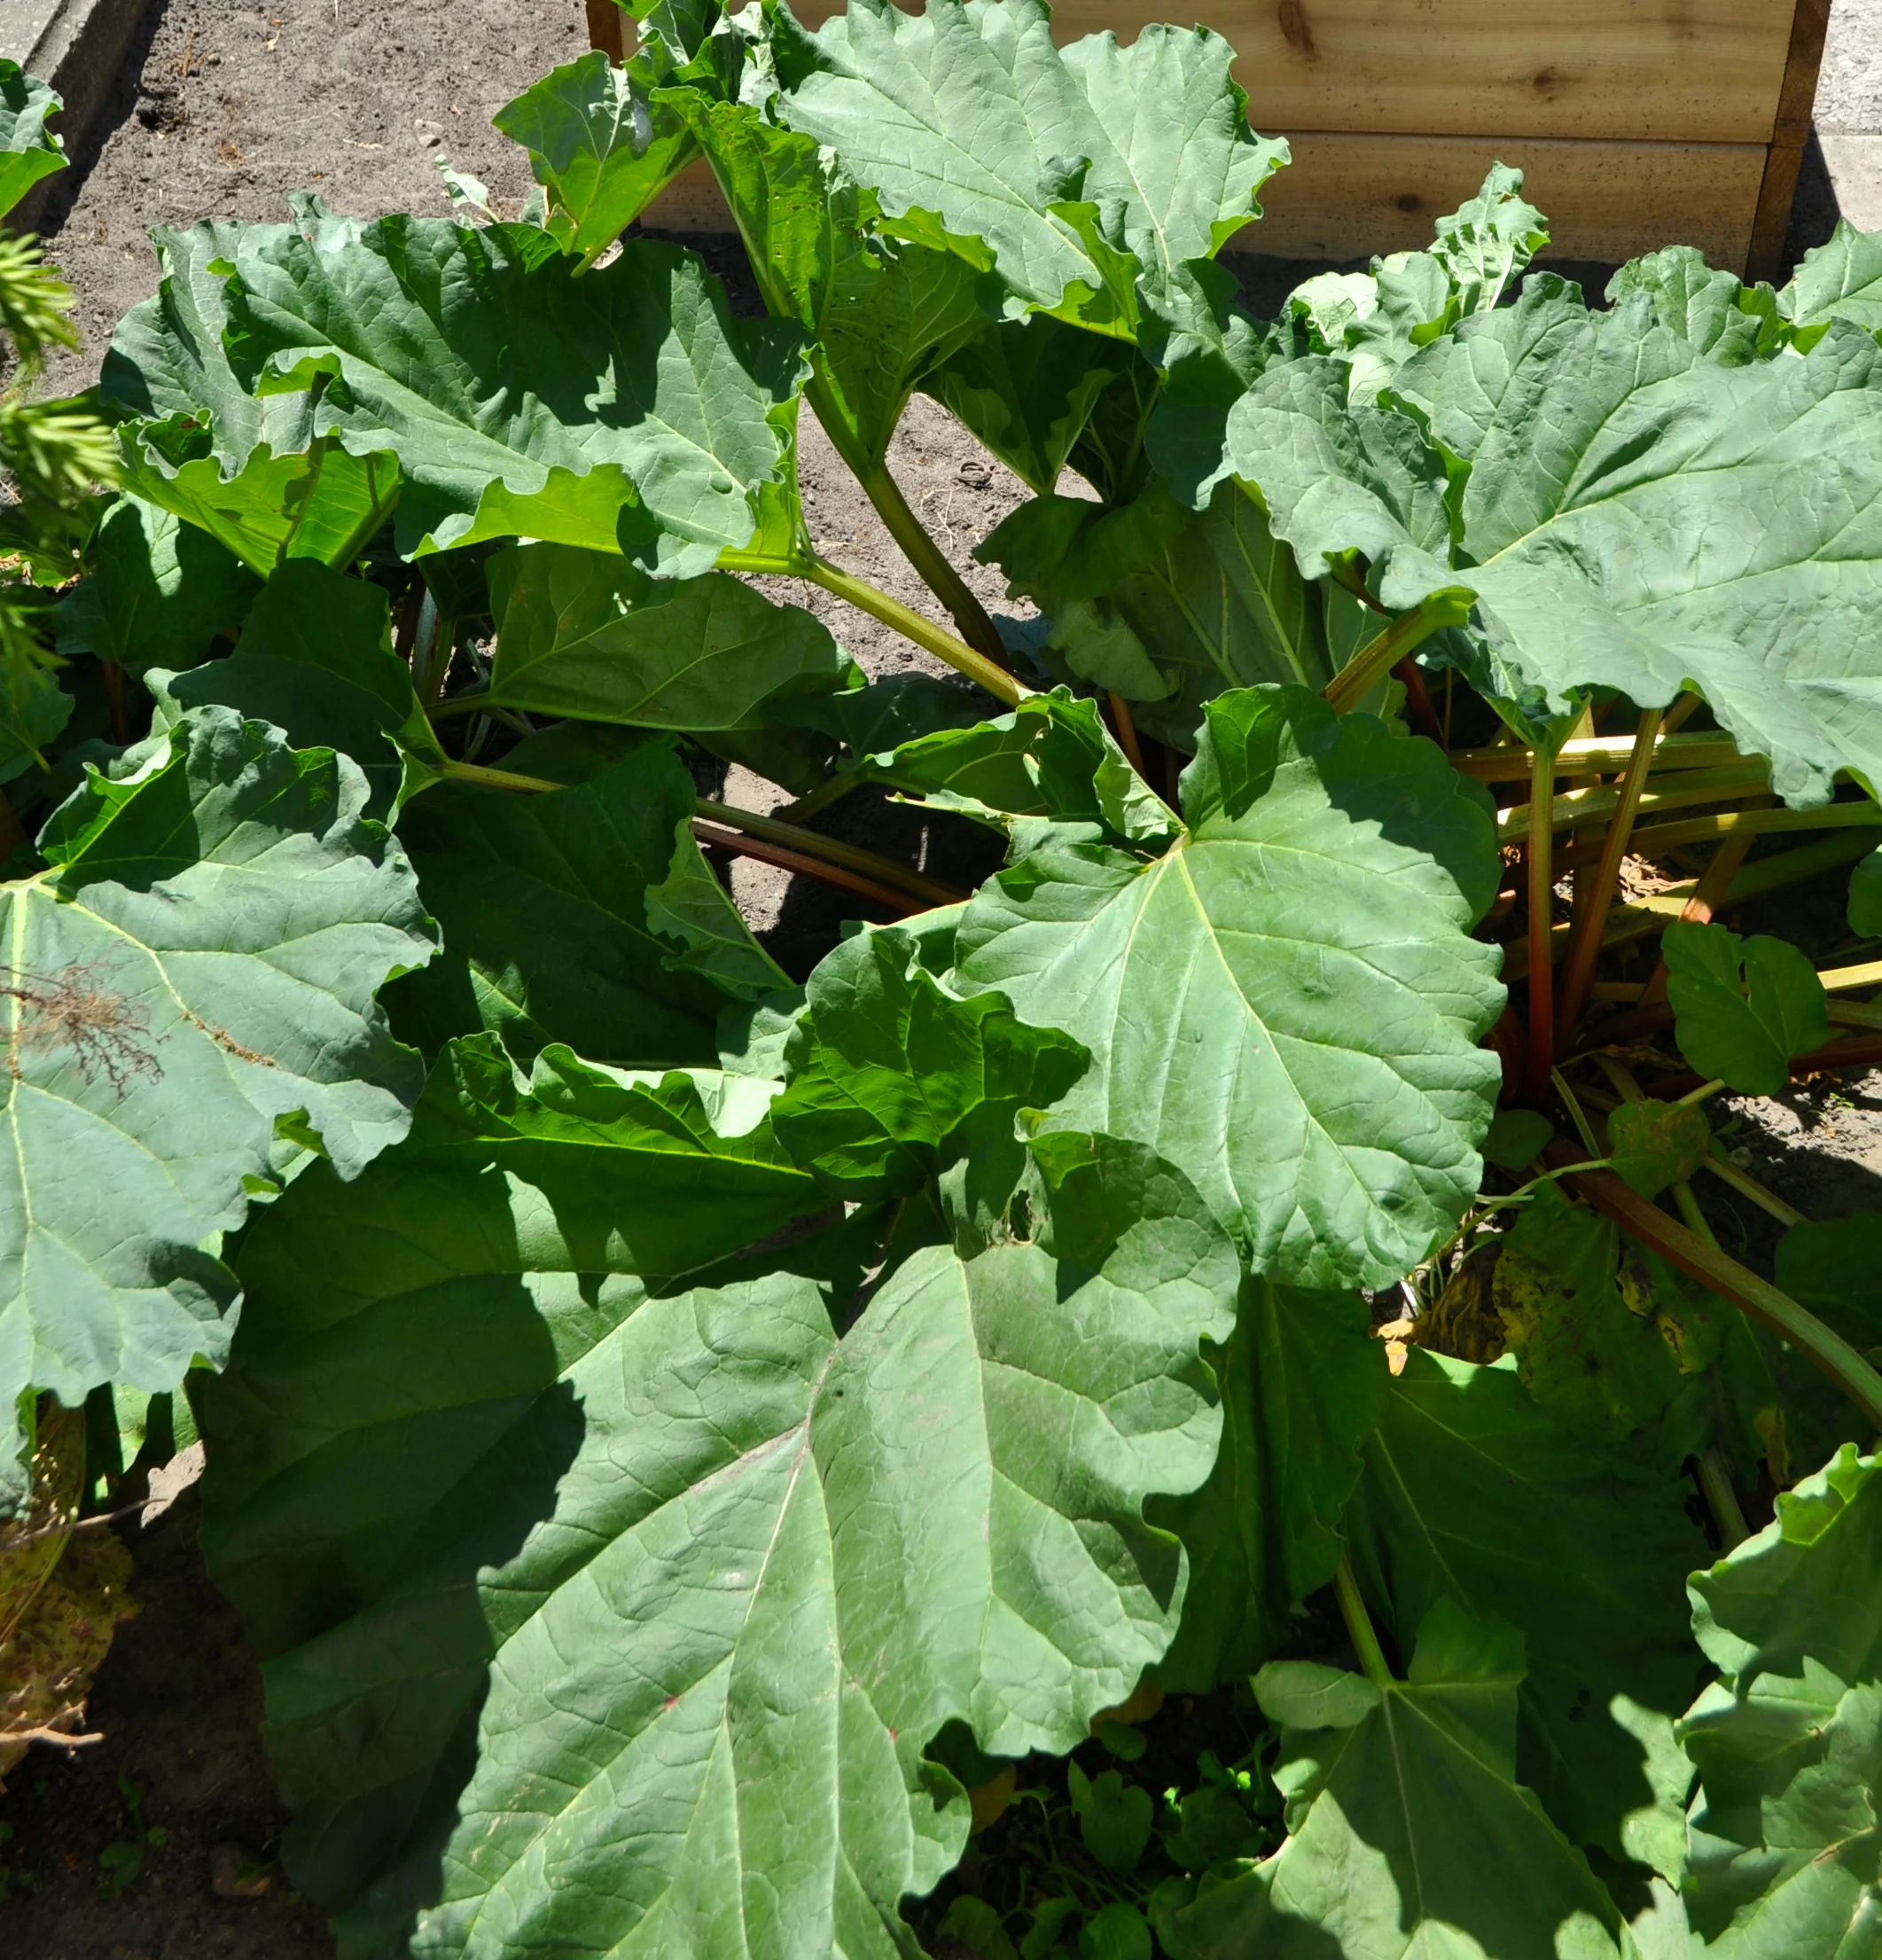
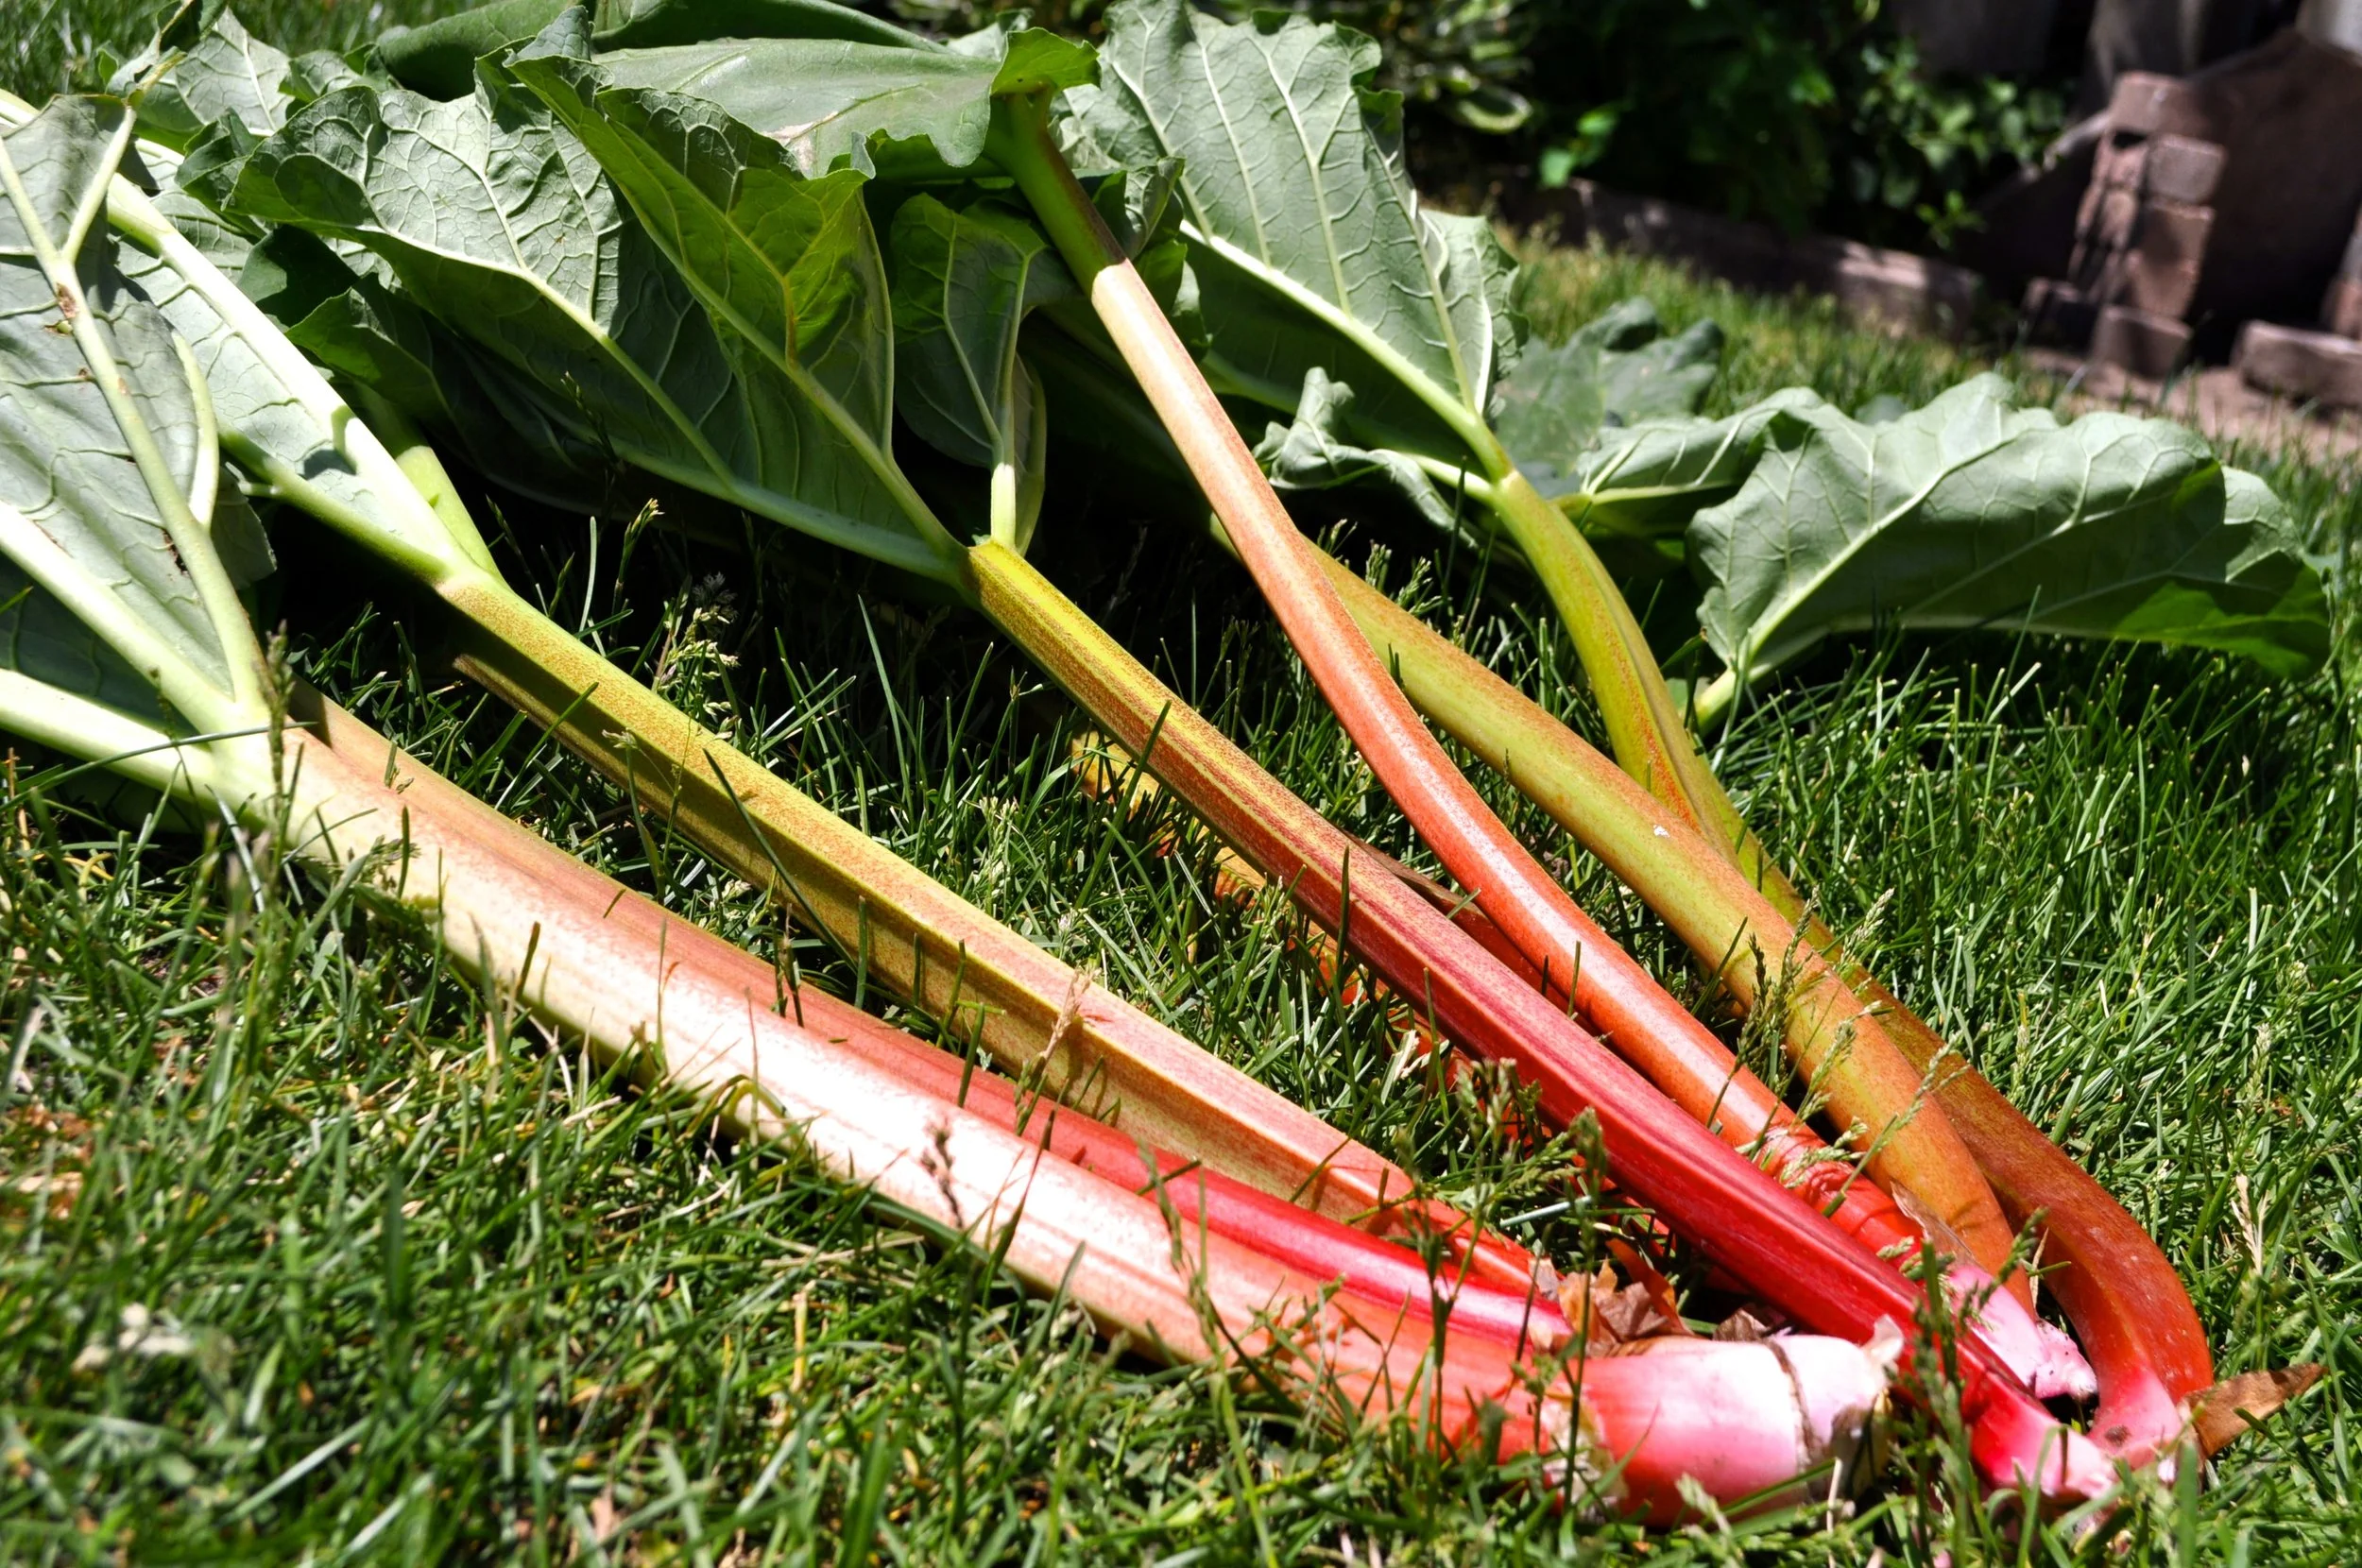
When it started appearing in early spring we watched with anticipation. I read all about how to tend to Rhubarb (more info here) and was super excited when it was ready to harvest. In our zone Rhubarb can usually be harvested starting in June and continues producing until mid to late sumer depending on the season. It's ideal to harvest when stalks are 12" - 18" long and 1/2" -1" thick. The colour can range from celery green to deep red and does not determine ripeness, which I thought was interesting.
To harvest, grab the stalk at the base and twist while pulling. This will break off the stalk at the root. Don't forget to cut off and dispose of the leaves outside in your yard waste bag. They are poisonous and should never be ingested. That's why rhubarb stalks are sold without leaves at markets and in grocery stores.

Harvesting your Rhubarb will encourage continued growth. If not harvested, stalks will become weak & rot :(
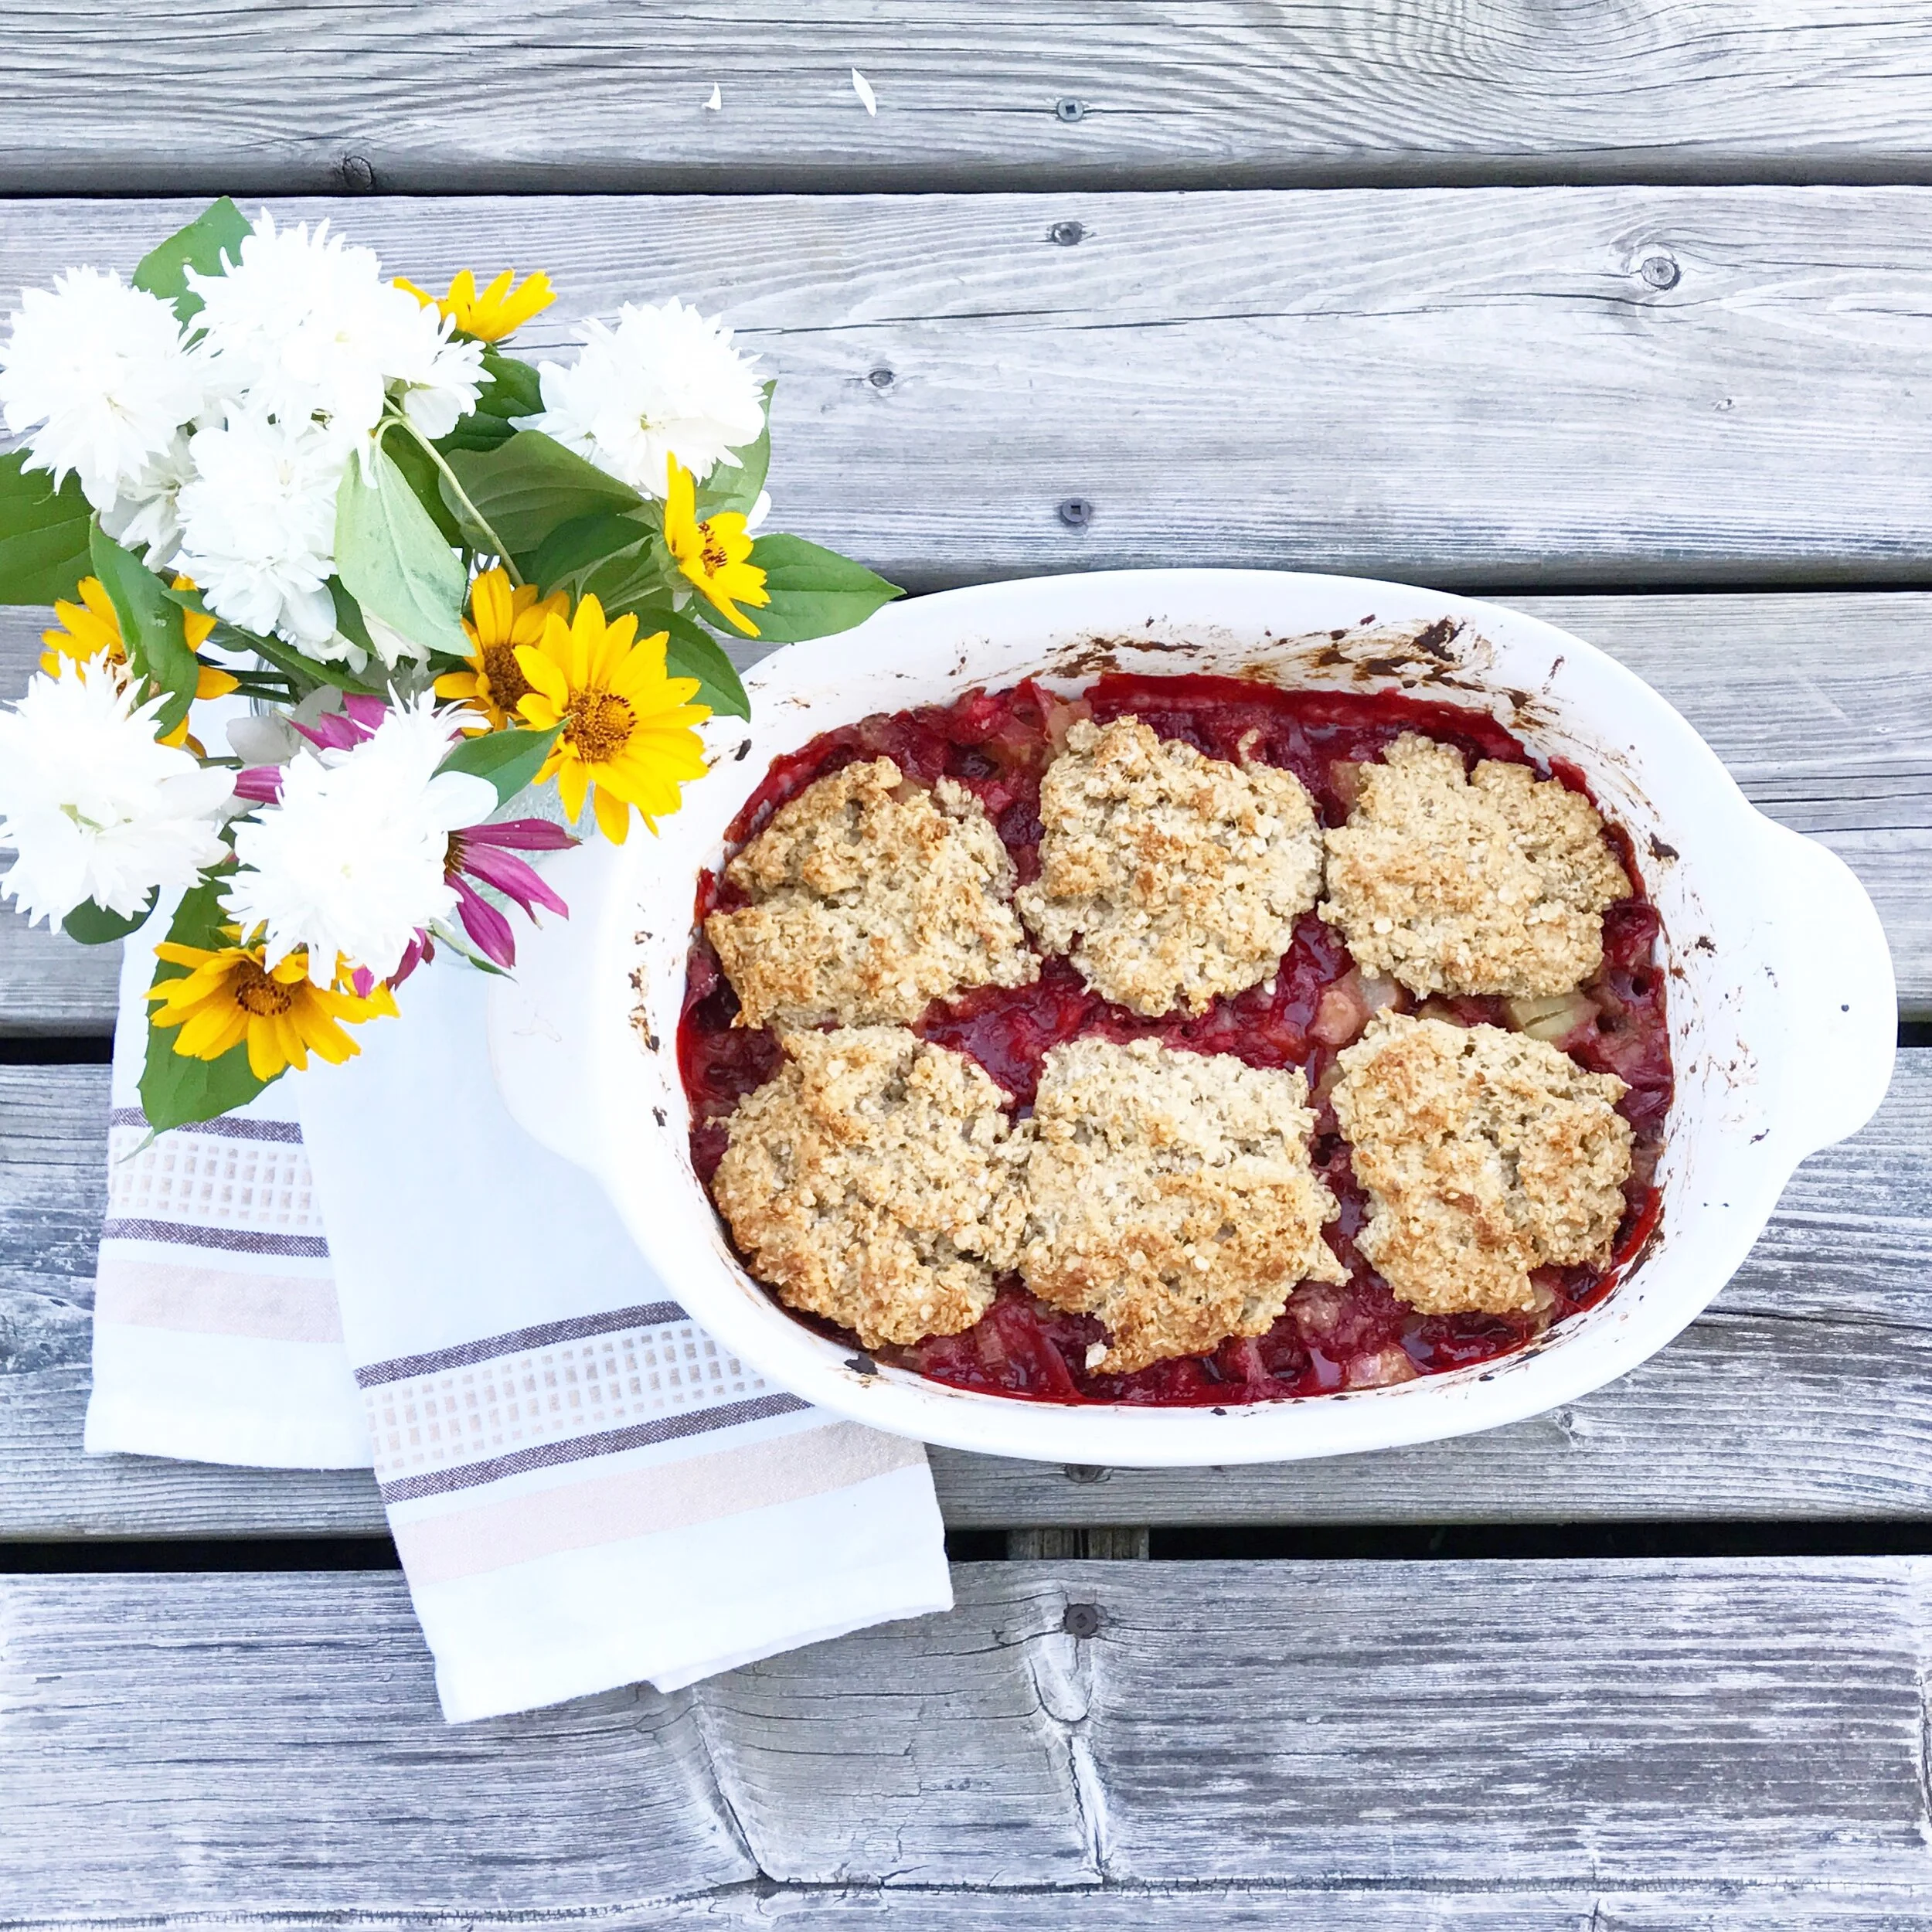
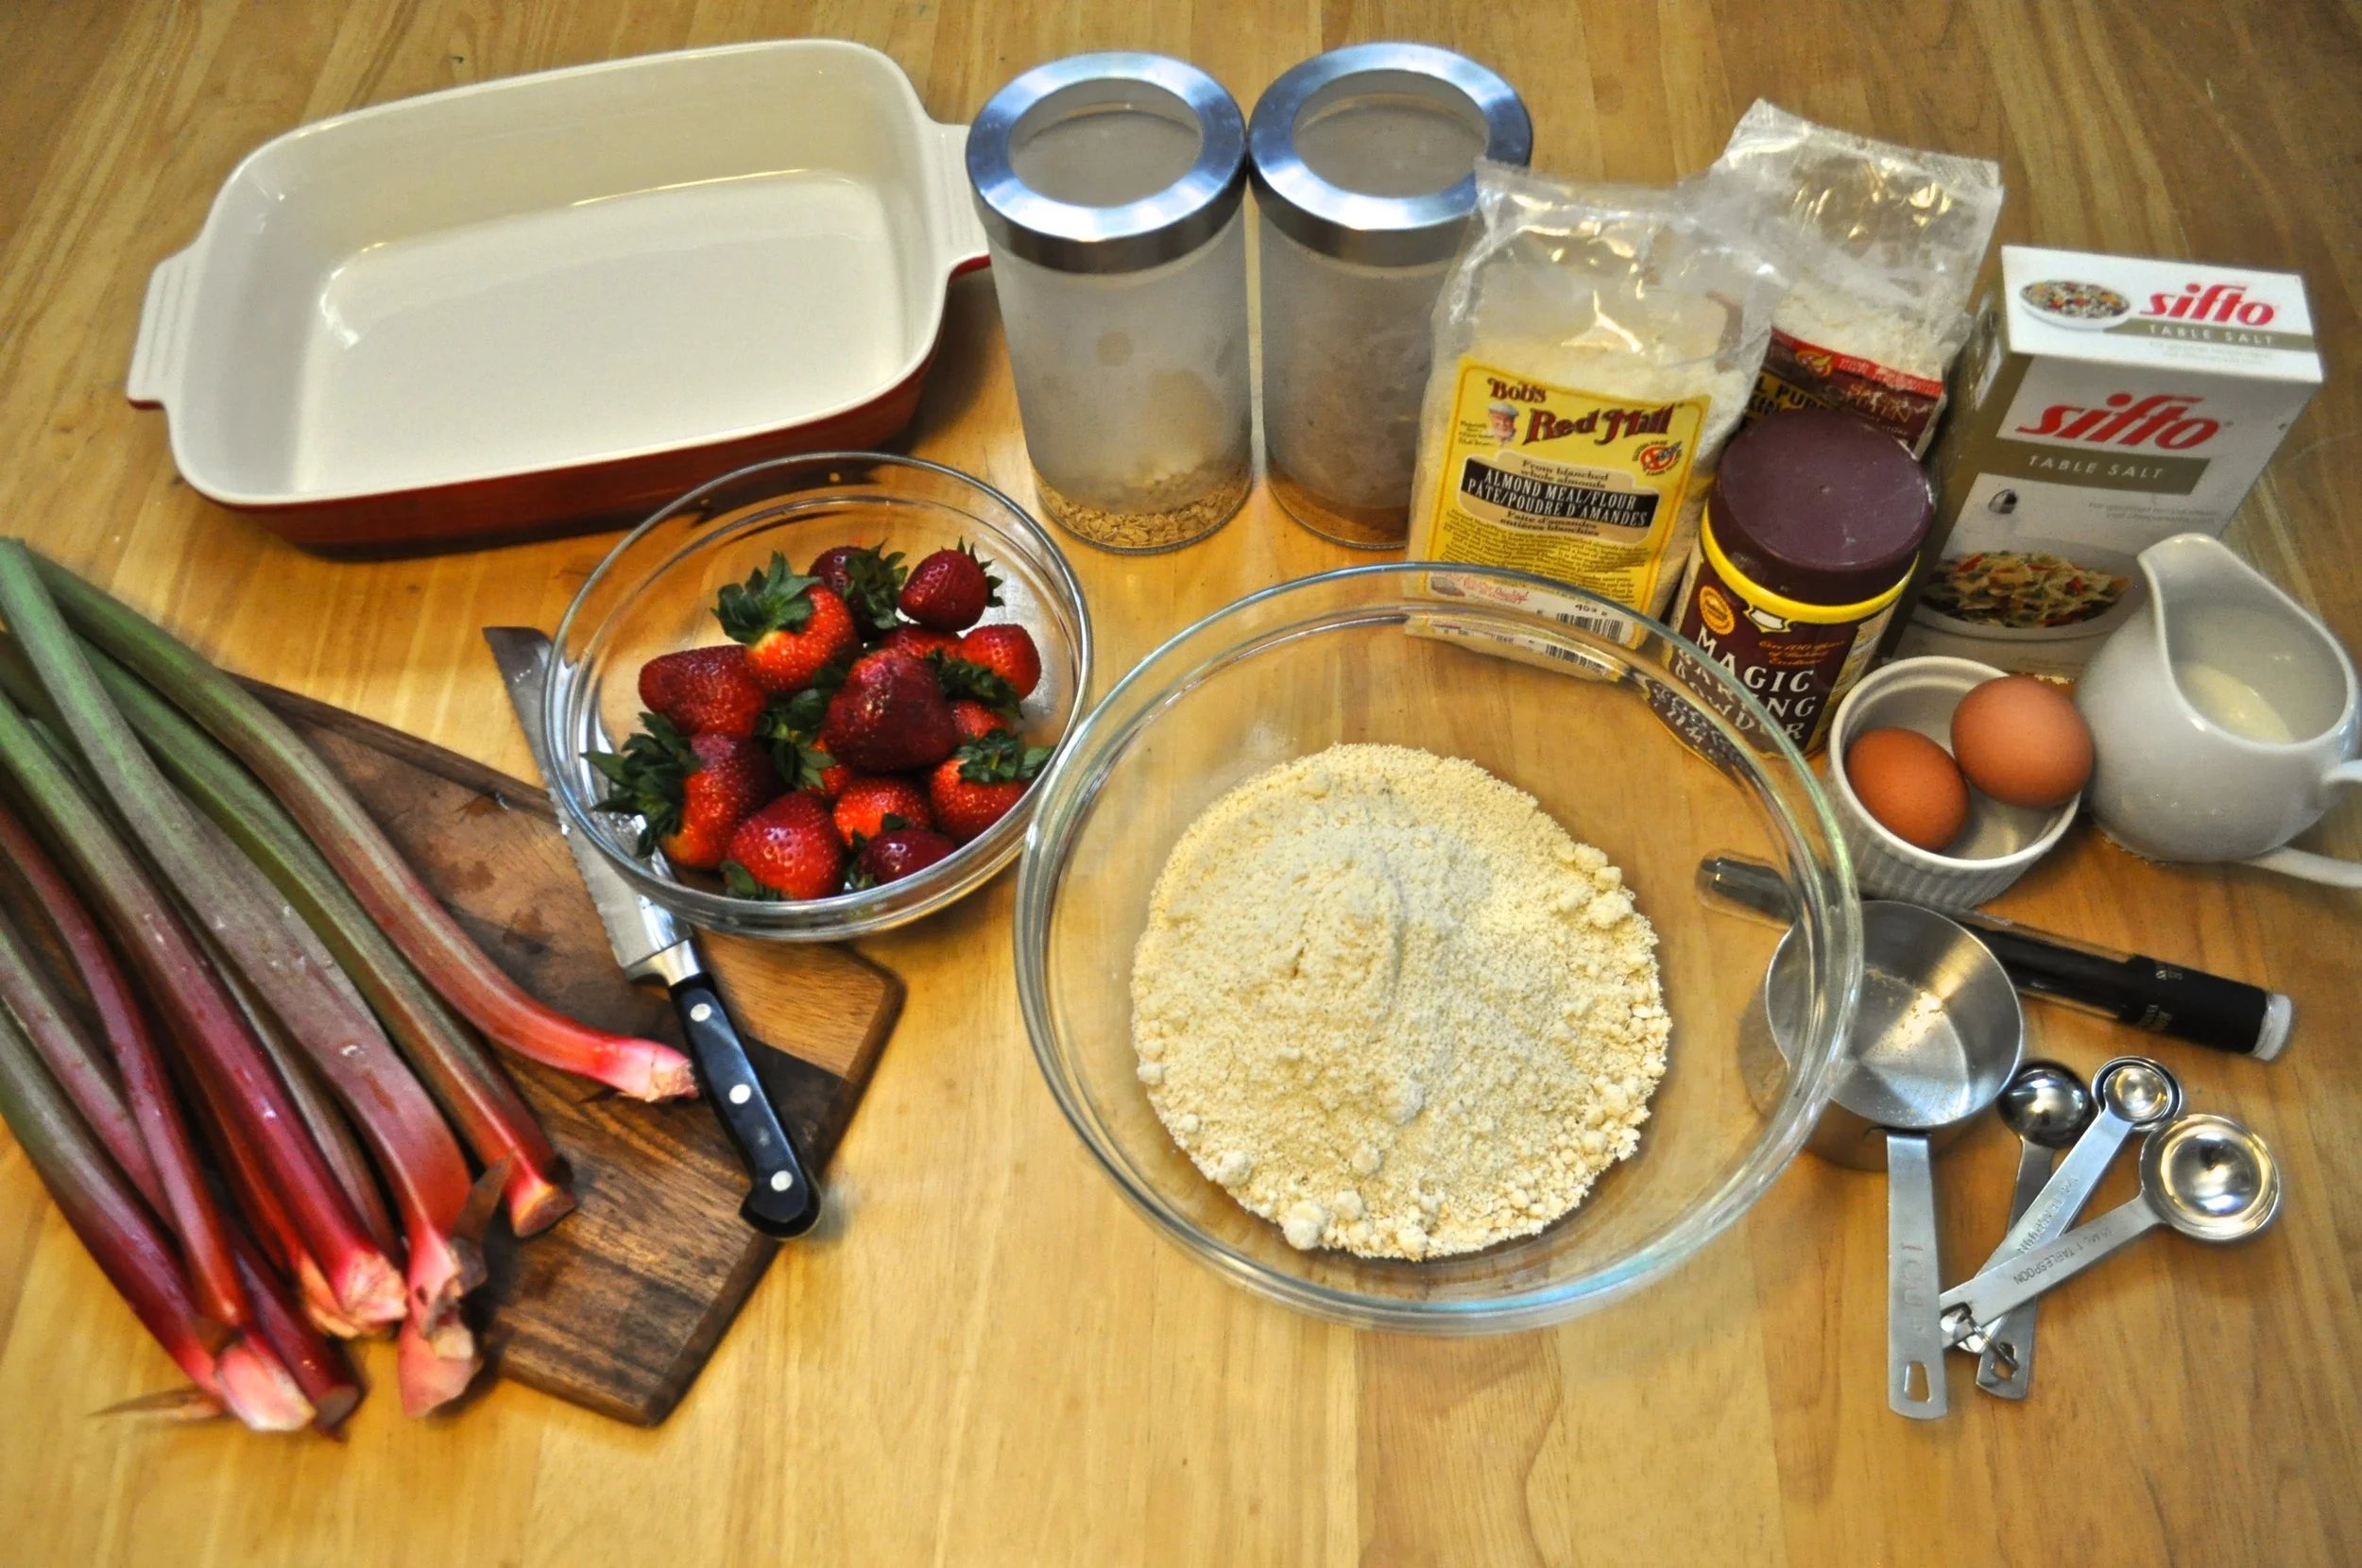
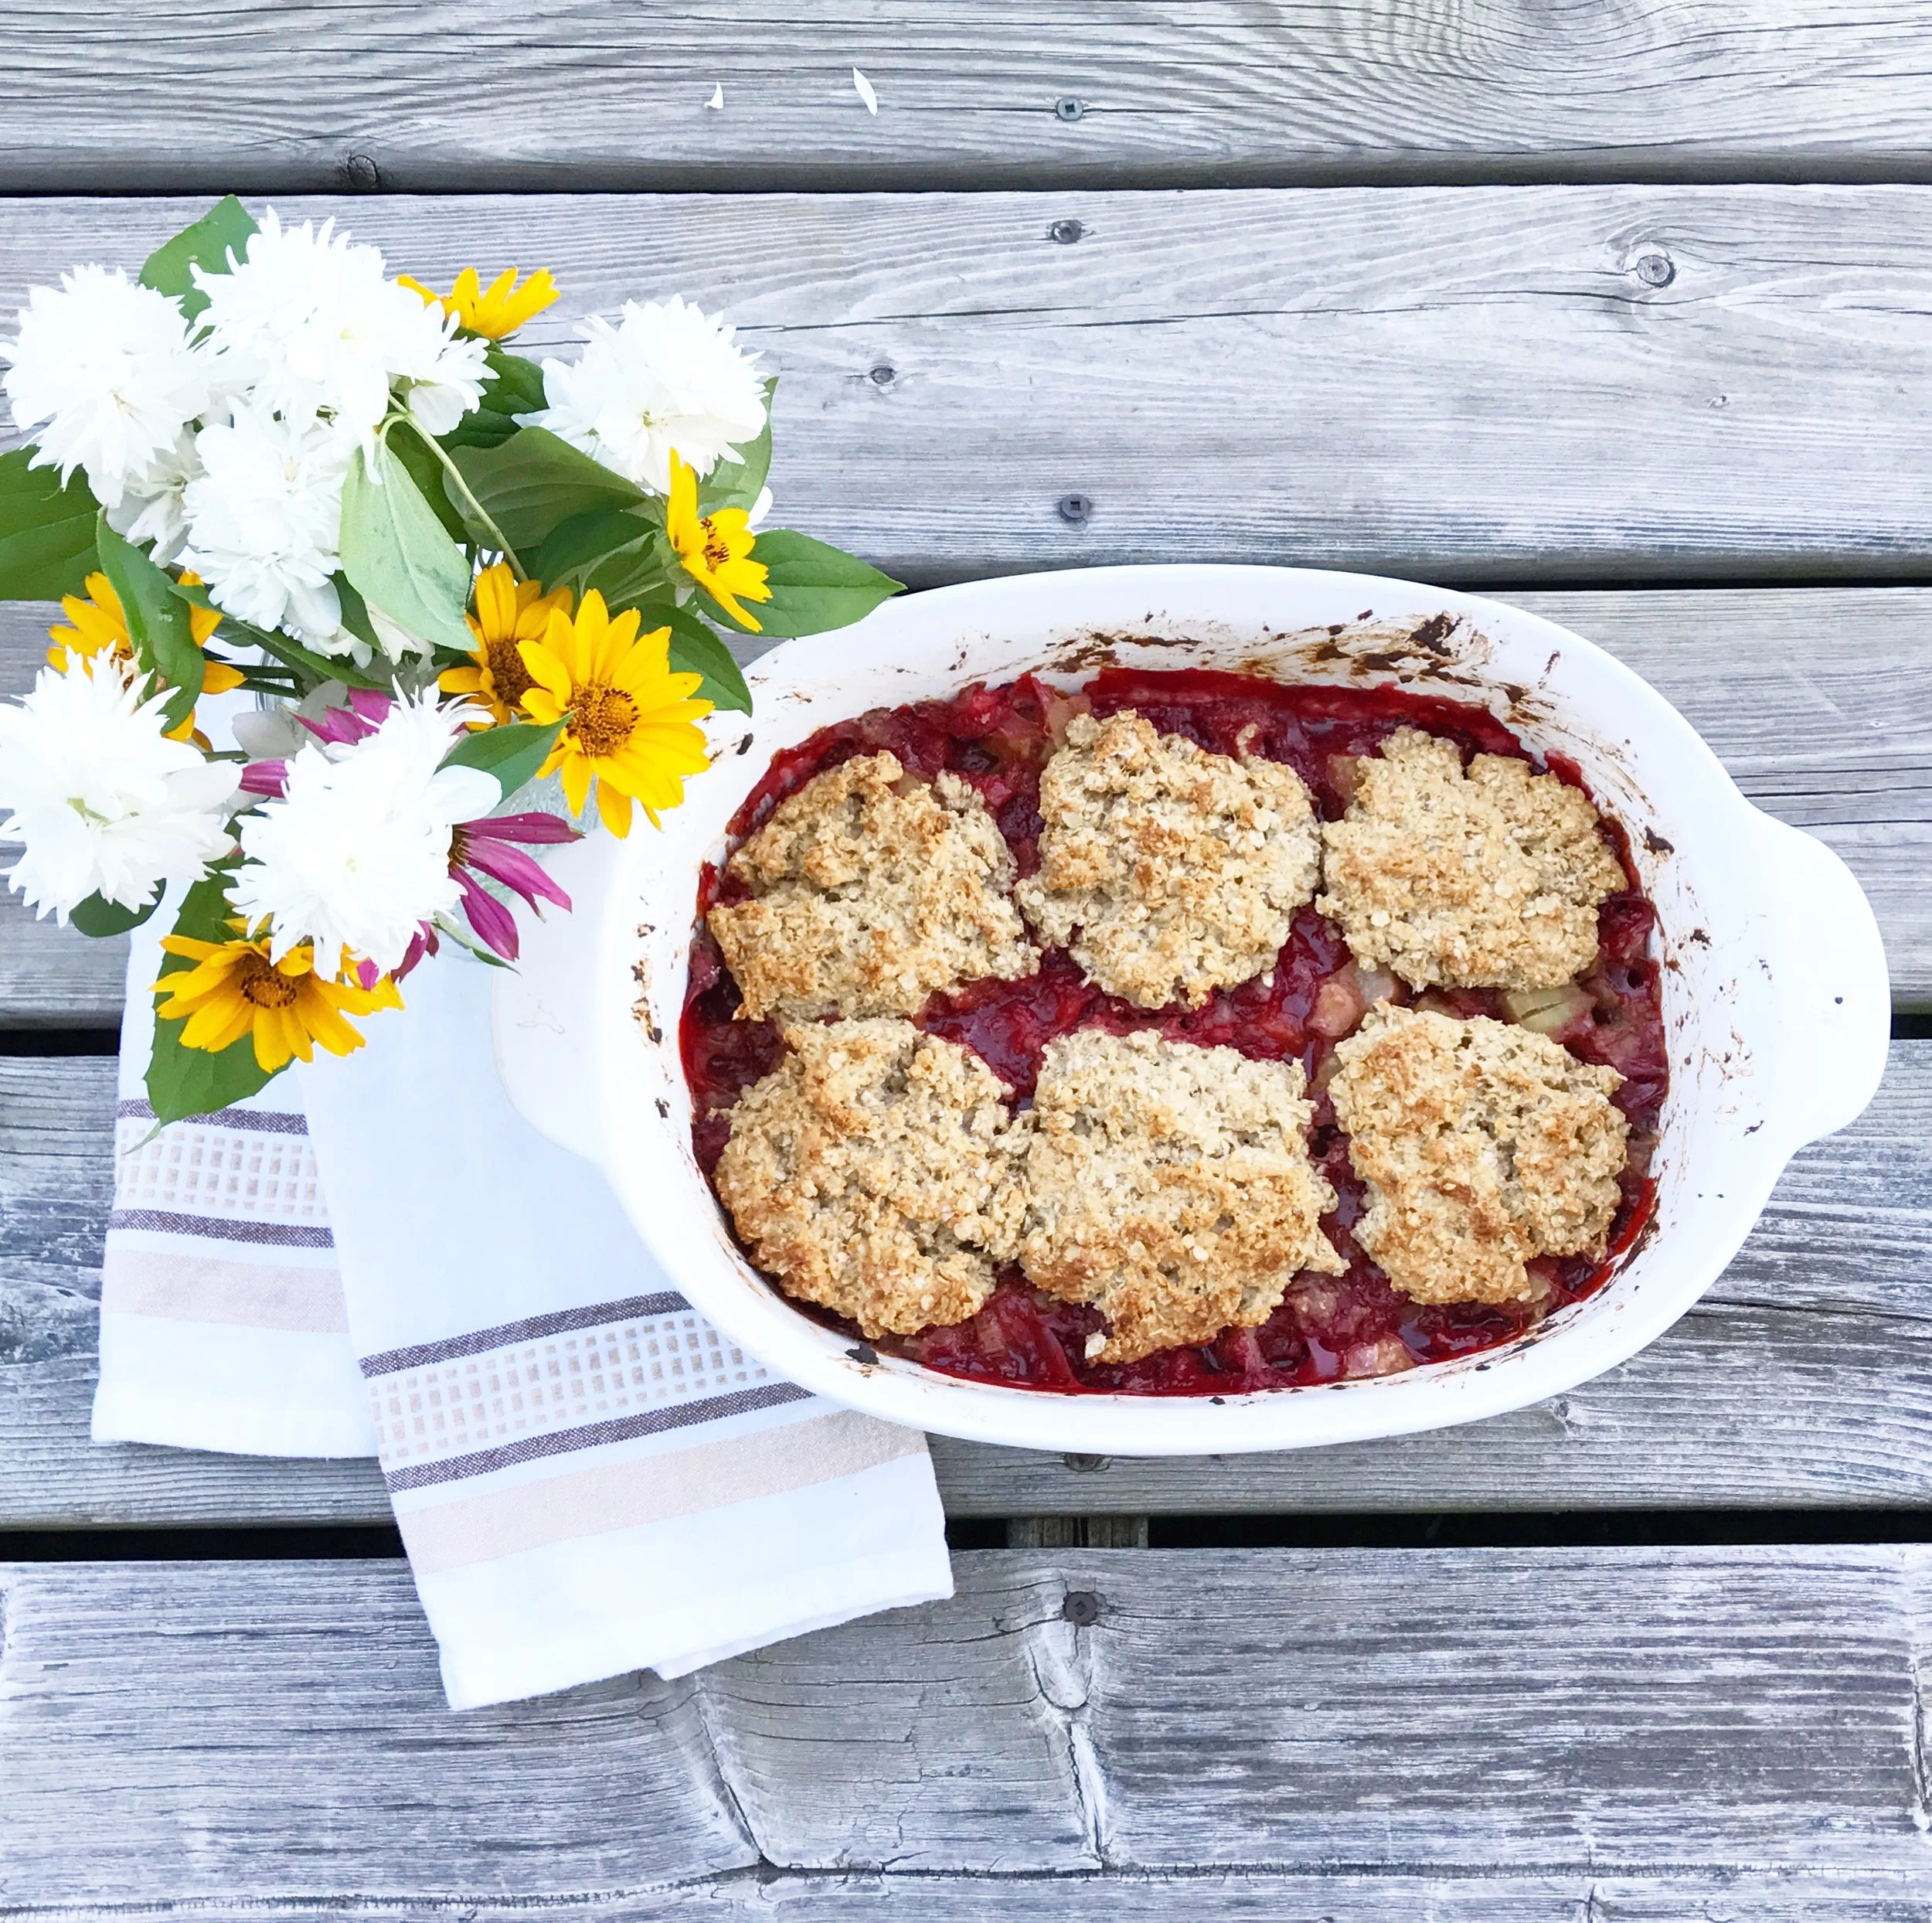
Once you have your beautiful harvest of Rhubarb you'll need to make something. I chose this Gluten-Free Strawberry Rhubarb Cobbler from Home to Heather (full recipe below with minor adaptations). We're not a GF family, but I always enjoy making recipes healthier and since many of my friends and family are GF, it's a nice bonus of this recipe. The recipe can also easily be made vegan by substituting the egg for ground chia seeds & water, the butter for coconut oil & the cream for almond or coconut milk.
This recipe is quick to prepare and absolutely delicious. Top it with a little ice cream or fresh whipped cream and you have a perfect summer treat. I forgot to get a photo of the finished product the 1st time, but that's ok. It was so good that I had to make it a second time...in 1 week ;) Yum!
Check out The Old Farmers Almanac if you're interested in planting some rhubarb or need to learn how to care for yours. It's a great resource for all gardeners.
Enjoy!
- Care
Gluten-Free Strawberry Rhubarb Cobbler
Filling
3 cups rhubarb
2 cups strawberries
1/2 cup coconut sugar (or brown sugar)
1/2 cup oat flour (or regular flour)
Topping
I cup oats
1/2 cup almond flour (or regular flour)
1 Tbsp coconut sugar (or brown sugar)
1/2 tsp baking powder
1/4 tsp salt
1/4 cup melted butter (or coconut oil)
1 egg
2 Tbsp cream (or almond milk)
1 tsp vanilla (or inside of 1 fresh vanilla bean, optional. I added this because I love fresh vanilla)
Instructions
Preheat oven to 350F
Chop fruit and toss in a large bowl with sugar and flour until combined
Transfer filling to ungreased 8x8 baking dish
Mix dry topping ingredients together
Add in egg, butter & cream
Mix until combined and spoon over filling like drop cookies (don't smooth out, just dollop on)
Bake for approximately 45 mins until filing is bubbling and topping is nicely browned

Delicious Banana Blueberry Bran Muffins
These banana blueberry bran muffins are a perfect healthy treat anytime, but especially in pregnancy & postpartum. They are a great source of iron, fibre, healthy fats & energy, all things new mamas need. They freeze really well, so they are a perfect recipe to stock your freezer with before baby arrives. Plus they taste great!
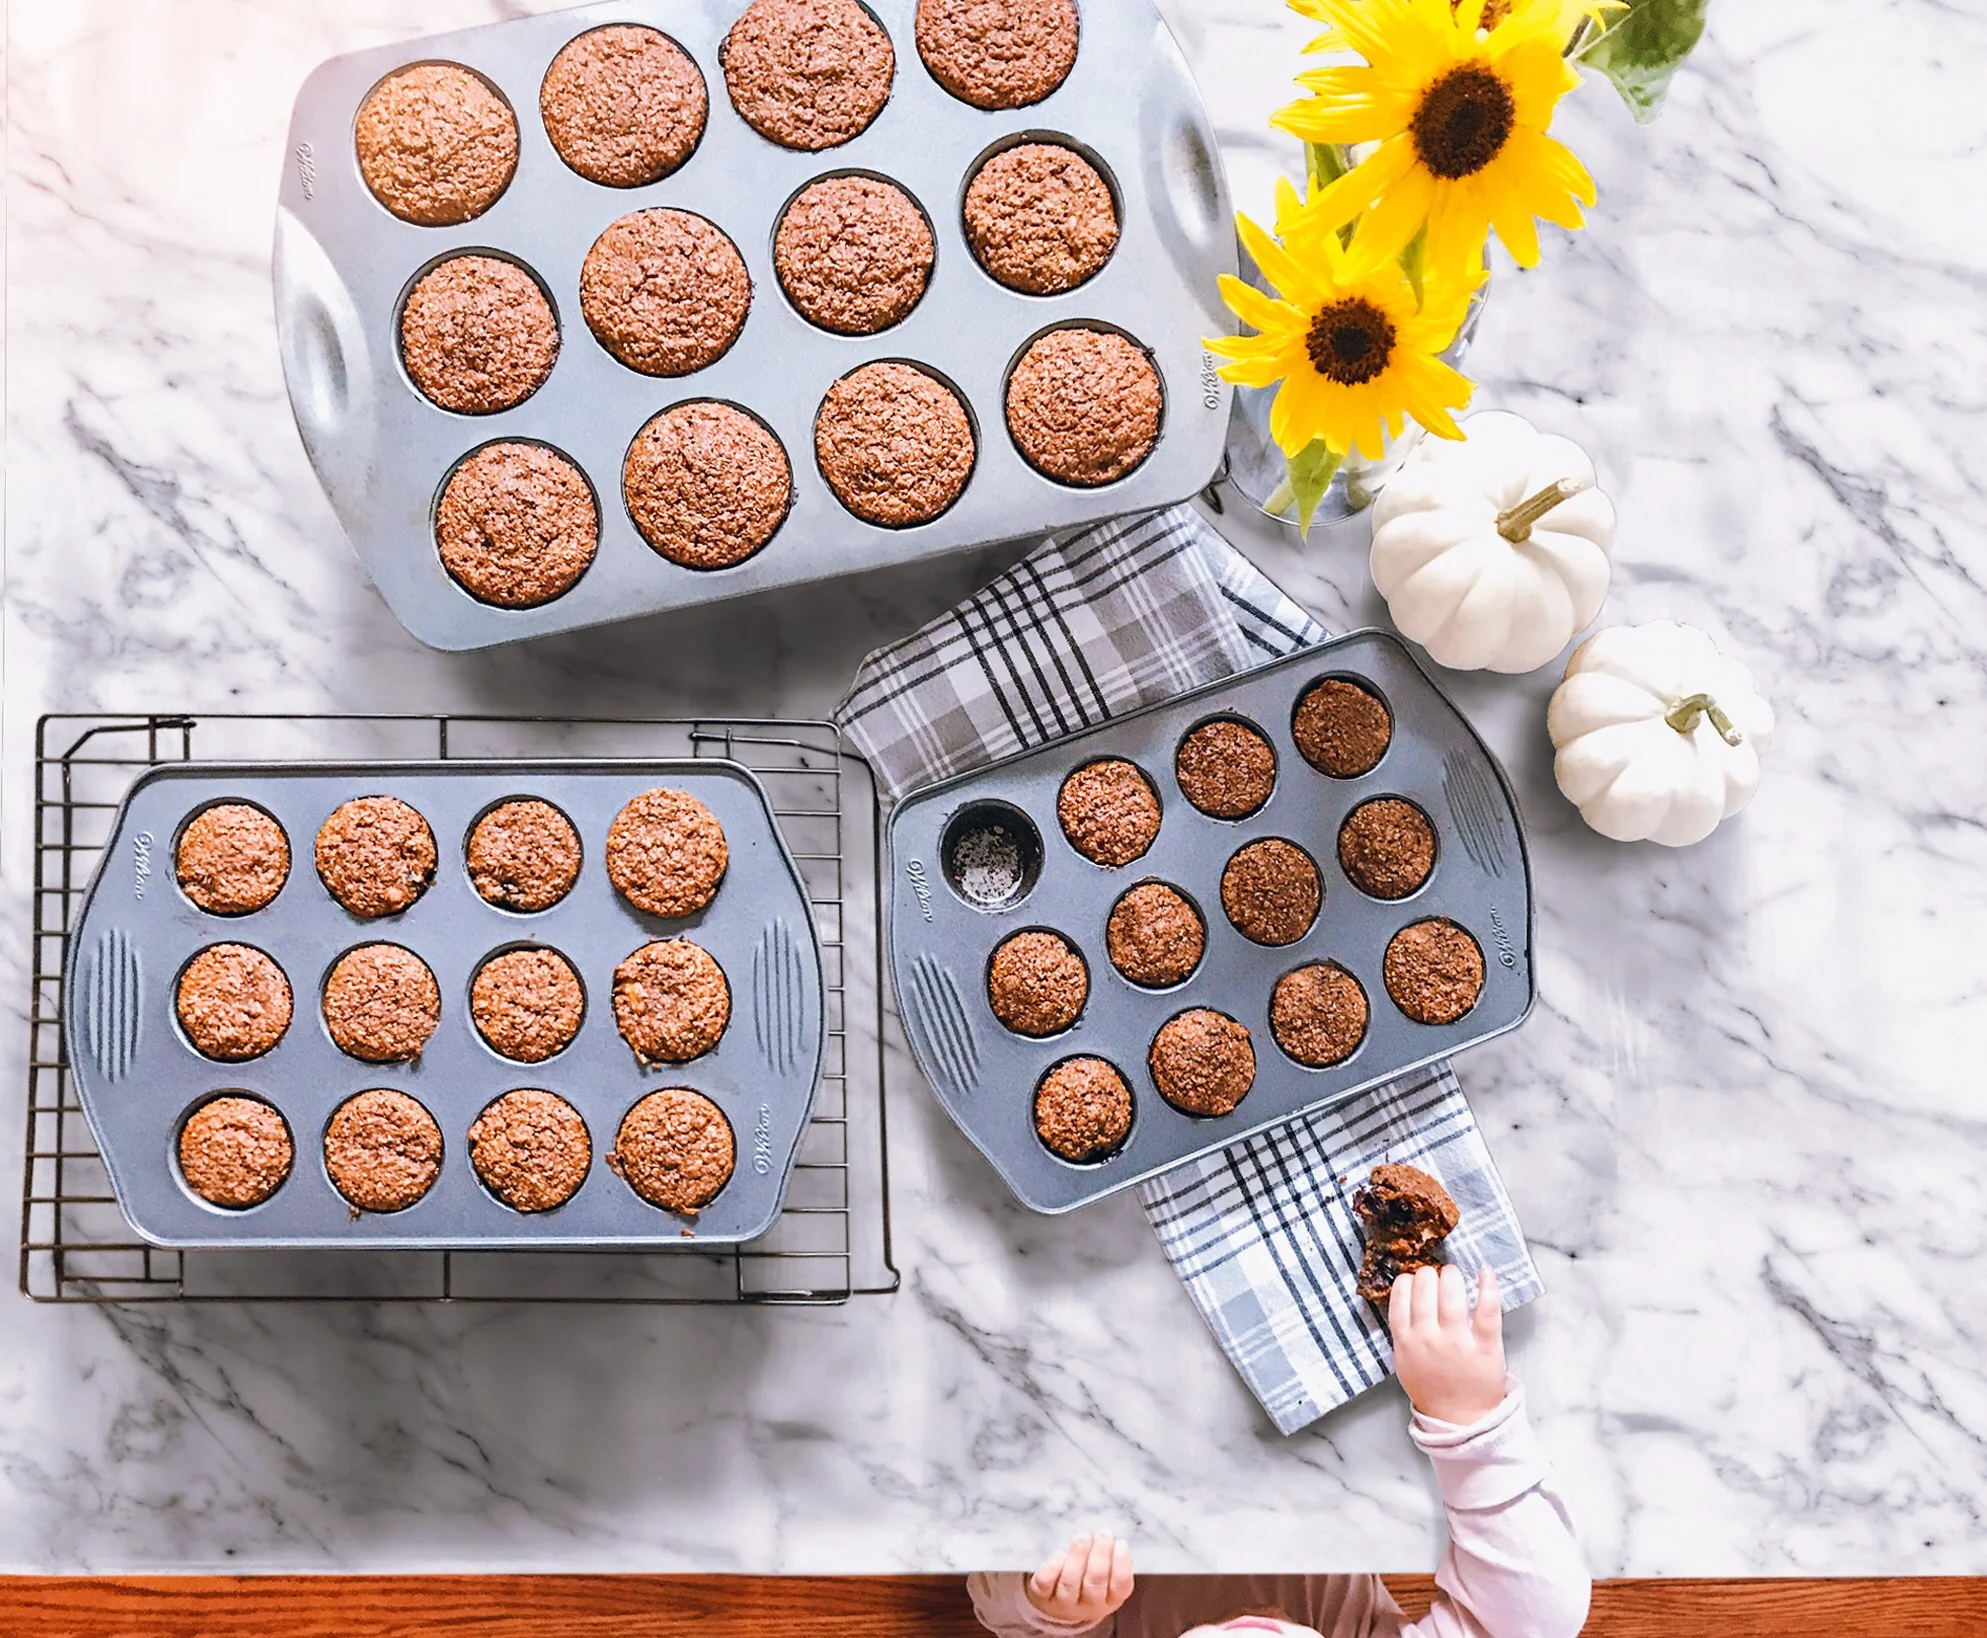
These banana blueberry bran muffins are a perfect healthy treat anytime, but especially in pregnancy & postpartum. They are a great source of iron, fibre, healthy fats & energy, all things new mamas need. They freeze really well, so they are a perfect recipe to stock your freezer with before baby arrives. Plus they taste great!
These are a favourite recipe in our house. I make them at least once a month and everyone loves them. Even my toddler gobbles them up!
Warning: These muffins are very high in fibre so you may want to limit how many your little ones eat ;)
Enjoy!
- Care
Banana Blueberry Bran Muffins
INGREDIENTS:
- 2 cups wheat bran
- 1 cup oat bran
- 1 cup whole wheat flour
- 2 tsp. baking soda
- 1 tsp. baking powder
- 1/2 tsp. salt
- 2 large eggs
- 2/3 cup whole milk
- 2/3 cup full fat yogurt
- 1/3 cup coconut oil
- 1/3 cup molasses
- 1/3 cup unpasteurized honey*
- 1 tsp. pure vanilla extract
- 2 small bananas
- 1 1/2 cups fresh or frozen blueberries
Store in airtight container up to 3 days or freeze.
*If making these for babies younger than 12 months, simply substitute the 1/3 cup of honey with a 1/3 cup black strap molasses*
INSTRUCTIONS:
- Heat oven to 375° with rack in middle of oven
- Grease your muffin pans or line with paper liners. (Recipe makes about 18 giant, 24 regular, or a combo of 12 regular & 24 mini).
- Combine the wheat bran, oat bran, whole-wheat flour, baking soda, baking powder, & salt in a large bowl and set aside
- Combine eggs, milk, yogurt, oil, molasses, honey* & mashed bananas in a small bowl and mix well
- Pour wet ingredients into dry ingredients & mix with a rubber spatula just until combined
- Gently fold in blueberries
- Fill muffin cups generously with batter & bake until a toothpick inserted in the center comes out clean, 17-20 mins for regular size muffins, 12-15 for mini muffins and 20-23 for giant muffins.
- Remove from oven and cool in pan on wire racks for 10-15 minutes, then carefully remove from pan and serve warm, or let cool on a wire rack completely before storing.
- Store in airtight container up to 3 days or freeze.
*If making these for babies younger than 12 months, simply substitute the 1/3 cup of honey with a 1/3 cup black strap molasses*